Getting Started with GETTING THINGS DONE - 2014 - in 28 steps

DSC_9660

Amendment:

Getting started with GTD is much easier if you have a buddy. Preferably, two buddies, and experienced GTDer buddy, and someone who is at the same experience level as you in implementing GTD. See GTD buddy system for more details.

How To:

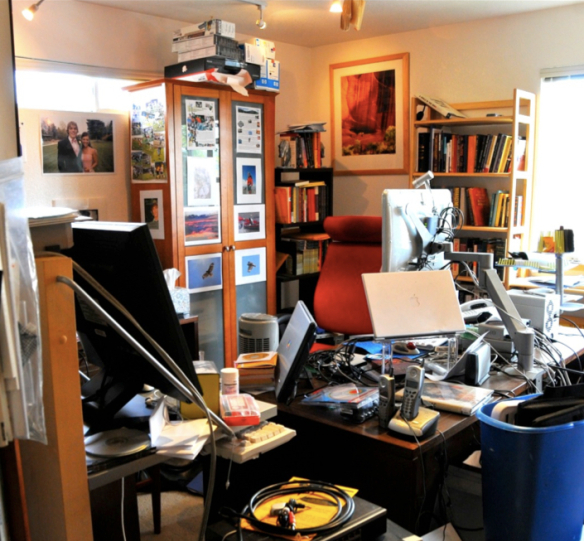
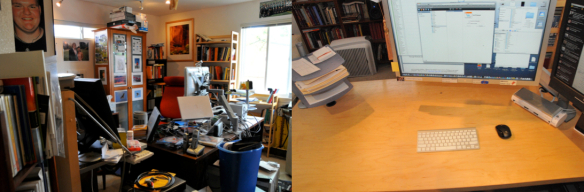
If you asked me how to get started with GTD today (see What is GTD before embarking on this journey), this is the advice I would give. Step zero, take a picture of your desk. If you follow this guide, and get GTD to stick, starting point chaos, will be a valuable data point to refer back to. Here’s my initial desk before embarking on GTD

  1. Order GETTING THINGS DONE and 1,000 3×5 cards
    a. Buy the unabridged audible version of GTD and listen to it while you are driving.
    b. And, buy a Kindle or paper version so you can highlight passages, when you circle back to re-read GTD.
  2. Order a Fujitsu ScanSnap iX500
  3. Go to CostCo and get 4 large (free) boxes in which to triage documents
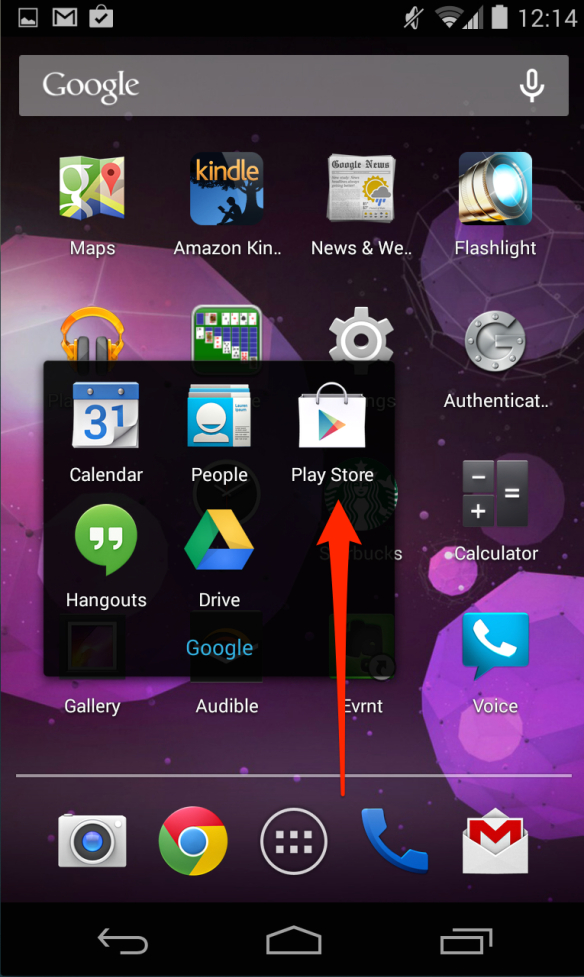
  4. Subscribe to Evernote
    a. Go to Evernote.com and click on “Sign Up”
    b. Get you your credit card and pay the $45 a year
    c. Get your email confirmation that you account is set up. Write down your username and password for evernote on a 3×5 card.
  5. Download Evernote and install the client on the computer you use most
    a. Download Evernote
    b. Install Evernote
    c. Connect the installed software on your computer, to your evernote account (use the username and password you wrote down in Step 4 c.
  6. Install Evernote Clearly into the web browser you use most
    a. Clearly is a browser add-in, separate from the software you installed above. Evernote = database. Browser add-in = on-ramp to database.
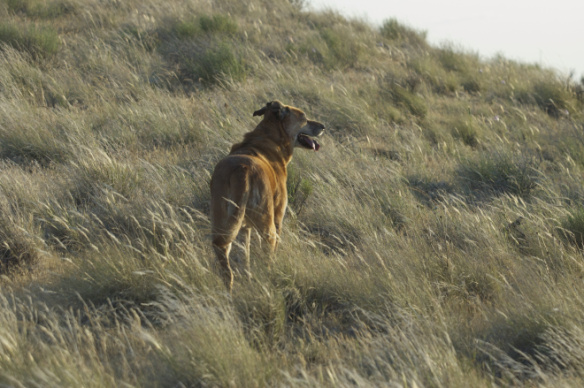
    b. Go to a favorite web page of yours, then click Clearly (a Luxo Lamp Icon) and watch as Clearly removes the clutter from the web page, allows you to highlight text. And most importantly, allows you to save the page to Evernote when you highlight or click sae. You are done for day 1. Time to walk your dog. Your dog will feel stress lifting off you as Millie demonstrates in the picture at the top of this post.
  7. Practice with Evernote (open it up, see the pages you have captured, add manual notes, create notebooks, etc.) each day as you wait for GETTING THINGS DONE and your ScanSnap to arrive.
  8. Practice with Clearly every day as you wait for GTD and your scanner. You might want to read the RestartGTD post where the capstone line is: “Clearly all by itself makes Evernote worth it!” towards the bottom. Then go back and play with Clearly and Evernote.
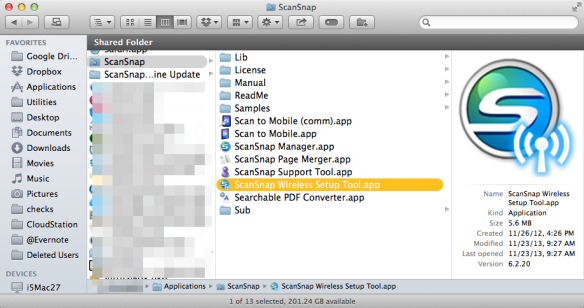
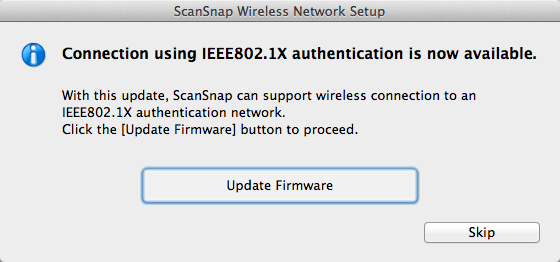
  9. When the ScanSnap arrives, unbox it immediately, and install it on your computer with the included DVD. This will take you about 20 minutes. Do not read GETTING THINGS DONE until instructed to do so in Step 12. If you procrastinate on installing the ScanSnap to save 20 minutes now, it will take you 20 months or never, to get the ScanSnap installed. Do it. Do it now! (31 seconds in)
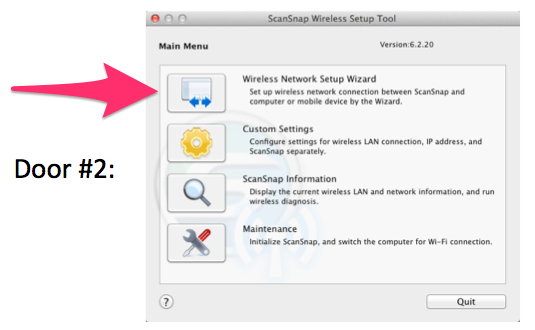
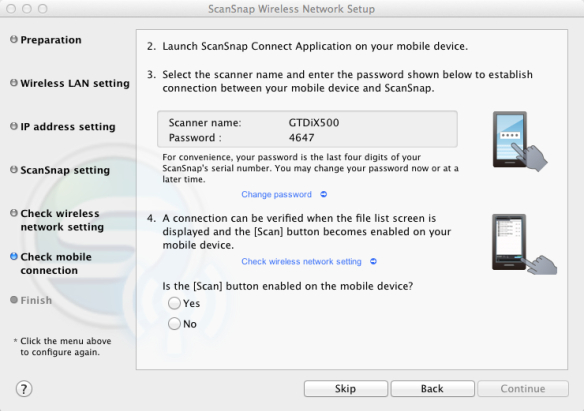
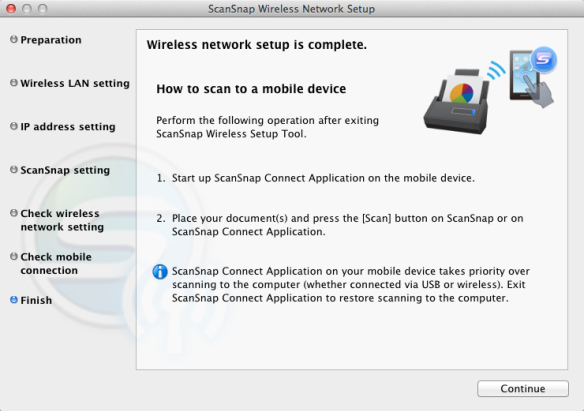
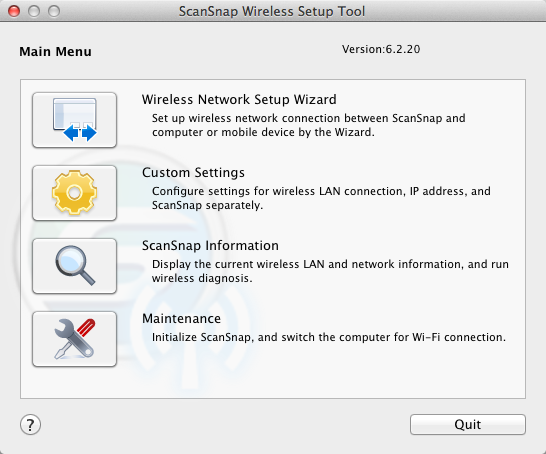
  10. After the ScanSnap is installed, get it working so you can Scan-To-Evernote with one click.
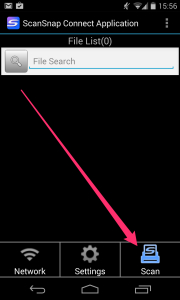
    a. Start the installed ScanSnap software by clicking on its icon at the bottom of your screen
    b. Left-click once on the ScanSnap software icon after it is running
    c. Look for “Evernote” in the pop-up list, and left-click once on it
    d. Put a page in the ScanSnap, push the blue button, and watch as the page appears in Evernote. Cool!
  11. Once you have steps 1 through 10 accomplished, then …
  12. Read the first three chapters of GTD.
  13. Read only the first three chapters of GTD. Don’t give in to temporary energy and enthusiasm, and read the entire book. Just chapters 1-3.
  14. Energized by your first wave of hope after reading …
    Mark the 4 boxes you brought home from CostCo as
    “Recycle”
    “To Scan”
    “IN” and
    “Precious”
  15. Next put all your papers into the “IN” box. Don’t worry about making a mess. Just put each document in as a document. You will process and re-organize these documents later.
  16. After “IN” is full, then stop. Take the rest of the day off. I know you are eager to sprint to GTD nirvana. But, you need to pace expectations. Expecting to do a single good block of work at a time to implement GTD is a maximum. If you try to do more than a single block of work, you set yourself up for failure, self recrimination, and external ridicule. 83% of people who attempt to implement GTD fail. And they fail because they try to do too many things, too quickly, while tired. You did not make your organization a mess in a day. And you can’t transform it to a masterpiece in a day. One good thing a day is enough. If you want to see an organizational mess, check out the RestartGTD post on GTD Time Lapse at the top for before pictures.
  17. Next day, approach the “IN” CostCo box, and pull the first document from “IN” box, hold it up. Look at it, suppress any feelings about it, and ask yourself:”Will this ever have a next action?”
    a. If the answer is “Yes” put the document into “To Scan” and then go back to “IN” and repeat this step.
    b. If the answer is “Maybe” then put the document into “To Scan” and then go back to “IN” and repeat this step.
    c. If the answer is “No” then put the document in “Recycle” and then go back to “IN” and repeat this step.
  18. Once your “IN” box is empty, or your “To Scan” box is full (whichever comes first) then take another rest. At least 90 minutes to let your brain reset.
  19. When you come back, move the “To Scan” box next to your ScanSnap. Take each document out one at a time. Put the document into the ScanSnap, push the blue button. When the document is finished scanning, either put it in the box labeled “Recycle” or the box labeled “Precious” if the document needs to be saved.
    1. Once your “To Scan” box is empty, take the rest of the day off. Manage your expectations. One block of GTD work. One day. P-a-c-e yourself.
  20. Go back to Step 15 if you have more papers to process. And repeat Steps 15-20 until all the paper in your life has been recycled or captured in the box marked “Precious”
  21. Take the rest of the day off. Manage your expectations. One block of GTD work. One day.
  22. Once you have all the paper in your life captured in Evernote, the next step is to get your desk clear. Everything off. No pictures. No teddy bears. No momentos. Nothing on your desk in your field of view as you work. In particular, no pictures of faces in front of you where you work. Your brain will work processing faces without ever shutting off. One student has commented to me that this HUGELY reduced her fatigue.
    a. If you don’t have a real desk. Get a real desk. No substitutions, kitchen tables do not count. Floors do not count. You need a big space where you feel pleasure when you work. Go to IKEA’s “As Is” department and buy returned legs, tabletops, panels, conference tables. And modify to taste.
    b. Go to Amazon and get a monitor arm, wireless keyboard, and wireless trackpad or wireless mouse, to transform your desk back from being a giant monitor stand cluttered with paper, into being a brain’s desk that facilitates work. This is the most disregarded step in my instructions. But, it REALLY HELPS. So give yourself a leg up and try investing in your desk.
  23. Once you have a clear desk, and all your paper captured in Evernote, it is time to take your first “After GTD” desk picture. Put the “Before GTD” desk picture into Powerpoint on the left. And the “After GTD” desk picture on the right. Then save the PowerPoint slide where you won’t lose it. Here is my before/after PowerPoint slide:BeforeAfterDesk_pptxBefore/after pictures are important. Before/after pictures are hope. Elephant food if you are a Heath & Heath SWITCH: How to change when change is hard fan.
  24. Next step is time to clear your mind. Most people have 300+ projects in their minds when they start GTD. Sitting down to scrape these out of your head and on to paper, is terrifying. But once you start, you won’t believe how it lightens your mind, and how the time flies.
    a. Sit down and write down every open loop you can think of on 3×5 cards. Go for 100 at your first sitting.
    b. Once you get to 100, take the rest of the day off. Manage your expectations. One block of GTD work. One day.
  25. Repeat step 23 until you don’t have anything else on your mind.
  26. Once your mind is clear, then lay the cards out on your desk. The bigger the desk, the easier this is. Then
    a. group the cards together in clumps of similar stuff.
    b. These clumps are your projects.
    c. Organize each project’s clump into a neat stack on your desk. Once you have all the cards into their natural clumps
    d. put rubber bands around each stack of cards/clump.
    e. Take the rest of the day off. One block of GTD work. One day.
  27. At this point, your mind is clear. You have all your ideas where your brain knows they won’t be lost. Now you have to decide how you want to move forward with GTD.
    a. Whether you will go all analog, using manila folders - one for each project - with 3×5 cards in them, and keeping a master project list by hand.
    TrustedSystemgenerations01_pptx 2
    Or …
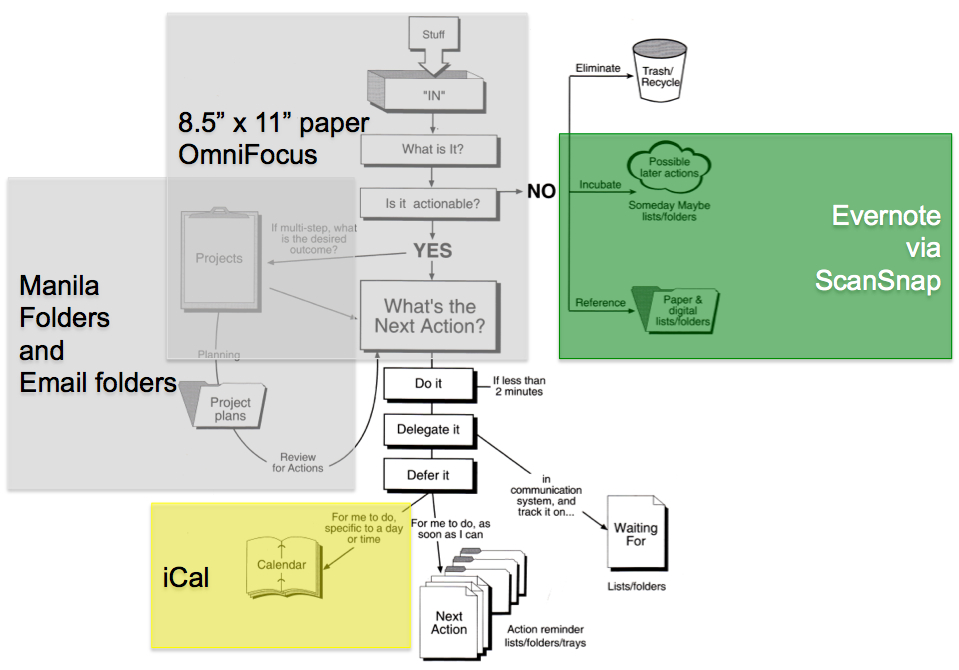
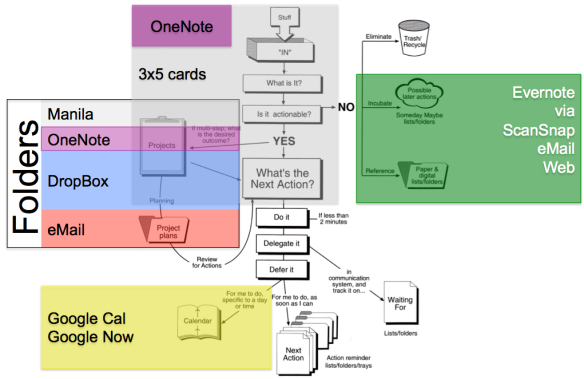
    b. Go digital OneNote to organize your projects. Creating project lists with [[projectname]] and then transcribing your 3×5 card notes for each project, into next actions. *Note* your 3×5 cards are likely not Next Actions in the David Allen sense. The step of taking a thought on your mind that you are feeling guilty about, and then compiling it into next actions as you transcribe the card into OneNote is not wasted effort.
    c. Using Evernote to manage your projects as well as your reference files. Create a “Projects” folder in Evernote. Then, create a sub folder for each project. And then either transcribe your 3×5 card into next actions as in b. above with OneNote. Or, by scanning your 3×5 cards into Evernote.
    d. Using OmniFocus (if you are a Mac person). OmniFocus is powerful … and dangerous. OmniFocus is probably the highest fidelity GTD software system. But you may experience over-organization from OmniFocus with the consequence your brain refuses to use the system … as I did. However, if you are a sales person, think hard (try) OmniFocus because David Allen has refined the GTD system to work for sales people. Nobody works harder than sales people, you will need all the system you can get to do your job well.

    e. Some kind of hybrid system. My GTD trusted system is broken up across paper and electronic tools. This is less simple to explain. But, my brain will use it. I tried OmniFocus in a monolithic trusted system (27 d.), but I hated sitting down to my desk. So I had to retreat to paper.
    TrustedSystemgenerations01_pptx

The Goal

The above 28 steps are the process that I’ve seen work the best for the about 200 people I’ve helped boot-up GTD. Personally, I’ve stayed on the GTD wagon because I have a ScanSnap and Evernote. These tools make it easier to capture information correctly, than to live in a mass of disorganized papers. My love of 3×5 cards and manila folders gradually gives way to electronic project organizing as a project lifts off. The cards and folders are early stage capture tools for my projects.

Your mileage will vary. My tools will not be perfect for you. I’ve changed my tools so many times (except Evernote and the ScanSnap) that I’m proof that one size does not fit all.  Single design does not even fit one person all the time. But the point is to build your system gradually, experimenting, testing, reflecting on how it *feels* to your brain. Does it allow you to swing, to stop constantly worrying you’ll forget something? Does it *feel* fun to work with? Does your system cut your procrastination and guilt? Are you trying to do too much, too fast?

Incompleteness

This process will not get you 100% to the way David Allen’s system. But, it will get you to the nearest local maxima of GTD productivity and GTD swing. Once you go paperless you will discover what a drag paper is. Your Evernote reference filing system will allow you to find everything … in 15 seconds. Evernote *secret* = Evernote does text recognition on all your documents. All you have to do is think of two words that would only be on the document you need, type them into Evernote and *zap* the document is at your finger tips.

Once you have all your projects in some kind of place (manila folder, OneNote folder, Evernote folder) you will feel release of stress. An emergency department doctor who I dragged kicking and screaming to Evernote and a clear desk said to me “I can’t believe how much less stress I’m feeling now.” After my first week of GTD my wife said “Why are you so happy?”

Notes

  • When doing a mind sweep, I do not follow David Allen’s two-minute rule. This is the only time in my GTD life, that I don’t DO anything that can be done in 2 minutes, and instead, just write down the 2 minute tasks. After my mind is empty, it is easy to take the 2 minute pile, and burn through it. And, it gives you quick wins to keep expectations at bay.
  • I’ve found that three steps in the above process are sticking points:
    a. Getting the scanner out of the box and functioning. I’ve had to drive to people’s desks and make the scanner go for them because of this “out of box” sticking point. See RestartGTD post abomination of deskolation for case study.
    b. Getting the desk clear. Again, I’ve found it easier to drive to desks and show people what their desk looks like REALLY EMPTY. If you contact me ([email protected]) for advice. The first thing I will say is “Tell me about your desk?” and what you need to say back is “I got EVERYTHING off it.”
    c. P-a-c-i-n-g yourself. Manage your own expectations. Do not change everything in your organizing, all at once. Know that change will take t-i-m-e. Match building your GTD system, to when you have blocks of fresh energy. Energy is temporary. Read that sentence again!
  • This step-by-step puts getting your computer infrastructure working as a pre-cursor to reading GTD. If you don’t put infrastructure first, you will try to get Evernote and your ScanSnap working while you are tired. Not a good strategy.  
  • When starting out, keep two separate kinds of files: (a) Project Files, and (b) Reference Files. Consciously separating the two kinds of files can prevents confusion. *Aside* I suspect that I *resist* using Evernote for project files because my brain likes having physically separate project and reference files.
  • Reference filing is a capstone skill of getting into and staying with GTD.
  • Having a real desk is a capstone skill of getting into and staying with GTD. Clutter is the enemy, and there is more clutter on desks than everywhere else in your life. Win the battle against clutter, GTD will work.
  • Managing expectations is a capstone skill of GTD. One block of GTD work. One day. Is the rule.
  • Experimenting with new tools, selectively, is a capstone skill of staying with GTD.

GTD Time-Lapse

In the beginning, I was disorganized, no GTD, no Evernote, no OmniFocus, no Dropbox, no OneNote. My desk looked like this:

TrustedSystemgenerations01_pptx

Then I went from no GTD to GTD via Paper and Evernote:

My desk changed to this:

Then, I got really excited, and went to a 100% digital GTD system via Omnifocus:

This is the first time I fell off the GTD wagon. I could not stand to sit down at my desk. The feeling of drowning by binary proxy kept me out of my organized office and away from my organized desk. Ugh! But the seeds of RestartGTD.com were born. Somewhere I’m POSITIVE I heard (via Audible copies of his books) David Allen say “If you get too organized, your brain will refuse to use your system.”

I refactored, cut back the role of Omnifocus, got a new job, Evernoted/digitized the 94,000 pages of notes I had from my Ph.D. and went to a hybrid paper and digital system that looked like this:

And my four desks looked like this:

TrustedSystemgenerations01_pptx 6

Then as I experimented with my system and changed jobs I :

  • Dropped Dropbox for Google drive when I bought a ChromeBook. Google drive is not even in the same league as Dropbox as far as reliability goes, but I’ve stayed with Google drive and Google Apps for simplicity’s sake.
  • Added OneNote to keep work notes separate from home notes. This has actually facilitated manila folders as OneNote makes it *trivial* to print all my tabs (virtual manila folders) and put them into real labeled GTD manila folders.
  • Kept 3×5 cards. They are indispensable for organizing. Laying a large number of cards out on a big table, then re-arranging them into thematic clumps, is the most powerful project organization tool that I possess. *Note* to OneNote and Evernote folks, please please please add 3×5 cards and a flexible user interface for re-arranging cards to your programs!!!!!
  • Kept manila folders. In my new job, I can see my boss relax when I pull out a folder that has an updated project plan in it. And once she saw that she could look in one place for my project list and see what is going on, again, I could visibly see her relax.
  • Kept eMail.

So my system now looks like this:

And my dungeon desk looks like this:

Thoughts on Tools:

  • OmniFocus is an awesome tool. If you are going to implement GTD to the letter, I don’t think there is a better software package. But I learned that implementing GTD to the letter is not for my brain. But there is TREMENDOUS power in OmniFocus if it is for you.
  • Evernote has been with me since the beginning of my GTD journey. I remember listening to David Allen say “the lack of a good general-reference system can be one of the greatest obstacles to implementing a personal management system” (p. 95 Kindle L1500) and realizing “Evernote! I can use Evernote to be my reference filing system!” You see I had Evernote before I read GTD, I just did not have a use model for it, because I did not appreciate how critical reference filing is to GTD.
  • Evernote keeps adding tools. Some of them are wonky (Evernote Hello for example), but Web ClipperClearly, and Skitch have been game changers for me. Evernote has also gradually increased the kinds of files that it indexes (Word for example was a pain before Evernote started indexing it), and the handwriting recognition is slowly improving. The growth of Evernote’s tool set has kept me loyal as I know I don’t need to jump ship for the latest slick tool. Probably, this reticence kept me for too long from trying OneNote again. I was on the beta team for OneNote 1.0 and getting a change made to the program was like trying to teach a pig to sing.
  • Dropbox is also an awesome tool. But it was (a) too expensive and (b) to focused on single users, at the time I adopted it. Dropbox too is adding tools, but unlike Evernote, Dropbox has not added tools at the point of most intense need for me, and built out from there. I’m sure to Dropbox, Evernote’s file replication must look plebeian, a pale copy of Dropbox with a different user interface. But to me, Dropbox is infrastructure first, and OneNote and Evernote are tools first, with backing infrastructure.
  • OneNote has surprised me. The community of kindred minds around OneNote is much larger than Evernote. And OneNote has the same wonderful enthusiasm of Apple products and Evernote, among its users. OneNote has many of the same over-structured limits as Evernote, only 1 level of sub folders, for example. But, the user interface and the integration with Microsoft Office are freeing to my mind. And, I can’t wait to investigate OneNote add-ins. Evernote’s add-ins are a pallid picture of the promise of its API. More on OneNote as I delve deeper.
  • Google Apps and Google Drive have converted me. I’m now keeping my evolving documents (like resume) on Google drive. I’ve had to delete and re-download my stored files three times. And when I look into my Google Drive folders now, I’m often missing files, finding renamed folders that indicate Google Drive has a problem with becoming confused. Dropbox has none of these issues. So I do miss being able to have confidence in my cloud storage. But I’m careful, back up A LOT, and limp through.
  • Google Now. Another fun surprise. Google now reads my emails and then puts notifications on my phone and in my web browser automatically. This is a huge help for my absent mindedness (call me “Dr. Spaz” please).

Where GTDers are on our own.

David Allen does not recommend technology. Technology is too fad-y I suspect. So we are on our own in sharing experiences and frustrations. And, in dealign with providers like Evernote and MicroSoft and OmniGroup in advocating for GTD-helpful features.

GTDers are also on our own figuring out how to separate work and personal trusted systems. “When you’re trying to make a living there ain’t no such thing as pride.” Richard Marx - Don’t Mean Nothing Lyrics | MetroLyrics. And when you are in the middle or the bottom of a big company, keeping separate personal and work trusted system is a key survival skill.

OneNote vs. Evernote vs. Dropbox

*Update*

I’ve edited this post in light of having gone back through my GETTING THINGS DONE (GTD) history, and looking at the different trusted systems I’ve evolved over the four years of using GTD.

  1. Title graphic has been recomposed to put GTD at the center. Ouch! When I realized I missed this in the original post. Ouch I say!
  2. Last graphic has been recomposed dropping Google Drive (unreliable) and swapping back in Dropbox. This will take some work as I have to squeeze down from 30 gigabytes of storage to 20 (the most storage I can have for free on Dropbox).
  3. Last paragraph has been edited to put both OneNote and Dropbox into project management (I use them both for project files).
  4. Added a fourth like about OneNote (Read on!).

This is not a full on review, but I’ve been using OneNote daily for a month, so I thought I’d *reflect* a little on how I like OneNote, and how it compares with Evernote. Just rule of three likes, dislikes and reflections in this post.

What I like about OneNote:

  • The tabs. OneNote lets you have tabs on the top or right side of your notebook. This is a clear win over Evernote where notebooks (the equivalent of OneNote tabs the way I use both programs) are rigidly stuck in a list at the side of your screen, or in a rigid grid of notebooks in the main window.
  • Sub notes. If you create a tab for a project, you can insert notes underneath the project and indented from the parent tab. Again, a clean kill improvement over Evernote. From a GTD perspective this has helped me to focus more on the work, and less on the housekeeping of organizing the work.
  • Linking. You create [[aroundwhatyouwanttolink]] and the note is automatically linked to the parent project list. For GTD people this allows you to have each project on a tab that you start from the master list of all projects. Just create [[NewProject]] on your master list of projects, and *poof* you magically have a new tab named NewProject, now, get to work!
  • After a couple days, I have to add one more thing I like about OneNote … the connection between Microsoft Outlook and OneNote. I can drag an email into OneNote and choose either to have a PDF of it (printing to OneNote) or just an embedded copy of the email. This is not a clear win over Evernote as I can also capture email to Evernote from outlook. But, the thing is, because OneNote is a “family of Office” product, I intuitively knew that the link would be there. Evernote’s linking to email has to be discovered separately. My impression is that both OneNote and Evernote are improving their linking over time.

What I don’t like about OneNote

  • The canvas. Evernote’s canvas is static, text-based, and more intuitively appealing to me. In OneNote, whenever you click the mouse too far away from what you’ve already typed, you create a new text window. Which does automatically scroll down when you type something in any other text window. This is an example of too much flexibility for me. I find myself creating only one text window per note, and then being sure to add new thoughts to that single window. Static canvas, clear win for Evernote.
  • Too narrow a focus. OneNote focuses on you, your keyboard, and your projects. So it does not *feel* like a document management (or reference filing) system. Another clear kill for Evernote. I am forever adding a note to Evernote, and then much later taking that note out of my GRAPHICS or INBOXNOTEBOOK (the two big capture notebooks in my Evernote use) and either moving it to a project notebook, or copying the contents, pasting the contents into another note, and deleting the first note. OneNote is more narrowly focused than Evernote. I would not think about putting 14,000 articles and clippings into OneNote, for example.
  • Adding new text after a pasted-in graphic. I can’t figure out how to get OneNote to allow me to create new bullet lines in an outline, from clicking on the clip, hitting right arrow, and then either return or shift return as needed.

Reflections:

  • OneNote vs. Evernote, like Evernote vs. Dropbox is not a choice of one tool OR the other. They overlap in functionality. But OneNote is a lot more competition for Evernote, than it is for Dropbox. Here is what the overlap *feels* like to me. 
  • Both OneNote and Evernote are (to my liking) overly rigid. I’m still looking to be able to re-arrange virtual note cards on a virtual desk top. And, to be able to arrange notebooks in relation to one another. But OneNote and Evernote allow note arranging little if at all.
  • Project focus is an area that OneNote excels in, and where Evernote is weak. I applied for a project management job at Evernote this year, and won the opportunity to work a test problem in new products. But, alas, no job was forthcoming despite my ENTHUSIASM and ranting and railing about Evernote as a platform. But, OneNote, if it shows nothing else, indicates how Evernote could up its game in the project management sphere.
  • Evernote is a platform. OneNote is an application. OneNote feels like Excel or PowerPoint, a point-focused app that captures and structures analytical thinking. Evernote with its open API, back end infrastructure, and plug ins for browsers that make ripping just the information you want out of a web page, easy, feels like a platform.

GTD-Conclusions:

In David Allen speak, OneNote lives in the land of projects and project plans. Evernote lives in the land of reference filing, and Dropbox and OneNote live in the land of project organizing infrastructure.

TrustedSystemgenerations01_pptx

GTD Modularity: What is Up With That?

GTD hit me like a ton of bricks. Modularity bricks that impacted my skull in this order:

  1. Paperless reference filing with Evernote and a ScanSnap. If you don’t have it, uneedit.
  2. One idea, one piece of paper.
  3. Indulge your brain, organize to fit how your brain works.
  4. Organize, … just enough.
    Too much organization and your brain will refuse to use the organization, not enough, and you are hosed.
  5. Separate functions.
    1. Processing from doing  <== HUGE
    2. Building infrastructure separate from processing or doing <== HUGER
    3. Feeling guilty, from building infrastructure, processing, or doing <== Hugest!!!!

bill meade [email protected] (please email me, don’t feel guilty about it! … just do it. Do it now!)

What is Evernote Web Clipper?

Web Clipper is …

Evernote has a web page at https://evernote.com/webclipper/guide/#1 that shows you how Web Clipper works, and, what you can do with Web Clipper. I have not read Evernote’s entire web site, but it seems to me that Evernote is as meticulous about not mentioning GETTING THINGS DONE as David Allen is meticulous in avoiding mentioning electronic technology. The purpose of this post is to explore the roles Evernote Web Clipper can play in a GTD trusted system.

*Aside* David Allen is the master of the game of organizing. I yield to no one in admiration for the refined, focused, and effective system that Allen has made GTD.

But …

… if I were David Allen, I would be pushing a two “gateway” technology tools to catalyze GTD implementation. For example:

  • Dual-sided-single-pass-50-page-input-scanners. Currently the ScanSnap iX500 is the top rated scanner in customer satisfaction (based on Amazon revues). A professional scanner is a gateway technology because it allows you to get paper out of your face. My 94,000 page massive filing system took four long afternoons to import to computer.
  • Evernote. Because once you have all the atoms of your “might-have-a-next-action” converted to electrons, you need a way to Google your electrons to find documents as you need them. I wish that Evernote had competitors, but right now, there just are none.

Zooming Out …

There are three GTD universes that trusted systems need to interact with: atoms, bits universe (email, web pages), and images (physical stuff reduced to bits or images):

The reason we have headaches about all the stuff we have to do, is that all the objects in all three of these domains will live in our brain if we do not have a better way to manage them.  GTD is a better way to manage all the “stuff” objects in these three realms, but implementing GTD is hard.  Why is implementing GTD hard?

  1. Because we have to recognize all the stuff that we are carrying around in our subconscious. For example, how many projects do you have? Common answer “10 or 12” actual answer >300. Understanding how one is organized before GTD, is sure to overwhelm.
  2. Because to get all the objects in our subconscious out of minds, we have to take their real-world counter parts (atoms, bits, and images) and move them into a trusted system.
  3. Because we have to build a trusted system before we move anything.
  4. Because we are afraid we will “do it wrong” when building our trusted system.
  5. Because doing steps 1 through 3 is exhausting and it takes a pretty big investment to accomplish these steps. And, life does not stand still while doing steps 1-3.

What does this have to do with Evernote Web Clipper?

Glad you asked!!! Because Evernote Web Clipper is the principal means of moving important “bits stuff” from the world, into your Evernote database.

This image is an idealization of how the world should work to on-ramp stuff-with-next-actions (STNA) into an Evernote reference file system.

Q: What is Evernote Web Clipper?

A: The principal on-ramp to move bits from the world into your Evernote database.

Q: Why is this a big deal?

A: Because when you have captured the bits your subconscious is diligently not-forgetting, and your sub conscious sees that it can trust your system. Your brain will go through the-mother-of-all-defrags and you will reclaim massive quantities of now-empty memory slots to renew your creativity and amplify focus power.

In this analogy, why is a scanner so important? Because a scanner is an on-ramp for all your paper into your Evernote Database. And, once the atoms have been turned to bits and brought into Evernote, you can recycle the atoms and gain two physical degree of freedom over your work environment: (1) Elimination of clutter, and (2) Rearrangement freedom as you can CraigsListFree your file cabinets and take back tons of office space. And, you reclaim memory slots increasing creativity and amplifying focus power.

What about Web Clipper on tablets and Smart Phones? It appears that Evernote has not gotten there yet. So Evernote gets a Janus (my little marker for stuff that isn’t in Evernote yet, but I find does make it in over time) as I predict this will happen.

800px-Janus1Source: Wikipedia

I did find, however, Jonathan Mergy’s web site where he has a workaround to simulate Evernote Web Clipper for iPhones and iPads. I am an Android, so I have not tested this. But once you install Web Clipper and get accustomed to it, you instinctively reach to click on Web Clipper when you are using your phone or tablet.

bill meade


Appendix A: Basic How Tos:

To see several of the things Web Clipper can do:

  • Go to https://evernote.com/webclipper/guide/#1


Mac users, use your ScanSnap iX500 to scan to phone: Part 2 How?

Screenshot_2014-03-07-15-56-28

Introduction:

This post will step-by-step Macintosh users through getting our most excellent ScanSnap iX500 scanners, to scan directly to our smart phones.

This journey began 2 posts ago with the discovery that when you set up ScanToPhone the first thing Fujitsu’s programmers want you to do is to update the firmware on your scanner. Then, 1 post ago I explored why anyone would want to scan directly to phone. Mostly, I just decided to close my eyes and try setting this up.

OK, this tutorial will assume that you have gone through how to update your firmware step by step and you now have your iX500 scanner all cutting edge and ready to go.

Step 1: Run “ScanSnap Wireless Setup Tool.app”

Go to /Applications/ScanSnap/ScanSnap Wireless Setup Tool.app and double click. Your should see this in your /Applications/ScanSnap folder:

ScanSnap

Step 2: See which door opens up. Door #1, Door #2, or Door #3

If you see Door #1 this is good! You either have a Ph.D. (license to be absent-minded), you have not turned on your ScanSnap iX500, or both. Next action? Open the ScanSnap iX500 so that it turns on.

Fantastic, you are ready to implement your X clicks and to begin scanning from ScanSnap to phone. **Note** If you saw Door #1 and then opened your ScanSnap, you will see Door #2 in about 2 seconds.

Oops, you need to update your firmware before you can set up ScanToPhone. Go to my step-by-step tutorial “Think Like A Fujitsu Programmer To Upgrade your iX500 Firmware“.

Step 3: Click “Wireless Network Setup Wizard” in Door #2

Presentation1

… and then follow the dialogs along … 

… and find your network and click on it, then follow the dialog … 

… then enter your security key and follow the dialog … 

… then you will be informed that your ScanSnap is successfully connected, click on OK to continue … 

… you will be shown a dialog like this to indicate you have successfully connected your ScanSnap wirelessly … 

… next you will be asked if you want to scan to your mobile device (phone), click “OK” … 

… after you click “Yes” on the previous dialog you will see a new dialog that will send us from configuring the iX500, to installing Fujitsu’s phone app …

ScanSnap_Wireless_Network_Setup

… so go to the iOS or Android store and download the free ScanSnap program to your phone … 

… once you have ScanSnap Connect Application installed on your phone you can click “Yes” on your Mac, (for having installed the app) and then click Continue …

… the next dialog you see shows you two critical facts:

(1) Scanner Network Name and = GTDiX500 for my scanner
(2) Scanner Network Password = 4674
for my password <- write this down

Now you are ready to open the ScanSnap app on your phone (see Appendix A for step by step instructions for installation on an Android phone) …

ScanSnap_Wireless_Network_Setup

… and then click “Yes” and “Continue” in the dialog … 

ScanSnap_Wireless_Network_Setup

… and the Macintosh part of setup is almost done! …

ScanSnap_Wireless_Network_Setup

… Click finish and then the Macintosh side of ScanToPhone setup is complete. Now pick your phone up and open the ScanSnap Connect App, then your phone will find your ScanSnap and ask you for your four digit password … it should look like this …

Whoa, where was that password set? <<Panic>> Four digits? But, … I’ve got all my fingers … I’m confused!

Fear not! Setups involving two devices, are the worst. So take a chill pill and scroll up three dialog boxes. My password is 4647, your password will be different, but will be in that same dialog. Now wait, you wrote your password down right? :-) 

… enter your password phone your app screen will look like this …

… **note** the blue scanner icon in the lower right-hand corner. This is the indicator that your scanner is read to scan to your phone. Put your business card into your iX500 and then touch the blue icon on your phone …

… like magic, your phone will have a PDF scan of your business card. Mine looked like this …

… if all went well, you should be done and the happy owner of a ScanToPhone new core competence. For maximum payoff, use this capability to “Wow” your peers and make them say “Whoa, I’ve never seen anything like it!”  

Or, if this did not work for you, contact me, or at least vote on why it did not work below:

Enjoy!

Support RestartGTD by buying at Amazon with this link!

bill meade
Data researcher seeking team
see http://goo.gl/JkkEI8

Appendix A: Installing Scansnap Connect Application on an Android phone 

Go to Google Play Store:

Screenshot_2014-03-11-12-14-08_png_and_Nexus_4

… then click on “Apps” …

Screenshot_2014-03-11-12-17-52_png_and_Android

… then search for “ScanSnap Connect Application” and choose “INSTALL” … 

… the app will then install … 

… and once installed will give you the option to open or uninstall … 

Think like a Fujitsu programmer to update the firmware on your ScanSnap iX500

ImageJust a quick post to end the week. I’ve been working on a post showing step by step how to enable the ScanToPhone capability of the ScanSnap iX500 scanner. In the process of setting up ScanToPhone. The *first* thing that happens when you start enabling the ScanToPhone feature is that your ScanSnap’s firmware gets updated.

Now, having worked at HP in LaserJet-land, I’m always for firmware upgrades because they are the king. Upgrade firmware, you can do more, do faster, do with less heat, do without hassle, etc. New Firmware = Goodness.

In fact, I have checked for firmware upgrades for my iX500 at Fujitsu, multiple times, but have not seen them. Once I began setting up ScanToPhone *bam* first thing is a firmware update. Here is how (on the Mac):

Step 1: go to your /Applications/ScanSnap/ folder and click on “ScanSnap Wireless Setup Tool.app”

ScanSnap

The first thing you will see after you open this program is:

skitch

As I said, I’m a sucker for updating firmware. Whenever I see a dialog button saying this, I click it. When you click “Update Firmware” you will then see a thermometer dialog that looks like this:

And when you look at your iX500 you will see that the panel light is indeed orange as indicated in the dialog. The dialog will progress for about 3 minutes, and then the panel light will turn blue and you’ll see a dialog like this:

And then you will see the gateway dialog to the ScanToPhone setup process that looks like this:

skitch

And you are done. Your firmware has been updated in your ScanSnap iX500!

Enjoy!

Support RestartGTD by buying at Amazon with this link!

bill meade
Data researcher seeking team
see http://goo.gl/JkkEI8

Dungeon Desk

NewImage
Source: 13th Age via Adam.Legendary.org

Introduction:

When was the last time you stopped working in your office, and started working on your office? Kind of like the E-Myth idea of not working your business and instead working on your business.

Well, this week I decided to spend my low-energy work time from 2:00 pm to 3:00 pm, working on my new office. I recently moved my home office into the furnace room, and as always, I’m having a lot of fun optimizing, without spending money.

Monday:

I discovered pre-cut white boards at Home Depot. Here is the in-aisle display for the 2’x3’ model:

IMG 20140102 151218e

In our furnace room we have two cabinets for storing canned goods.  The cabinets have sliding doors that were begging to have whiteboards on them. I bought one 2’x3’ board ($6.88) and one 2’x4’ board ($9.97) at Home Depot and then “hung” them on the food storage cabinets by putting 3/4” screws with large heads, around the edge of the board.  Here is what the cabinets look like now:

Presentation1 22

Alas, I found that the whiteboard was sagging away from the cabinet door 1/2 up.  So I added 2 middle screws 1/2 way up each board.  These middle screws pierce the board and hold it flat to the cabinet door.

I found Industrial strength Velcro® at Home Depot (UPC 0-75967-90595-8) and used this to attach a whiteboard eraser on edge and a whiteboard marker directly to the larger white board (see Cabinet 2). No hunting for writing implements!

Tuesday and Wednesday:

On Tuesday and Wednesday I added my 3 tier paper tray to my desk setup, and on Wednesday I added a 1’x1’ IKEA Lack shelf to hold the portable Canon inkjet printer I use in my office. Here is what they look like now:

IMG 20140104 142648 jpg 11

Thursday:

Light is luxury in a dungeon. So Thursday’s task was to get better light into the office without any cash changing hands. I was able to do this because I had an old Home Depot Hampton Bay track light setup from four home offices ago that I was able to repurpose. The only components I needed to buy were power connectors (2 @ $10 each = $20) to run the two separate tracks I set up.

Presentation1 6

Friday:

On Friday I spent an hour re-arranging the power setup for my desk. Step 1 was to test my UPS. It was dead. Bother! I pulled it out of the setup and re-wired. You can’t really see a re-wiring in a picture, but for me it *feels* like I’m taking next actions off my mind. Wiring gets tanglier and tanglier over time, and my brain apparently, is monitoring that.

So here is the Dungeon Desk:

I’ve broken my own rule of “nothing on the desk” to implement my Bose Companion 5 computer speakers.

  • First, the sub-woofer is on the desk because the speakers get glitchy if the USB cable is longer than 5 or 6 feet.
  • Second, the speakers are on the desk because they sound fine on the desk, and I don’t see them while I’m working on the computer.  The sound reflects under the iMac and comes up over the keyboard and trackpad. *Note* I used to mount the speakers on the top of my 27” iMac, but they don’t stay well and it is just a hassle to have more weight on the arm.
  • Third the Bose “hockey puck” sound controller is on the desk because the cable is fraying by the hockey puck, so I can’t mount it on the lower right corner of my iMac any more. iMac mounting requires the cable to make tight turns that wear it out.

And, I’ve broken my rule to have Puffs on my desk because I have chronic rhionitis and I was sick for the month of December 2013. so it is just convenient to have tissues close at hand.

I’ve mounted a 12 outlet power bar at the left end of my desk’s work surface. This is handy for laptop repair and use. I also have another 12 outlet power bar behind my rolling file cabinet at the right of my desk.  This powers all the devices on to the right of my desk.

Out of Sight Infrastructure:

I’ve been evolving my out of sight-while-I-work-but-close-at-hand infrastructure lately, I’m pretty pleased with it so far. You may be able to file off the serial number on this idea and use it for yourself. Here is what the rolling file cabinet looks like:

IMG 20140104 142736

Here is an annotated shot:

IPhoto 50

Here is a closer shot:

Support RestartGTD by buying your ScanSnap iX500, Label Printer, Cordless Phone, External DVD driveBose Companion 5 speakers, Apple Mac, or Windows Ultrabook at Amazon!

bill meade

RestartGTD is a blog about getting back on the GETTING THINGS DONE bandwagon after falling off.

3″x5″ Cards and Manila Folder GTD Startup

Introduction:

I had a request after yesterday’s post on clutter, to show the basic 3”x5” card and manila folder system that I urge people to implement GETTING THINGS DONE (GTD hereafter) with. This post’s purpose is to answer any questions about 3”x5” and manila as I implement GTD.

Your mileage will vary on my advice.  In fact, over time, my mileage with 3”x5” cards and manila folders has varied. The goal is to find a natural and expressively powerful way for your brain to work, not to rigidly adopt ideas. Right now I use a hybrid paper and computer (Evernote + Dropbox/Google Drive) GTD system.  But, I reserve the right to go 100% electronic in OmniFocus in the future, or 100% paper. If it feels good, do that!

Cards and Folders:

So, I helped an accountant implement GTD. Before GTD the accountant was very organized, in fact, almost over-organized.  Take a look at the desk before and after the GTD makeover:

Accountant Before

And then, we scanned all reference materials into Evernote, recycled the paper, and set up a simple manila folder project system with one folder for each project, and all materials (letter paper, post it notes, etc.) captured within folders.

Accountant After

Note the differences in the same cube. By switching note taking 100% to 3”x5” cards, ideas (one idea, one piece of paper) become mobile. Prior to 3”x5” cards, notes were taken in spiral bound notebooks and post it notes.

Spiral bound notebooks trap ideas in random order (see GTD page 30 where David Allen says “written notes need to be corralled and process instead of left lying embedded in stacks”) and post it notes seem like such a good idea when you are capturing the idea, but who knows where they go (with missing socks in the dryer?) when you need to refer back to them.

The basics of a GTD 1.0 makeover:

  • All object cleared from workspace where they can be seen in main working position (usually looking at a monitor). The single worst thing you can have in front of you when you is a picture of a person. Your subconscious can’t stop itself from processing faces. If you must have pictures move them out of view of your main work position.
  • Manila folder system kept outside field of view in main working position. In the after, the manila folders are at far left of the desk.
  • All reference materials scanned and entered into Evernote. All project materials gathered into manila folders. Please stop second guessing yourself and order the ScanSnap iX500 so you can finally get this over with.
  • *Note* Reference folders and project folders are PROFOUNDLY different. David Allen specifies supporting references be kept out of sight (GTD page 38) so having Evernote capture all of your materials is great.  Besides, you don’t have to figure out how to move a filing cabinet into your office. And even better, you can take a filing cabinet out of your office!

And, … that is it.

How It Works:

You have an idea, you write the idea down on a 3”x5” card. One idea, one piece of paper, simple really!

Now, where do you put the 3”x5” card? If you don’t have a project that this idea is related to, you need to create a project. To do this I print a folder label on my Brother QL-700 label printer (link to Amazon for convenience but OfficeMax is cheaper). The print dialog looks like this:

IMac27label01 lbx

Then I print the label (2.5 seconds) and attach to the manila folder. Giving me a nice neat folder to hold my project.

Next, you can put the 3”x5” card you created inside this folder. But now where do we put the folder? My answer is to buy itso small bins from Target …

IMG 20131230 213627

And then insert a small metal book-end inside …

and then accumulate project “clumps” in the itso tote.  Here is an itso tote with my current clump of writing projects.

IMG 20131230 203109

You can see that the book-end prevents folders from becoming bowed.

The Payoff:

For me, the payoff from organizing projects in this way happens once I sit down to do the project.  I take the folder, open it up, and then I can spread out all the ideas I’ve accumulated about the project. When I see that all my ideas are where they should be, I get a subconscious jolt of affirmation. Aaaahhhhhh all the ideas are here. Now, let’s go!

bill meade

Three Questions and Ten Steps for Hoarders to get to GTD “First Base”

Source: Images.google.com

Introduction: 

Advice on getting started with GETTING THINGS DONE for hoarders. 

Step 1: Get an Evernote.com premium account
Step 2: Get a ScanSnap ix500 single-pass-dual-sided scanner
Step 3: Get three large packing boxes from CostCo.  Label them To-Scan, Over-Due, Precious
Step 4: Triage your documents into the three boxes according to this flowchart:

Step 5: Stop triaging once either the Over-Due or To-Scan boxes has been filled to capacity.
Step 6: Take the Over-Due and To-Scan boxes, sit down, and scan them into Evernote
Step 7: Recycle the documents once you have them scanned into Evernote
Step 8: Take a break from the hoard
Step 9: If there are documents remaining in the hoard, go to step 4 and repeat
Step 10: Once everything is into Evernote, take a 2 day break

GTD “First Base:”

Once a hoarder has recycled and scanned and recycled, s/he has “kissed” Getting Things Done for the first time.  

S/he won’t have the big GTD payoffs of a clear mind (that is GTD “second base”), but will have a lot more elbow room for setting up a proper desk, and taking control of work environment. 

bill meade