Back on the wagon weekend: 55 Next Actions

Tried a new format of GTD inside Evernote. A single page that has the following sections:

Next Actions Page

Today:

  1. sssssss

This Week:

  1. yyyyyy

Eventually:

  1. uuuuuuuu

Waiting for:

  1. jjjjjjj

Shopping For:

  1. Amazon.com
    1. Thing 1
  2. Home Depot
    1. Thing 2
  3. Thrift store
    1. Thing 3 (or 2 or 1 if they have it)

Mind Sweep:

  1. Project 001
  2. Project 002
  3. Project 003

Done:

2/25/2018

  1. Next action completed 1
  2. Next action completed 55

I’m loving this format. When I catch myself worrying, I mind sweep the worry out of my head into the section above. When I feel a shift from writing down, I indent next actions underneath the projects, for example:

  1. Project 001: Get Cable Internet into Church
    1. Call cable company to research whether they will want to come in under ground or from a power pole.
    2. Figure out the best entry point for ground or pole
    3. Meet R. and plan out where the modem/router will go.

Then once I feel like I’ve got all the next actions I need for the project, I cut the next actions from the mind sweep, and paste them into Today or This week or Eventually.

On the weekend of 2/25/2018 I was able to burn through 55 next actions. And I’m really back on the wagon!

Bill Meade

Perfect GTD Desk V5.0 Upgrade!

Before:

The converted Ikea Conference Table GTD desk has been looking ragged, ever since I plugged the pre-cut trap door cut-out. I’ve been meaning to recover the desk for years, but three moves in three years = no veneer. Instead of veneer, I decided two weeks ago, I was sick of being in a GTD slump. So I went to Home Depot and found an inexpensive peel and stick solution. Bricolage, does not look cheap, but was = $30.

After:

What I found was 1′ x 2′ sheets of flooring, peel and stick flooring. And in an afternoon I re-covered the Ikea table with industrial stone.

I cut 3/4″ x 12″ pieces of flooring to edge band the desk, and nailed the strips on with finishing nails to insure adhesion. The floor tile has added about 50 pounds of weight to the desk, and made it more stable. A surprise.

The flooring is enough tougher than wood, that I do not have to flinch when I put a heavy object on the desk. I liked the look so well that I bought a second box of tiles and have been resurfaced my side unit.

Side Unit Before:

The top of the side unit actually looked more like the moon surface, with drywall screw craters where the previous configuration of organizers were anchored.

Side Unit After:

The stand at top left is an inverted iMac stand, with the flooring trimmed around the footprint. This will be a table for my label printer in the current evolution of the perfect GTD desk.

Bill Meade

What is “clear working space” on a desk? Involuntary Clutter Makeover for RandsInRepose.com

Source: RandsInRepose.com’s CAVE ESSENTIALS

Introduction:

I’m still reflecting on RandsInRepose.com’s CAVE ESSENTIALS post. And while I think Rands has the perfect idea about the job of a desk:

“A desk’s job is to build productivity, and for me, it achieves this by first providing an immense amount of clear working space.”

I don’t think Rand’s desk meets his criteria. Why? Because:

  1. Rand’s desk is neither clear
    nor
  2. Immense

Wut?

Here is a close-up of Rand’s desk:

The elements of a desk being “not clear”

Clutter is the STRATEGIC enemy desk productivity.  It is impossible to remove all clutter, but the more you remove, the less brain energy wasted. For example, I think facial pictures are “the queen mother” of all clutter. Why? Because our brains are hardwired to recognize faces. Whenever a face is in front of your eyes, part of your brain is concentrating on an infinite decode loop (“Who is it? Who is it? …).

One of my MBA students heard me say facial pictures are the queen mother of clutter, and moved her daughter’s picture from next to her monitor, to out of her peripheral vision to the left. The pic is still there, she can look at the pic whenever she wants, but she is not burning energy decoding the picture when she’s trying to work. The result:

“I can’t believe how much less tired I feel at my desk.”

  1. Monitors are not on arms that would:
    1. Lift monitors clear of the work surface to allow the work surface to be used … for work!
    2. Allowing monitors to be effectively removed from the desk when one is not being used
    3. or both are not being used
    4. Allowing use of the desk space now taken up by the base of the monitor stands. Rands barely has space to lay down 3 3″x5″ cards, let alone to try to arrange cards to hot-boot a project.
      1. As my go-to hot-boot project methodology is Rough Organizing with 3×5 cards, this is a major defect in my eyes. *Note* Rands probably does not organize with 3×5 cards like I do. To each brain, it’s own organization scheme.
    5. Allow monitors to be precisely aligned/arranged
    6. Prevent the instinctive piling up of clutter on monitor bases
  2. Visible clutter on the desk
    1. What is visible clutter?
      1. Anything not being used to work, that is within the eyesight envelope of the person working.
      2. Take the above picture, and make the 0 degree line perpendicular to the center of each monitor, and then you can construct the full “clutter envelope” of a desk.
      3. I recently had a work desk that had 180 degrees of isolation when I was sitting. Action shot:
      4. Here is the close up of the work surface
      5. Sitting at this desk, the walls of the alcove were just long enough to shield my peripheral vision from any motion. And having all motion and clutter removed from peripheral vision is FANTASTIC!!!
  3. Wires, wires, everywhere.
    1. Can’t tell if Rand’s mouse is wired, but the keyboard looks wired.
    2. I switched to Apple’s Magic Keyboard 2 and Magic Trackpad 2 this summer and both are “Meh” not great, but they are … wireless and minimally increase clutter.
    3. *Note* that I have a Jabra 410 talking hockey puck speaker phone which is wired, mounted on the lower left hand corner of my iMac.
      1. I just recently discovered Velcro with “Rogue Adhesive” which allowed me to get the Jabra 410 off my desk surface, and removed 1 wire’s worth of clutter.
    4. Pay me now, pay me later.
      There is no such thing as a free lunch. I have just as much wire clutter as Rands, I just insure that I can’t see the wires when I’m working. Here is the back of my iMac:

      1. From left to right I also have a USB hub/DVD ROM driver,
      2. an extra Apple cable to charge my (Meh) Apple Keyboard and Mouse. Tucked in at top center under the Apple.
      3. And a 3×5 card/pen reservoir
      4. And last but not least, I have a low intensity under-counter LED light attached to the bottom of my imac so I can work in the dark on my (meh) keyboard and still see the letters.
      5. 1.E.i. above show the clutter seen when working

The elements of a desk not being immense

Rands’ desk looks like it is 2.5’x5′ which in inches is 30″x60″ which is not bad by today’s standards. But … the I would change about Rands’ desk is to make it deeper. Like a foot deeper. My IKEA conference table desk is 43″ deep, and 73″ long.  Rands likes having his couch super deep, he needs to do the same thing with his desk.

Surface to Arm Ratio

After using my IKEA conference table work surface for a year, I felt like I was not able to use enough of the desk surface, so in true barbarian style, I slid the work surface far forward on the support frame. This made the front overhang off the support by 15.5″ and allowed me to cut a 15″ diameter hemisphere out of the desk front.

I can now roll my chair all the way into the hemisphere and reach both the far left (with my left hand) and far (with my right hand) right corners of the desk. So the surface to arm ratio for me on this desk = 1.

Makeover Suggestions for Rands’ Desk

  1. Two VESA monitor arms + iMac VESA adapter
    1. If your two display devices are vesa, two $30 single monitor arms are the way to go. I’ve tried the dual monitor arms and they don’t allow enough freedom to arrange the monitors.
    2. If you like Rands, have a recent vintage iMac without VESA support, then you’ll need the $100 MacSales.com VESA adapter. 
  2. Larger desk surface
    1. Deeper by at least 12″ is a must
    2. Wider would be nice too
    3. I would look for a larger desk surface at IKEA’s clearance area. There are lacquer panels in blood red that might do nicely while costing next to nothing.
    4. Try mounting the new surface over the top of the existing surface. Height change will not be too great. Chair goes up and life goes on.
    5. Rands probably does not need as much desk space as I do because it looks like 300 3×5 cards are not a big part of his thinking life.
    6. So Rands won’t need the 15″ hemisphere cut out either.
  3. Clutter (pictures, polar bear, etc.) moves left until it is out of peripheral vision while looking straight at the left-hand monitor.
    1. There seems to be a credenza at left, I would move that 3′ into the room perpendicular to the front of the desk (to get stuff out of peripheral vision), and put the clutter on the credenza.
      1. Idea = Minimal change and clutter eliminated.
      2. As David Allen says, you want “just enough” organization.
  4. Wireless keyboard/mouse/trackpad
    1. I switched to a track pad because I move my right wrist less on a track pad, and less movement has led to zero wrist pain.
  5. Twist ties or cable ties to hide all the wires from view while working at the 2 monitors.
  6. ScanSnap iX500 next to the printer at right.
    1. Scansnap is the digital on-ramp to
    2. Evernote to go paperless
    3. Printer is the digital off-ramp

Getting Started with GETTING THINGS DONE - 2014 - in 28 steps

DSC_9660

Amendment:

Getting started with GTD is much easier if you have a buddy. Preferably, two buddies, and experienced GTDer buddy, and someone who is at the same experience level as you in implementing GTD. See GTD buddy system for more details.

How To:

If you asked me how to get started with GTD today (see What is GTD before embarking on this journey), this is the advice I would give. Step zero, take a picture of your desk. If you follow this guide, and get GTD to stick, starting point chaos, will be a valuable data point to refer back to. Here’s my initial desk before embarking on GTD

  1. Order GETTING THINGS DONE and 1,000 3×5 cards
    a. Buy the unabridged audible version of GTD and listen to it while you are driving.
    b. And, buy a Kindle or paper version so you can highlight passages, when you circle back to re-read GTD.
  2. Order a Fujitsu ScanSnap iX500
  3. Go to CostCo and get 4 large (free) boxes in which to triage documents
  4. Subscribe to Evernote
    a. Go to Evernote.com and click on “Sign Up”
    b. Get you your credit card and pay the $45 a year
    c. Get your email confirmation that you account is set up. Write down your username and password for evernote on a 3×5 card.
  5. Download Evernote and install the client on the computer you use most
    a. Download Evernote
    b. Install Evernote
    c. Connect the installed software on your computer, to your evernote account (use the username and password you wrote down in Step 4 c.
  6. Install Evernote Clearly into the web browser you use most
    a. Clearly is a browser add-in, separate from the software you installed above. Evernote = database. Browser add-in = on-ramp to database.
    b. Go to a favorite web page of yours, then click Clearly (a Luxo Lamp Icon) and watch as Clearly removes the clutter from the web page, allows you to highlight text. And most importantly, allows you to save the page to Evernote when you highlight or click sae. You are done for day 1. Time to walk your dog. Your dog will feel stress lifting off you as Millie demonstrates in the picture at the top of this post.
  7. Practice with Evernote (open it up, see the pages you have captured, add manual notes, create notebooks, etc.) each day as you wait for GETTING THINGS DONE and your ScanSnap to arrive.
  8. Practice with Clearly every day as you wait for GTD and your scanner. You might want to read the RestartGTD post where the capstone line is: “Clearly all by itself makes Evernote worth it!” towards the bottom. Then go back and play with Clearly and Evernote.
  9. When the ScanSnap arrives, unbox it immediately, and install it on your computer with the included DVD. This will take you about 20 minutes. Do not read GETTING THINGS DONE until instructed to do so in Step 12. If you procrastinate on installing the ScanSnap to save 20 minutes now, it will take you 20 months or never, to get the ScanSnap installed. Do it. Do it now! (31 seconds in)
  10. After the ScanSnap is installed, get it working so you can Scan-To-Evernote with one click.
    a. Start the installed ScanSnap software by clicking on its icon at the bottom of your screen
    b. Left-click once on the ScanSnap software icon after it is running
    c. Look for “Evernote” in the pop-up list, and left-click once on it
    d. Put a page in the ScanSnap, push the blue button, and watch as the page appears in Evernote. Cool!
  11. Once you have steps 1 through 10 accomplished, then …
  12. Read the first three chapters of GTD.
  13. Read only the first three chapters of GTD. Don’t give in to temporary energy and enthusiasm, and read the entire book. Just chapters 1-3.
  14. Energized by your first wave of hope after reading …
    Mark the 4 boxes you brought home from CostCo as
    “Recycle”
    “To Scan”
    “IN” and
    “Precious”
  15. Next put all your papers into the “IN” box. Don’t worry about making a mess. Just put each document in as a document. You will process and re-organize these documents later.
  16. After “IN” is full, then stop. Take the rest of the day off. I know you are eager to sprint to GTD nirvana. But, you need to pace expectations. Expecting to do a single good block of work at a time to implement GTD is a maximum. If you try to do more than a single block of work, you set yourself up for failure, self recrimination, and external ridicule. 83% of people who attempt to implement GTD fail. And they fail because they try to do too many things, too quickly, while tired. You did not make your organization a mess in a day. And you can’t transform it to a masterpiece in a day. One good thing a day is enough. If you want to see an organizational mess, check out the RestartGTD post on GTD Time Lapse at the top for before pictures.
  17. Next day, approach the “IN” CostCo box, and pull the first document from “IN” box, hold it up. Look at it, suppress any feelings about it, and ask yourself:”Will this ever have a next action?”
    a. If the answer is “Yes” put the document into “To Scan” and then go back to “IN” and repeat this step.
    b. If the answer is “Maybe” then put the document into “To Scan” and then go back to “IN” and repeat this step.
    c. If the answer is “No” then put the document in “Recycle” and then go back to “IN” and repeat this step.
  18. Once your “IN” box is empty, or your “To Scan” box is full (whichever comes first) then take another rest. At least 90 minutes to let your brain reset.
  19. When you come back, move the “To Scan” box next to your ScanSnap. Take each document out one at a time. Put the document into the ScanSnap, push the blue button. When the document is finished scanning, either put it in the box labeled “Recycle” or the box labeled “Precious” if the document needs to be saved.
    1. Once your “To Scan” box is empty, take the rest of the day off. Manage your expectations. One block of GTD work. One day. P-a-c-e yourself.
  20. Go back to Step 15 if you have more papers to process. And repeat Steps 15-20 until all the paper in your life has been recycled or captured in the box marked “Precious”
  21. Take the rest of the day off. Manage your expectations. One block of GTD work. One day.
  22. Once you have all the paper in your life captured in Evernote, the next step is to get your desk clear. Everything off. No pictures. No teddy bears. No momentos. Nothing on your desk in your field of view as you work. In particular, no pictures of faces in front of you where you work. Your brain will work processing faces without ever shutting off. One student has commented to me that this HUGELY reduced her fatigue.
    a. If you don’t have a real desk. Get a real desk. No substitutions, kitchen tables do not count. Floors do not count. You need a big space where you feel pleasure when you work. Go to IKEA’s “As Is” department and buy returned legs, tabletops, panels, conference tables. And modify to taste.
    b. Go to Amazon and get a monitor arm, wireless keyboard, and wireless trackpad or wireless mouse, to transform your desk back from being a giant monitor stand cluttered with paper, into being a brain’s desk that facilitates work. This is the most disregarded step in my instructions. But, it REALLY HELPS. So give yourself a leg up and try investing in your desk.
  23. Once you have a clear desk, and all your paper captured in Evernote, it is time to take your first “After GTD” desk picture. Put the “Before GTD” desk picture into Powerpoint on the left. And the “After GTD” desk picture on the right. Then save the PowerPoint slide where you won’t lose it. Here is my before/after PowerPoint slide:BeforeAfterDesk_pptxBefore/after pictures are important. Before/after pictures are hope. Elephant food if you are a Heath & Heath SWITCH: How to change when change is hard fan.
  24. Next step is time to clear your mind. Most people have 300+ projects in their minds when they start GTD. Sitting down to scrape these out of your head and on to paper, is terrifying. But once you start, you won’t believe how it lightens your mind, and how the time flies.
    a. Sit down and write down every open loop you can think of on 3×5 cards. Go for 100 at your first sitting.
    b. Once you get to 100, take the rest of the day off. Manage your expectations. One block of GTD work. One day.
  25. Repeat step 23 until you don’t have anything else on your mind.
  26. Once your mind is clear, then lay the cards out on your desk. The bigger the desk, the easier this is. Then
    a. group the cards together in clumps of similar stuff.
    b. These clumps are your projects.
    c. Organize each project’s clump into a neat stack on your desk. Once you have all the cards into their natural clumps
    d. put rubber bands around each stack of cards/clump.
    e. Take the rest of the day off. One block of GTD work. One day.
  27. At this point, your mind is clear. You have all your ideas where your brain knows they won’t be lost. Now you have to decide how you want to move forward with GTD.
    a. Whether you will go all analog, using manila folders - one for each project - with 3×5 cards in them, and keeping a master project list by hand.
    TrustedSystemgenerations01_pptx 2
    Or …
    b. Go digital OneNote to organize your projects. Creating project lists with [[projectname]] and then transcribing your 3×5 card notes for each project, into next actions. *Note* your 3×5 cards are likely not Next Actions in the David Allen sense. The step of taking a thought on your mind that you are feeling guilty about, and then compiling it into next actions as you transcribe the card into OneNote is not wasted effort.
    c. Using Evernote to manage your projects as well as your reference files. Create a “Projects” folder in Evernote. Then, create a sub folder for each project. And then either transcribe your 3×5 card into next actions as in b. above with OneNote. Or, by scanning your 3×5 cards into Evernote.
    d. Using OmniFocus (if you are a Mac person). OmniFocus is powerful … and dangerous. OmniFocus is probably the highest fidelity GTD software system. But you may experience over-organization from OmniFocus with the consequence your brain refuses to use the system … as I did. However, if you are a sales person, think hard (try) OmniFocus because David Allen has refined the GTD system to work for sales people. Nobody works harder than sales people, you will need all the system you can get to do your job well.

    e. Some kind of hybrid system. My GTD trusted system is broken up across paper and electronic tools. This is less simple to explain. But, my brain will use it. I tried OmniFocus in a monolithic trusted system (27 d.), but I hated sitting down to my desk. So I had to retreat to paper.
    TrustedSystemgenerations01_pptx

The Goal

The above 28 steps are the process that I’ve seen work the best for the about 200 people I’ve helped boot-up GTD. Personally, I’ve stayed on the GTD wagon because I have a ScanSnap and Evernote. These tools make it easier to capture information correctly, than to live in a mass of disorganized papers. My love of 3×5 cards and manila folders gradually gives way to electronic project organizing as a project lifts off. The cards and folders are early stage capture tools for my projects.

Your mileage will vary. My tools will not be perfect for you. I’ve changed my tools so many times (except Evernote and the ScanSnap) that I’m proof that one size does not fit all.  Single design does not even fit one person all the time. But the point is to build your system gradually, experimenting, testing, reflecting on how it *feels* to your brain. Does it allow you to swing, to stop constantly worrying you’ll forget something? Does it *feel* fun to work with? Does your system cut your procrastination and guilt? Are you trying to do too much, too fast?

Incompleteness

This process will not get you 100% to the way David Allen’s system. But, it will get you to the nearest local maxima of GTD productivity and GTD swing. Once you go paperless you will discover what a drag paper is. Your Evernote reference filing system will allow you to find everything … in 15 seconds. Evernote *secret* = Evernote does text recognition on all your documents. All you have to do is think of two words that would only be on the document you need, type them into Evernote and *zap* the document is at your finger tips.

Once you have all your projects in some kind of place (manila folder, OneNote folder, Evernote folder) you will feel release of stress. An emergency department doctor who I dragged kicking and screaming to Evernote and a clear desk said to me “I can’t believe how much less stress I’m feeling now.” After my first week of GTD my wife said “Why are you so happy?”

Notes

  • When doing a mind sweep, I do not follow David Allen’s two-minute rule. This is the only time in my GTD life, that I don’t DO anything that can be done in 2 minutes, and instead, just write down the 2 minute tasks. After my mind is empty, it is easy to take the 2 minute pile, and burn through it. And, it gives you quick wins to keep expectations at bay.
  • I’ve found that three steps in the above process are sticking points:
    a. Getting the scanner out of the box and functioning. I’ve had to drive to people’s desks and make the scanner go for them because of this “out of box” sticking point. See RestartGTD post abomination of deskolation for case study.
    b. Getting the desk clear. Again, I’ve found it easier to drive to desks and show people what their desk looks like REALLY EMPTY. If you contact me ([email protected]) for advice. The first thing I will say is “Tell me about your desk?” and what you need to say back is “I got EVERYTHING off it.”
    c. P-a-c-i-n-g yourself. Manage your own expectations. Do not change everything in your organizing, all at once. Know that change will take t-i-m-e. Match building your GTD system, to when you have blocks of fresh energy. Energy is temporary. Read that sentence again!
  • This step-by-step puts getting your computer infrastructure working as a pre-cursor to reading GTD. If you don’t put infrastructure first, you will try to get Evernote and your ScanSnap working while you are tired. Not a good strategy.  
  • When starting out, keep two separate kinds of files: (a) Project Files, and (b) Reference Files. Consciously separating the two kinds of files can prevents confusion. *Aside* I suspect that I *resist* using Evernote for project files because my brain likes having physically separate project and reference files.
  • Reference filing is a capstone skill of getting into and staying with GTD.
  • Having a real desk is a capstone skill of getting into and staying with GTD. Clutter is the enemy, and there is more clutter on desks than everywhere else in your life. Win the battle against clutter, GTD will work.
  • Managing expectations is a capstone skill of GTD. One block of GTD work. One day. Is the rule.
  • Experimenting with new tools, selectively, is a capstone skill of staying with GTD.

What is GTD Warm Boot Step #1?

Where Does a New Work Flow Start?

billathp.jpg

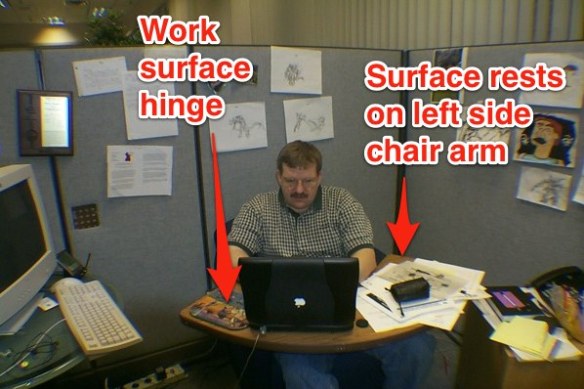
The Author @ HP Boise Legal Circa 2001

The last time I had a cube in corporate America, the cube came with 4 walls. Apparently, a few things have changed since “back in the day.” Today a cube is truncated into a
c | u | b | e so that four people put together have four walls. So I’ve got a corner or 1/4 of a cube.

Ironic Math Question: Is a corner of a square, a square root?

Back story, at HP I asked that my cube have zero work surfaces. Instead I ordered two lobby chairs that had tablet arms for laptops. And on the chair I used, installed a long work surface that reached from the right table arm to the left. Top down my cube looked like this.

Presentation1

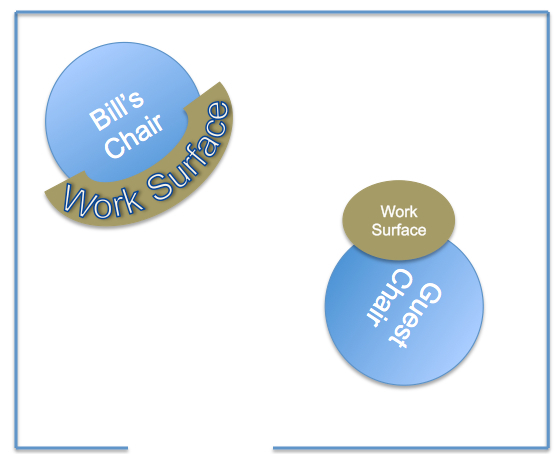
The fun thing about this set up was people would come in, sit down and say “Why is your cube larger than everyone else’s.” This was fun, because my cube was not larger than everyone else’s. Same as.

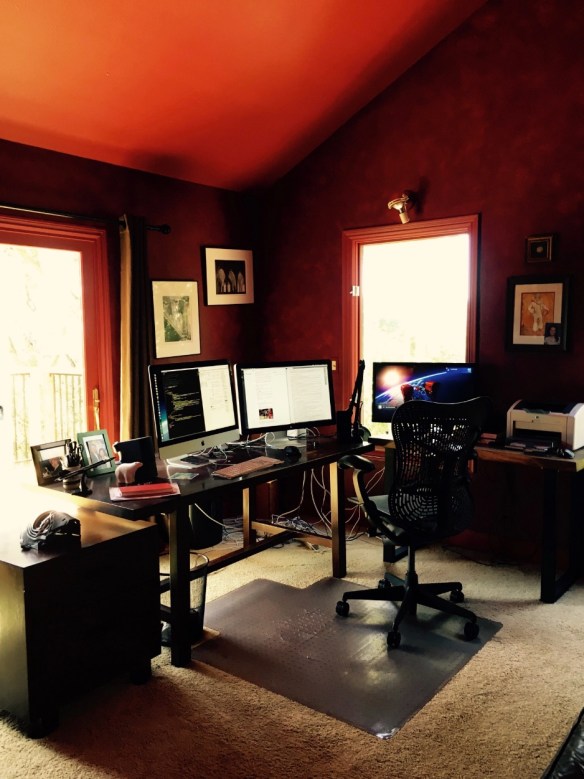
And same as brings us back to desk 1.0 at new job in the insuranceville company town.

IMG_20140717_131307

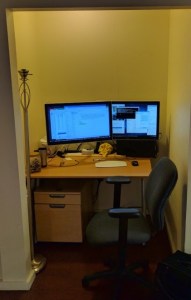
It is only natural to feel a moment of remorse for moving from my dungeon desk (see below) to a corporate environment with a uniformity fetish. However, life is bricolage (RestartGTD link) and constraints set you free (see previous post).

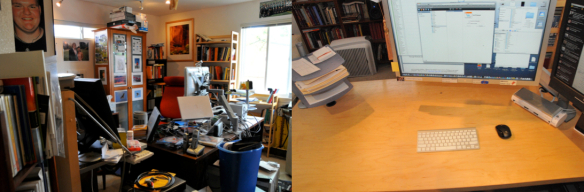
One big constraint of the new work space is books. Perhaps you have seen my picture in my library around the internet …

Spitzweig 1850

Alas, no more shelves, ladders, or extraneous reference materials. The internet is some compensation, but Mostly I’m shifting my references into Kindle and where possible, PDF files.
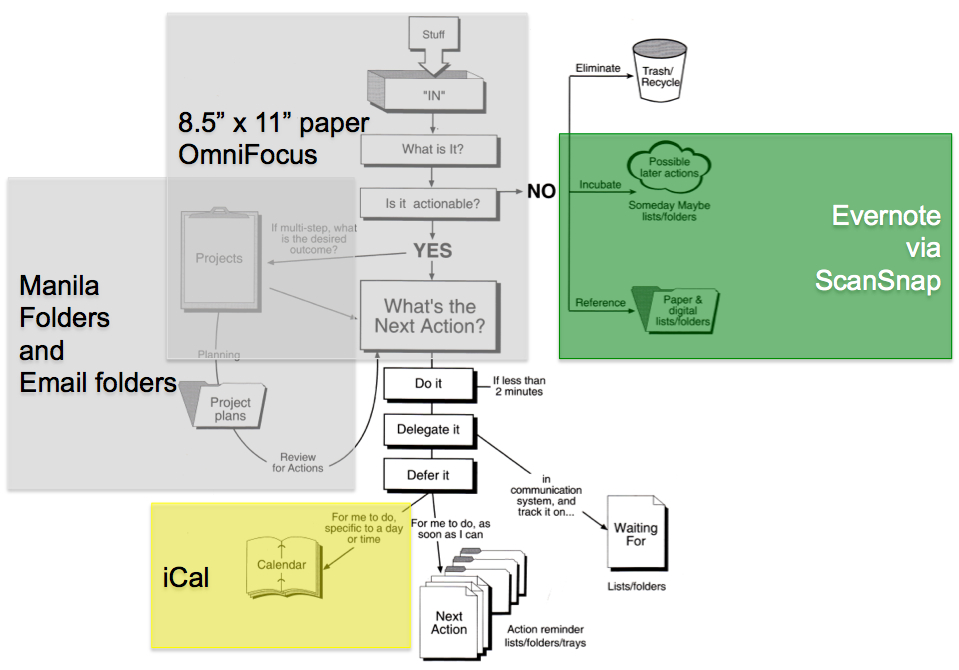
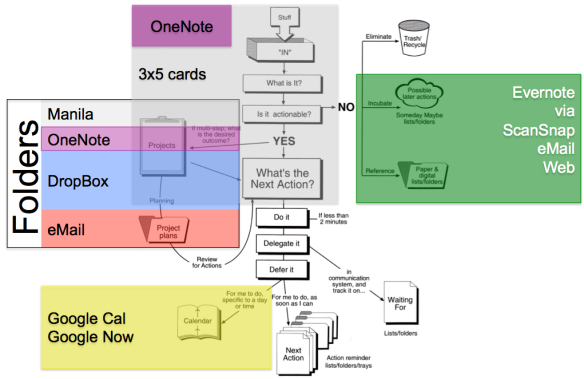
Bill_s_Kindle_for_Mac_5

GTD Start Up

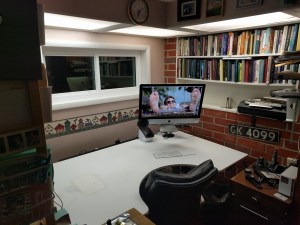
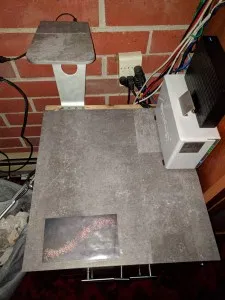
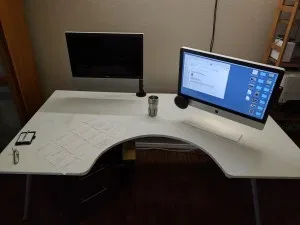
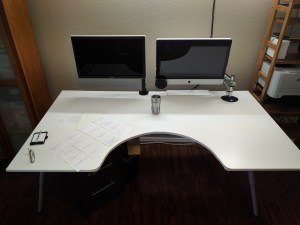
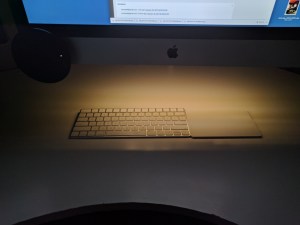
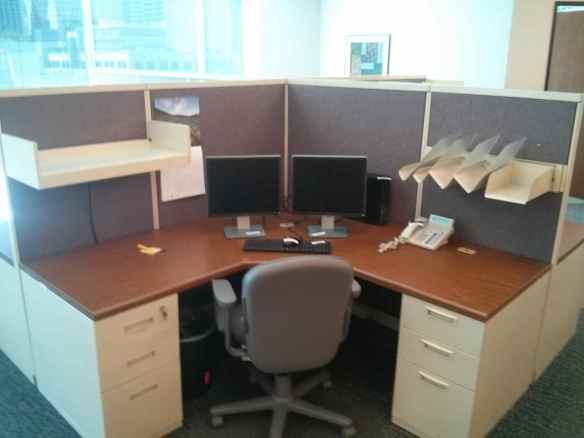
I decided to start with a 3×5 card heavy GTD setup. One idea, one piece of paper. Then, a manila folder for each project. In slinking around the supplies room if found a lot (20) diagonal folder holders that were “locally available” to install without causing any drama. So, here is what my desk looks like when I arrive in the morning.

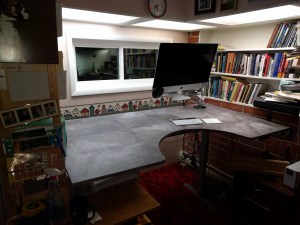
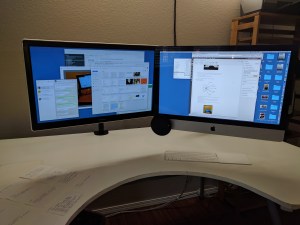
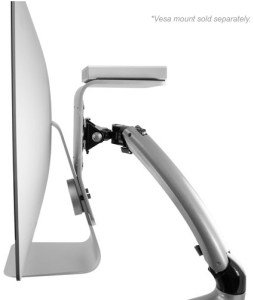
When I first arrive in the morning I move my monitors out of the way, up to the shelf, and then do a relaxed mind sweep. At least for now, I’m arriving at 8:00 am which is a scosh before my group, so I can take 10 minutes or so to allow ideas to bubble up, write them on cards, and then organize the cards into groups (columns).

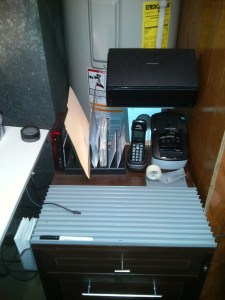
My new boss (who no, has not read GTD … yet …) is great at emailing me projects, hints, tips, etc. So my first week, I started by taking her emails, cards where next actions were captured during conversations, and then hacking out an initial set of projects. Each project gets a folder, and a diagonal slot at upper right on my desk. Cards get filed in project folders.

This physical folder organization has felt to me like it has helped trust to develop fast. If I’m not at my desk, the information is available for my boss to walk up to the folders, find the project she is concerned with, open the folder and see:

  • At the very front a list of next actions for the project. Think of an excel spreadsheet list that has completed tasks and next tasks.
  • The individual 3×5 cards with next actions on them.
  • Supporting materials for the project (most of which she has lent me, so this is great for her to be able to “pull back” materials she needs)

I also have a “Projects” folder with a list of all the individual projects. This list has been handy as my boss is on the spot with her boss and her peers about what I’m going to be doing (this company has a strong norm of close monitoring of new employees).

That is the initial set up so far.

bill meade

GTD: Problems Are Opportunities

Warm Booting GTD: Building A New Trusted System

IMG_20140717_131307

≈ New Job Desk 1.0

Just finished my first week at a new job. I’m now a senior data analyst at a health insurance company. The above picture is not my desk (once again I’ve neglected to take EXACT before pictures of my desk projects). But, the above desk is in the same position vs the window, on the same floor, and pretty much the same shelving and monitor setup as my new work desk, when I started on 2014/07/14.

New Job = New Set of Constraints on Organizing

I’ve worked with engineers (software, chemical, nuclear, mechanical, electrical, industrial, ….), and even worked inside a legal department once. But this is my first time working with: (a) actuaries and (b) health data. So there are a couple of constraints thrown into my GTD trusted system’s design:

  • No Evernote allowed
    Installing Evernote would break data security rules and get me fired. Too bad as I am a huge fan of Evernote.
  • Trusted system hermetically sealed great wall of China
    My work trusted system must be separate from the system I’ve built up over the past five years. This is interesting because the result at first cut, is a severing of my personal life from work. David Allen says this can’t really be done. We’ll see how big a GTD impact separate hermetically sealed trusted systems are.
  • No spending money
    Very strong culture of minimizing costs.

First law of marketing is that problems are opportunities. So setting up a new GTD system with constraints, is always fun. It is the constraints that set you free. (*Note* I’m pretty sure that Mr. Bartlett my Jr. year in high school said that “Beethoven said ‘The rules set you free'” but I’ve never been able to track that quote down. So, if you know who really said it, please email me at [email protected] and I’ll update the attribution here.).

Time for GTD Eduction! That is e-duc-tion (as in e-quack-tion … not education)

  "In his enchanting novel, A High Wind in Jamaica, Richard Hughes
describes a group of children who have been kidnapped by pirates on
the high seas and are stowed away in the ship’s cabin. One little
girl is lying there, staring at the wood grain of the plank wall 
next to her. She sees all sorts of shapes and faces in the grain, 
and starts outlining them in pencil. A whole fantastic scene 
appears. 
We’ve all done this kind of doodling: projecting shapes onto
something, then fixing and cleaning up the outlines so that the 
raw material comes to really look like what we imagine it to be.
When the child completes the gestalt of the wood grain, there is 
an encounter between the patterns given by the seemingly random 
swirls of wood grain residing outside the child and the patterns 
given by the child’s inner nature. The wood grain (or tree, or 
rock, or cloud) educes, or draws out of the child, something 
related to what the child knows, but that is also more or 
different than what the child knows because the child is both 
assimilating the outside pattern ... and accommodating 
... to the outside pattern. 
Here we can see why in the process of making artwork we are able 
to generate ... surprises. The artist has ... training, 
... style, habits, personality, which might be very graceful and 
interesting but are nevertheless somewhat set and predictable. 
When, however, [s/]he has to match the patterning outside him with 
the patterning [s/]he brings within his own organism, the crossing
or marriage of the two patterns results in something never before 
seen, which is nevertheless a natural outgrowth of the artist’s 
original nature. A moire, a crossing or marriage of two patterns, 
becomes a third pattern that has a life of its own. Even simple 
moires made from straight lines look alive, like fingerprints or 
tiger stripes."
Nachmanovitch, Stephen (1991-05-01). Free Play: Improvisation in 
Life and Art (Kindle Locations 1025-1041). Penguin Group US. 
Kindle Edition. BOLD, link to moire and [s/] added.

So bring on the constraints in educing a trusted system! The more constraints, the weirder the constraints, the greater the “surprises” in the GTD system.

In my next post I’ll describe the new GTD workflows which I’m evolving, and share more pictures.

bill meade


Amazing Kindle Book Steals!!!!!!!!!!!!!!!!!!!!!!!!!!!!!!!!!!!

Steal #1: Geoffrey Moore’s Gorilla Game for $.99

As I shared yesterday, Geoffrey Moore is a Ph.D. in literary criticism who somehow ended up in high technology marketing (see 1, 2, 3, 4 ($.99), 5, 6) and is the nicest person you could ever want to meet. Click here to get Gorilla game for $.99.

Amazon_com__The_Story_of_Philosophy_eBook__Will_Durant__Kindle_Store

Steal #2: Will Durant’s THE STORY OF PHILOSOPHY for $.99

Will and Ariel Durant wrote the massive Story of Civilization between 1935 and 1975.  His writing on philosophy makes me shake my head and say “Dang, why did I not observe this? … No … how could I have missed this?”

Both Geoffrey Moore and Will Durant (backed by Ariel Durant) write warmly and enthusiastically. Enjoyable!!!


bill meade


GTD on the cheap!

Amazon_com__Getting_Things_Done__The_Art_of_Stress-Free_Productivity_eBook__David_Allen__Kindle_Store

Just noticed today that Amazon has GETTING THINGS DONE Kindle version for $6.49. If you’ve never read a Kindle version of a book you may not know that:

  1. You can install the free Kindle reading software on your cell phone, laptop, desktop, or tablet (Kindle on iPad is THE BEST!)
  2. When you buy a Kindle version of a book, you can have it simultaneously on up to 6 devices. I have GTD on my phone, 27″ iMac, iPad, and 13″ venerable Macbook.
  3. When you read in kindle software, Amazon tracks where you have read, and what you have highlighted. What this means to busy GTD people is that you can read on your iPad at home, and then if you get stuck waiting for a train, you can pull out your phone, and pick up at the page you left off on.

At $6.49 this is a double opportunity. First to get a cheap copy and gift it to that special someone who really needs to read chapters 1-3 (you know who you are Jeff!), or, you can use this as an opportunity to refresh yourself on GTD, and to learn about the wonderfulness of reading on Kindle.

bill meade

*Note*

My advice on reading GETTING THINGS DONE for the first time is to buy the Audible version. Because:

  • David Allen reads the book. And it *helps* to hear from the master.
  • “Reading three chapters” seems like a big barrier, if you get the audio book you can do the same work in 1 commute.
  • Once you have your first audio book you can *feel* why people who listen to audio books READ MORE THAN THREE TIMES AS MUCH as people who only read paper.


Dungeon Desk

NewImage
Source: 13th Age via Adam.Legendary.org

Introduction:

When was the last time you stopped working in your office, and started working on your office? Kind of like the E-Myth idea of not working your business and instead working on your business.

Well, this week I decided to spend my low-energy work time from 2:00 pm to 3:00 pm, working on my new office. I recently moved my home office into the furnace room, and as always, I’m having a lot of fun optimizing, without spending money.

Monday:

I discovered pre-cut white boards at Home Depot. Here is the in-aisle display for the 2’x3’ model:

IMG 20140102 151218e

In our furnace room we have two cabinets for storing canned goods.  The cabinets have sliding doors that were begging to have whiteboards on them. I bought one 2’x3’ board ($6.88) and one 2’x4’ board ($9.97) at Home Depot and then “hung” them on the food storage cabinets by putting 3/4” screws with large heads, around the edge of the board.  Here is what the cabinets look like now:

Presentation1 22

Alas, I found that the whiteboard was sagging away from the cabinet door 1/2 up.  So I added 2 middle screws 1/2 way up each board.  These middle screws pierce the board and hold it flat to the cabinet door.

I found Industrial strength Velcro® at Home Depot (UPC 0-75967-90595-8) and used this to attach a whiteboard eraser on edge and a whiteboard marker directly to the larger white board (see Cabinet 2). No hunting for writing implements!

Tuesday and Wednesday:

On Tuesday and Wednesday I added my 3 tier paper tray to my desk setup, and on Wednesday I added a 1’x1’ IKEA Lack shelf to hold the portable Canon inkjet printer I use in my office. Here is what they look like now:

IMG 20140104 142648 jpg 11

Thursday:

Light is luxury in a dungeon. So Thursday’s task was to get better light into the office without any cash changing hands. I was able to do this because I had an old Home Depot Hampton Bay track light setup from four home offices ago that I was able to repurpose. The only components I needed to buy were power connectors (2 @ $10 each = $20) to run the two separate tracks I set up.

Presentation1 6

Friday:

On Friday I spent an hour re-arranging the power setup for my desk. Step 1 was to test my UPS. It was dead. Bother! I pulled it out of the setup and re-wired. You can’t really see a re-wiring in a picture, but for me it *feels* like I’m taking next actions off my mind. Wiring gets tanglier and tanglier over time, and my brain apparently, is monitoring that.

So here is the Dungeon Desk:

I’ve broken my own rule of “nothing on the desk” to implement my Bose Companion 5 computer speakers.

  • First, the sub-woofer is on the desk because the speakers get glitchy if the USB cable is longer than 5 or 6 feet.
  • Second, the speakers are on the desk because they sound fine on the desk, and I don’t see them while I’m working on the computer.  The sound reflects under the iMac and comes up over the keyboard and trackpad. *Note* I used to mount the speakers on the top of my 27” iMac, but they don’t stay well and it is just a hassle to have more weight on the arm.
  • Third the Bose “hockey puck” sound controller is on the desk because the cable is fraying by the hockey puck, so I can’t mount it on the lower right corner of my iMac any more. iMac mounting requires the cable to make tight turns that wear it out.

And, I’ve broken my rule to have Puffs on my desk because I have chronic rhionitis and I was sick for the month of December 2013. so it is just convenient to have tissues close at hand.

I’ve mounted a 12 outlet power bar at the left end of my desk’s work surface. This is handy for laptop repair and use. I also have another 12 outlet power bar behind my rolling file cabinet at the right of my desk.  This powers all the devices on to the right of my desk.

Out of Sight Infrastructure:

I’ve been evolving my out of sight-while-I-work-but-close-at-hand infrastructure lately, I’m pretty pleased with it so far. You may be able to file off the serial number on this idea and use it for yourself. Here is what the rolling file cabinet looks like:

IMG 20140104 142736

Here is an annotated shot:

IPhoto 50

Here is a closer shot:

Support RestartGTD by buying your ScanSnap iX500, Label Printer, Cordless Phone, External DVD driveBose Companion 5 speakers, Apple Mac, or Windows Ultrabook at Amazon!

bill meade

RestartGTD is a blog about getting back on the GETTING THINGS DONE bandwagon after falling off.

3″x5″ Cards and Manila Folder GTD Startup

Introduction:

I had a request after yesterday’s post on clutter, to show the basic 3”x5” card and manila folder system that I urge people to implement GETTING THINGS DONE (GTD hereafter) with. This post’s purpose is to answer any questions about 3”x5” and manila as I implement GTD.

Your mileage will vary on my advice.  In fact, over time, my mileage with 3”x5” cards and manila folders has varied. The goal is to find a natural and expressively powerful way for your brain to work, not to rigidly adopt ideas. Right now I use a hybrid paper and computer (Evernote + Dropbox/Google Drive) GTD system.  But, I reserve the right to go 100% electronic in OmniFocus in the future, or 100% paper. If it feels good, do that!

Cards and Folders:

So, I helped an accountant implement GTD. Before GTD the accountant was very organized, in fact, almost over-organized.  Take a look at the desk before and after the GTD makeover:

Accountant Before

And then, we scanned all reference materials into Evernote, recycled the paper, and set up a simple manila folder project system with one folder for each project, and all materials (letter paper, post it notes, etc.) captured within folders.

Accountant After

Note the differences in the same cube. By switching note taking 100% to 3”x5” cards, ideas (one idea, one piece of paper) become mobile. Prior to 3”x5” cards, notes were taken in spiral bound notebooks and post it notes.

Spiral bound notebooks trap ideas in random order (see GTD page 30 where David Allen says “written notes need to be corralled and process instead of left lying embedded in stacks”) and post it notes seem like such a good idea when you are capturing the idea, but who knows where they go (with missing socks in the dryer?) when you need to refer back to them.

The basics of a GTD 1.0 makeover:

  • All object cleared from workspace where they can be seen in main working position (usually looking at a monitor). The single worst thing you can have in front of you when you is a picture of a person. Your subconscious can’t stop itself from processing faces. If you must have pictures move them out of view of your main work position.
  • Manila folder system kept outside field of view in main working position. In the after, the manila folders are at far left of the desk.
  • All reference materials scanned and entered into Evernote. All project materials gathered into manila folders. Please stop second guessing yourself and order the ScanSnap iX500 so you can finally get this over with.
  • *Note* Reference folders and project folders are PROFOUNDLY different. David Allen specifies supporting references be kept out of sight (GTD page 38) so having Evernote capture all of your materials is great.  Besides, you don’t have to figure out how to move a filing cabinet into your office. And even better, you can take a filing cabinet out of your office!

And, … that is it.

How It Works:

You have an idea, you write the idea down on a 3”x5” card. One idea, one piece of paper, simple really!

Now, where do you put the 3”x5” card? If you don’t have a project that this idea is related to, you need to create a project. To do this I print a folder label on my Brother QL-700 label printer (link to Amazon for convenience but OfficeMax is cheaper). The print dialog looks like this:

IMac27label01 lbx

Then I print the label (2.5 seconds) and attach to the manila folder. Giving me a nice neat folder to hold my project.

Next, you can put the 3”x5” card you created inside this folder. But now where do we put the folder? My answer is to buy itso small bins from Target …

IMG 20131230 213627

And then insert a small metal book-end inside …

and then accumulate project “clumps” in the itso tote.  Here is an itso tote with my current clump of writing projects.

IMG 20131230 203109

You can see that the book-end prevents folders from becoming bowed.

The Payoff:

For me, the payoff from organizing projects in this way happens once I sit down to do the project.  I take the folder, open it up, and then I can spread out all the ideas I’ve accumulated about the project. When I see that all my ideas are where they should be, I get a subconscious jolt of affirmation. Aaaahhhhhh all the ideas are here. Now, let’s go!

bill meade