Alternatives
The dominant alternative scanners if you are looking to use Evernote as your GETTING THINGS DONE reference filing system are:
- ScanSnap Evernote Edition $495 (*Note* that you get a year of Evernote worth $45)
- ScanSnap iX 500 $448
- Epson WorkForce DS-510 USB ($279) or WiFi ($399)
- Brother ImageCenter ADS-2000 $308
- NeatDesk Desktop Scanner $339
- HP ScanJet 3000s2 $350
- ScanSnaps on Craigslist
Which one should you buy to get GTD off the ground? Any of them! Even though they cost real money, the incredible lightness of being you will get from being paperless will more than compensate. Do it, click a link and order. Do it now!
Having purchased a scanner (ScanSnap iX 500) recently, my fourth Fujitsu ScanSnap, here is the decision process I went through.
- ScanSnap Evernote Edition $495
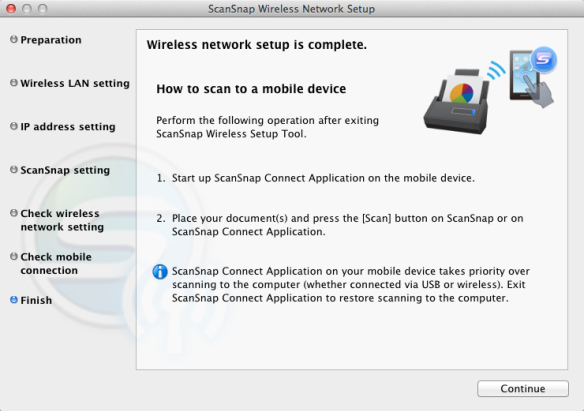
Came out just after I purchased. I missed my chance to have all the drugs. This scanner today, is a great first choice for an Evernote person. There is a scanner control panel for the Evernote ScanSnap edition that looks like this on a mac:
When the ScanSnap Evernote Edition came out, it was featured prominently on Evernote’s web site. It is much less prominent today. In fact, I had to Google to find the direct link to it. So this *might* be a white elephant that gets abandoned by the green elephant in the future. Still, it is a ScanSnap so you probably can’t go wrong.
And which routes documents, business cards, receipts, and photos automatically to Evernote notebooks that you specify. If automatic routing of documents to folders is something you are looking for, stop reading and buy the ScanSnap Evernote edition.
- ScanSnap iX 500 $448
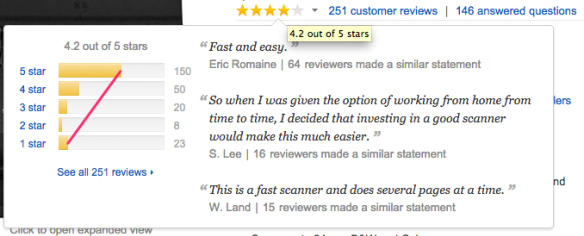
The reason to buy this scanner is that it is top rated. It has the highest satisfaction rating in document scanners on Amazon.com. When I’m buying a product on Amazon.com I look for as high a proportion of ratings as possible in 5 stars. And, the distribution of ratings has to be at least a triangle. Draw a line from upper right to lower left in the ratings bars, and if there is a bar over the line, I won’t buy that product. Look at the iX 500’s ratings:
The iX 500 has the questions and most answered questions, and it is the best seller. Great machine, neutral price (because it is wicked good), and as you push click, you will think of the machine’s price for the last time. Having four successful ScanSnap purchases, this is what I bought last time around.
- Epson WorkForce DS-510 USB ($279) or DS-560 WiFi ($399)
I looked at the Epson last time around. But it has less traffic, fewer ratings, fewer answered question. And is 1/2 star lower rated by Amazon customers.
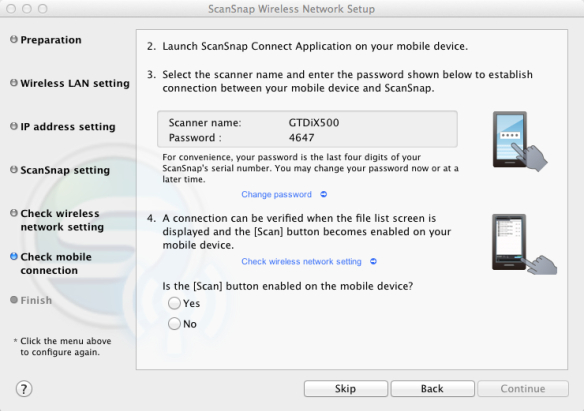
Still, this would be a better buy than the $250 ScanSnap scanner. The automatic document feeder on the lower level Fujitsu scanners is … um … not strong. I’ve owned two of the 300ish ScanSnaps and I’d rather gamble my money on the Epson DS-510 than re-buy a 300ish. Also, I like that there is a USB-only option for $120 less. Wireless connections are demon possessed by definition. I tried wireless on my ScanSnap iX 500 to make sure it works. And even got scan to phone working over wireless. But for everyday trouble free scanning, wireless can’t compete with USB.
If you go for the DS-560, you are just $50 away from the price of the defacto standard iX 500. So knowing I was going to like the iX 500, I just paid the extra money. Buy the best only cry once. But, I bet the DS-510 is a great product.
- Brother ImageCenter ADS-2000 $308
Like the Epson scanner, the Brother unit looks good. But again, fewer reviews, and less highly rated.
Again I thought hard about this, but for $150 less, the 150 customers giving it 5 stars vs. the 1,070 giving the iX 500 5 stars, might give me pause. Still, saving $150 bucks could be done. Amazon.com has great return privileges I hear. But I’m old and lazy so I did not go there.
NeatDesk does the most advertising, so many people see this as THE scanner to get. Until they check out the Amazon.com customer ratings:
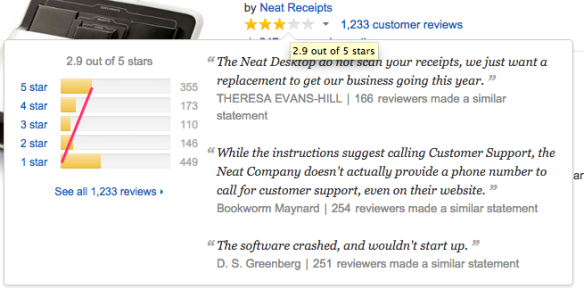
NeatDesk flunks my “triangle rule” as the number of 5 star reviews is actually lower than the number of 1 star reviews. Too bad, the slots that this scanner has for receipts of different sizes might be a great feature. Anyway, when I looked at the ratings, I knew this was not what I was looking for. Also, NeatDesk has separate versions of the scanner for Mac and PC which is always a bad omen.
- HP ScanJet 3000s2 $350
Having worked at HP with HP’s Digital Sender 9200, I would like to love this scanner. The 9200 was the first product I ever saw scan to PDF and email the PDF. It was a network only device. An amazing work of art from HP Bergamo (may it rest in peace) and a software artist section manager.
A quick look at the Amazon.com feedback is instructive:
Only eight 5 star ratings. And very few customer reviews. HP’s entry is a poor bet just because there is so much less user information about it.
- Craigslist ScanSnaps
If you are no-money-down GTD person, Craigslist is for you! Yes, you can find ScanSnap scanners locally. Here are three that are available in Portland OR near me.

I’ve had students buy ScanSnap S1500 scanners for $100 and be very happy with them. I’ve also found ScanSnap S1500 in liquidation shops. New-in-box ready to get you on the GTD wagon for good!
Hope this helps you pull the trigger! Order the scanner of your choice, and then go to my Getting Started with GTD 2014 post and start at the top of the list.
bill