Source: www.digitaltrends.com
Yes boss …
You know how it is when you get the email from the boss’s admin saying “Bill, do you have a scanner that can scan business cards?” Yeah, you could bring the scanner into the office, and then figure out how to make it work on the admin’s windows machine, then tinker to get the settings just right to save business cards into individual PDFs. But you know, it would just be easier to be the boss’s admin and take a bucket of cards home and scan them.
This howto is a step-by-step on how not to delegate, in order to save time and humiliation. Yes, on the one hand by scanning the cards yourself, you become your boss’s admin, but … only for 30 minutes. And, by being the admin you don’t have to fall into the mire of being the admin’s information technology minion.
Step 1: Have an extra tote in your office
Every time I’m in Target I try to pick up more of their “itso Clear See-Through Bin“s so that I’ve always got an extra. When you see your boss, ask her/him to put the cards into the bin for you. Also, ask how many cards there are. Boss will guess “250” for a pretty full bin. The cards will look like this:
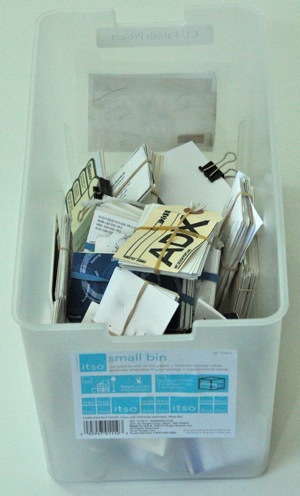
I get it, this looks TERRIFYINGLY LIKE AN ALL NIGHTER!
Step 2: Remain Calm When You See The Cards
Since you bought the Fujitsu ScanSnap, you know that there is a way to get all these cards scanned in, a way that can happen quickly. The challenge is to find the one or two *tricks* that you have to learn.
Step 3: Experiment with settings to find *tricks*
Settings? Tricks? Oh man!
(Wo)man up!!! Yes, settings in the ScanSnap manager. But, they can be understood in a maximum of 3 words each, and most take one word. Here are the 6 tabs in the ScanSnap manager that contain settings. And all the settings and tricks are worked out for you below, tab-by-tab.
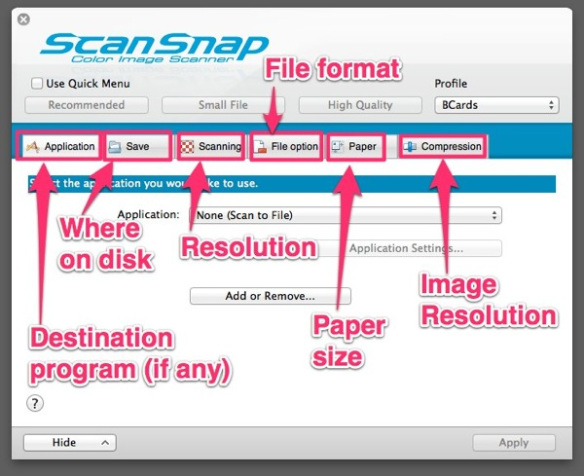
Source: Fujitsu ScanSnap Manager version 3.2 L41 home dialog
- Application Tab
- Save Tab
- Scanning Tab
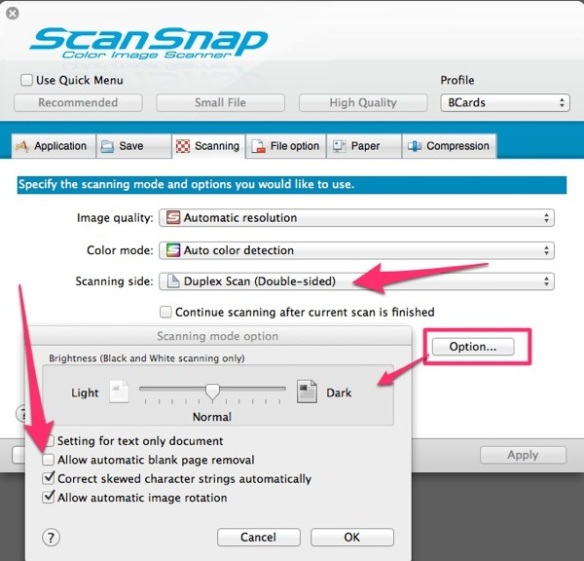
- File Option Tab
This is the second tab with a *tricky* setting. You need to click the option button to bring up the “PDF file format option” dialog. What this dialog does is to give you control over document boundaries.
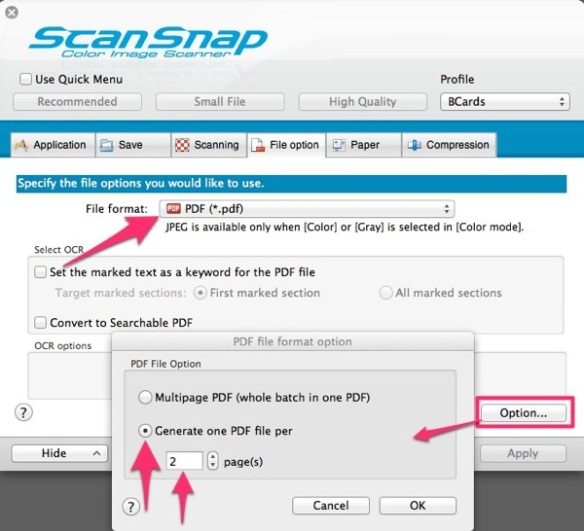
The default option for PDF file format is “Multipage PDF.” If you scan all the business cards in your tote with this option, you will have one file with all the cards in it, that will have twice the page count as the number of cards you have (front = 1 page, back = 1 page).
Probably not what you want if you are thinking of pushing all these cards into Evernote so that they become full text searchable. So, if you want each card in a separate PDF file that has both front and back of the card, choose the second option “Generate one PDF file per” and then “2” pages.
This will allow you to stack the business cards up in the ScanSnap’s 50 page hopper, and let the machine devour them automatically. This approach allowed me to scan my boss’s 640 business cards in 40 minutes flat (with experimentation time).
(Note, my boss’s underestimation coefficient for card count was 2.56 which is actually not too bad. When I was at HP running invention workshops, the average boss underestimated the number of invention disclosures her/his employees would produce, by over a factor of 5!).
- Paper Size Tab
I left it on default “Auto detect”
- Compression
Also left it on the default.
Step 4: Bulk Scan The Cards
To get an idea of what bulk scanning of the cards looks like, I’ve created a YouTube video (3 minutes and 41 seconds long) that shows how fast cards go through the scanner.
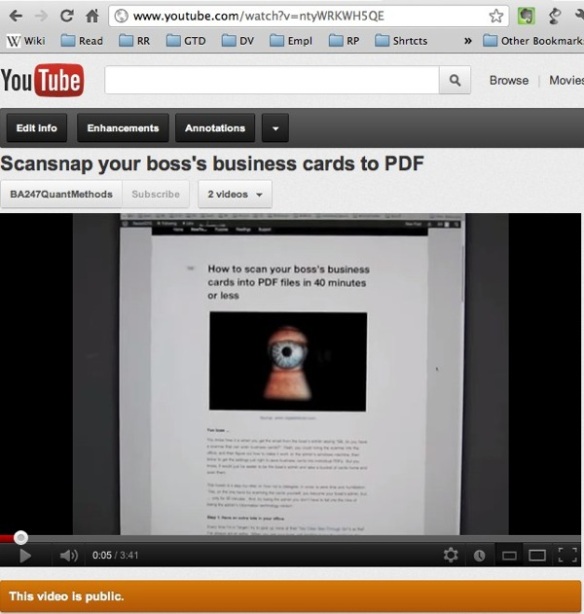
My informal testing produces about 66 cards per minute which means 3,960 cards per hour. Of course, you have to hand feed the cards into the scanner (great, now I get to be the scanner’s minion! :-) but on the other hand, your boss’s 640 cards will go through in 640/66=9.7 minutes.
So, of the 40 minutes I spent scanning my boss’s cards, just over 30 minutes was fiddling with settings on the software and taking cards out of rubber bands and putting the cards back into the same groups in the same rubber bands. Still, 40 minutes of scanning beats trying to work with unfamiliar computers with one hand tied behind my back (my boss’s admin does not have administrative access to her computer).
Step 5: Do The Math!
The Fujitsu ScanSnap S1500M (Windows ScanSnap Here) does 66 business cards (duplex scanned) per minute. It does 20 physical pages per minute which captures 40 scanned pages (again, because of duplex scanning). The reduced form equation for this kind of throughput is:
Worry time about paper > Time scanning paper and being done with worry


Nice demo Bill! Thanks also for your concise, compact and clear article.
I am curious about one thing! Can you tell me what other output file formats are available?
Neil also GTDer
Neil,
The scan-to file options are PDF and JPG see ScanSnap Dialog 1
But, you can really get scans to many other file types via the ScanSnap scan to application capability. See ScanSnap Dialog 2
For example, you can scan to Evernote as a PDF file, or as a text file. Scan to Word, Excel, etc. The only format I use is PDF because Evernote text files are not as modular as PDF files.
Having just started converting my portable computing life to a Google Chromebook (samsung), I’m in the process of shifting out of files in folders on a client computer, towards files on the cloud which I interact with 100% as tabs. The future of scanning for me is in my ScanSnap S1500 scanning to Google Docs as well as evernote, and the most excellent Android evernote app photo shooting documents to evernote where they are text recognized.
bill
Thank you very much for this tutorial. I adopted it with Windows where all option screens and the procedure are the same (with Scansnap S1300).
On the Save tab there is a button where I can change the filename format (maybe this is Windows specific) so I changed it to look like “jjjj_MM_dd_TT_mm_ss.pdf”
The advantage scanning to PDF is you have business cards’ both sides in one file. I use my iPad very frequently. So for me the drawback is to have an addional tap on my iPad because Evernote for iPad doesn’t display the PDF within the note but I have to tap on the link within the not to open the PDF.
Here in Germany we have a mix of single and double sided business cards (approx one third double sided - so one third will require 2 files). So I will start with JPG format that’s displayed inline the Evernote notes. That’s no big deal as I scan business cards the same day and I don’t have a pile like you had :-)
Glad the tutorial helped!
I have a friend who uses Evernote for all business cards but not through a scanner, instead the cards are captured with the computer web cam.
What about scanning your business cards into two 1-sided jpg scans, and then putting both scans into a single Note? Seems like this would give you the in-line-jpg that you want on the iPad.
I have not found Evernote to be useful on the iPad or iPhone or Android phone. Abysmally too slow to get anything done. I have the same experience when I log in to Evernote from the web. Slow, slow, slow, i give up.
Fortunately when I switched to an 11″ ultrabook last year, I was able to shift to the full-Evernote-client everywhere I go.
bill meade
Bill,
thanks for your tipp. I do it now exact this way so I have both sides in one note at a glance on my iPad.
I switched to iPad 3. Evernote runs quite smoothly on it. I use my iPad for many occations and locations. Two weeks ago I participated in a three day long conference and I only had my iPad with me.
But for intensive writing or research I still use my Windows desktop or my Macbook Pro :-)
Best regards,
Frank
F-A-N-T-A-S-T-I-C! Glad that I was not misunderstanding what you were doing!
b