Tried a new format of GTD inside Evernote. A single page that has the following sections:
Next Actions Page
Today:
sssssss
This Week:
yyyyyy
Eventually:
uuuuuuuu
Waiting for:
jjjjjjj
Shopping For:
Amazon.com
Thing 1
Home Depot
Thing 2
Thrift store
Thing 3 (or 2 or 1 if they have it)
Mind Sweep:
Project 001
Project 002
Project 003
Done:
2/25/2018
Next action completed 1
…
Next action completed 55
I’m loving this format. When I catch myself worrying, I mind sweep the worry out of my head into the section above. When I feel a shift from writing down, I indent next actions underneath the projects, for example:
Project 001: Get Cable Internet into Church
Call cable company to research whether they will want to come in under ground or from a power pole.
Figure out the best entry point for ground or pole
Meet R. and plan out where the modem/router will go.
Then once I feel like I’ve got all the next actions I need for the project, I cut the next actions from the mind sweep, and paste them into Today or This week or Eventually.
On the weekend of 2/25/2018 I was able to burn through 55 next actions. And I’m really back on the wagon!
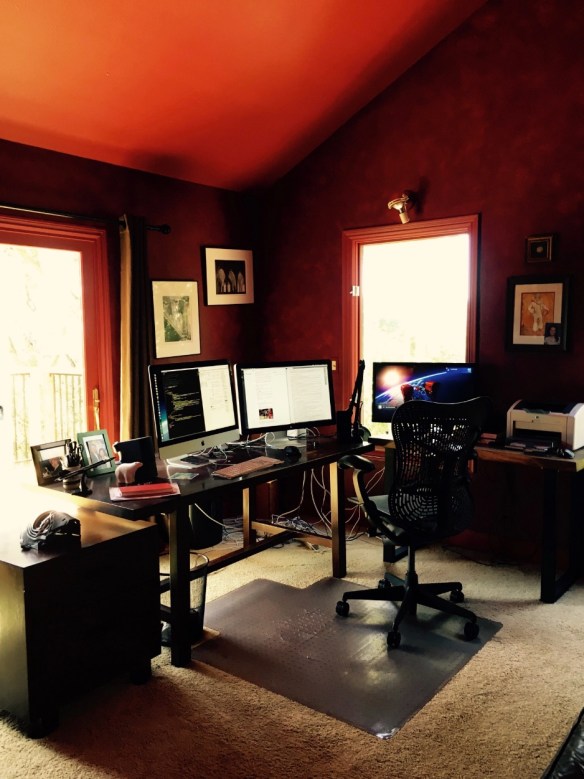
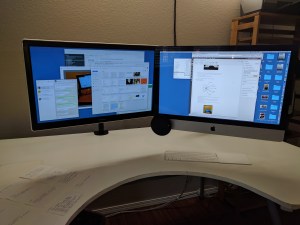
I’m still reflecting on RandsInRepose.com’s CAVE ESSENTIALS post. And while I think Rands has the perfect idea about the job of a desk:
“A desk’s job is to build productivity, and for me, it achieves this by first providing an immense amount of clear working space.”
I don’t think Rand’s desk meets his criteria. Why? Because:
Rand’s desk is neither clear
nor
Immense
Wut?
Here is a close-up of Rand’s desk:
The elements of a desk being “not clear”
Clutter is the STRATEGIC enemy desk productivity. It is impossible to remove all clutter, but the more you remove, the less brain energy wasted. For example, I think facial pictures are “the queen mother” of all clutter. Why? Because our brains are hardwired to recognize faces. Whenever a face is in front of your eyes, part of your brain is concentrating on an infinite decode loop (“Who is it? Who is it? …).
One of my MBA students heard me say facial pictures are the queen mother of clutter, and moved her daughter’s picture from next to her monitor, to out of her peripheral vision to the left. The pic is still there, she can look at the pic whenever she wants, but she is not burning energy decoding the picture when she’s trying to work. The result:
“I can’t believe how much less tired I feel at my desk.”
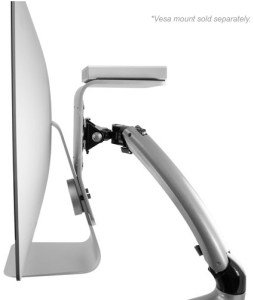
Monitors are not on arms that would:
Lift monitors clear of the work surface to allow the work surface to be used … for work!
Allowing monitors to be effectively removed from the desk when one is not being used
or both are not being used
Allowing use of the desk space now taken up by the base of the monitor stands. Rands barely has space to lay down 3 3″x5″ cards, let alone to try to arrange cards to hot-boot a project.
As my go-to hot-boot project methodology is Rough Organizing with 3×5 cards, this is a major defect in my eyes. *Note* Rands probably does not organize with 3×5 cards like I do. To each brain, it’s own organization scheme.
Allow monitors to be precisely aligned/arranged
Prevent the instinctive piling up of clutter on monitor bases
Visible clutter on the desk
What is visible clutter?
Anything not being used to work, that is within the eyesight envelope of the person working.
Take the above picture, and make the 0 degree line perpendicular to the center of each monitor, and then you can construct the full “clutter envelope” of a desk.
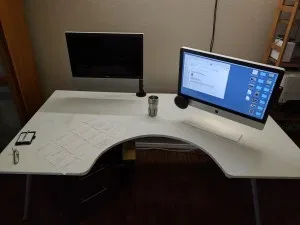
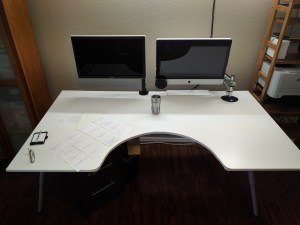
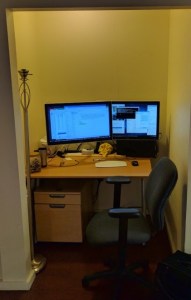
I recently had a work desk that had 180 degrees of isolation when I was sitting. Action shot:
Here is the close up of the work surface
Sitting at this desk, the walls of the alcove were just long enough to shield my peripheral vision from any motion. And having all motion and clutter removed from peripheral vision is FANTASTIC!!!
Wires, wires, everywhere.
Can’t tell if Rand’s mouse is wired, but the keyboard looks wired.
I switched to Apple’s Magic Keyboard 2 and Magic Trackpad 2 this summer and both are “Meh” not great, but they are … wireless and minimally increase clutter.
I just recently discovered Velcro with “Rogue Adhesive” which allowed me to get the Jabra 410 off my desk surface, and removed 1 wire’s worth of clutter.
Pay me now, pay me later.
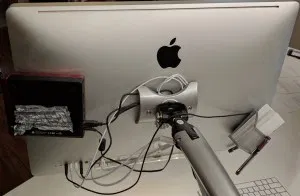
There is no such thing as a free lunch. I have just as much wire clutter as Rands, I just insure that I can’t see the wires when I’m working. Here is the back of my iMac:
From left to right I also have a USB hub/DVD ROM driver,
an extra Apple cable to charge my (Meh) Apple Keyboard and Mouse. Tucked in at top center under the Apple.
And a 3×5 card/pen reservoir
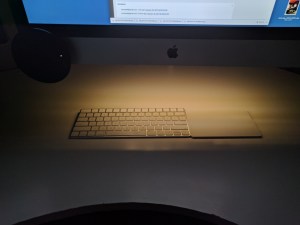
And last but not least, I have a low intensity under-counter LED light attached to the bottom of my imac so I can work in the dark on my (meh) keyboard and still see the letters.
1.E.i. above show the clutter seen when working
The elements of a desk not being immense
Rands’ desk looks like it is 2.5’x5′ which in inches is 30″x60″ which is not bad by today’s standards. But … the I would change about Rands’ desk is to make it deeper. Like a foot deeper. My IKEA conference table desk is 43″ deep, and 73″ long. Rands likes having his couch super deep, he needs to do the same thing with his desk.
Surface to Arm Ratio
After using my IKEA conference table work surface for a year, I felt like I was not able to use enough of the desk surface, so in true barbarian style, I slid the work surface far forward on the support frame. This made the front overhang off the support by 15.5″ and allowed me to cut a 15″ diameter hemisphere out of the desk front.
I can now roll my chair all the way into the hemisphere and reach both the far left (with my left hand) and far (with my right hand) right corners of the desk. So the surface to arm ratio for me on this desk = 1.
Makeover Suggestions for Rands’ Desk
Two VESA monitor arms + iMac VESA adapter
If your two display devices are vesa, two $30 single monitor arms are the way to go. I’ve tried the dual monitor arms and they don’t allow enough freedom to arrange the monitors.
I would look for a larger desk surface at IKEA’s clearance area. There are lacquer panels in blood red that might do nicely while costing next to nothing.
Try mounting the new surface over the top of the existing surface. Height change will not be too great. Chair goes up and life goes on.
Rands probably does not need as much desk space as I do because it looks like 300 3×5 cards are not a big part of his thinking life.
So Rands won’t need the 15″ hemisphere cut out either.
Clutter (pictures, polar bear, etc.) moves left until it is out of peripheral vision while looking straight at the left-hand monitor.
There seems to be a credenza at left, I would move that 3′ into the room perpendicular to the front of the desk (to get stuff out of peripheral vision), and put the clutter on the credenza.
Idea = Minimal change and clutter eliminated.
As David Allen says, you want “just enough” organization.
Wireless keyboard/mouse/trackpad
I switched to a track pad because I move my right wrist less on a track pad, and less movement has led to zero wrist pain.
Twist ties or cable ties to hide all the wires from view while working at the 2 monitors.
I’m mid-job-search right now. Decompressing from a 27 month stint at a startup with 60-100 hours a week. Received an awesome job offer last week that reminded me of a Rands In Repose post.
Scan down to “Deliberate Want” and the part about Michelle. My Michelle is Rachel, but I digress.
Decompression allows this thing, reading for fun, that it has been a while since I’ve engaged in. While in startup mode, I read for survival, not fun. But while I was finding Michelle in the post above, and sending the post to Rachel, I started reading more Rands posts.
Do this immediately!!!
And a post on CAVE ESSENTIALS jumped out and hit me so hard, I’m pointing you to it. I’m pointing you to CAVE ESSENTIALS right now! Do not walk, run to CAVE ESSENTIALS and experience organizational ambrosia via the written word.
Entelechy is a fancy way of saying “soul” Rand’s post is the soul of office organization. The elements of Rands office entelechy:
Self-pleasing environment design (red walls that nobody else can understand)
Telling people “The door… it’s right there.” at criticism of your office.
Your “forever desk” …
“A desk’s job is to build productivity, and for me, it achieves this by first providing an immense amount of clear working space.” There is an echo in this blog!
Deep leather couch (so deep that when you put your back against the couch you are in a new time zone).
There is an analogy between “rough carpentry” and the topic of this post “rough organizing.” Rough carpentry is also called “framing” and that is not a bad description of the result of a rough organizing session.
Rough Organizing: What is it?
Rough organizing involves the following tools:
GTD’s one idea, one piece of paper
GTD’s “mind sweep”
A clear desk
I start rough organizing with blank 3×5 cards. One idea, one 3×5 card. I fill in cards and then lay them neatly on the table in front of me in a grid. I fill in cards about the subject I’m working on until my mind is empty. Usually a dozen cards will do it. But, I carry 3×5 cards at all times, so I can capture open loop ideas whenever they make themselves available. So I often will have two dozen cards to rough organize.
The rough organizing starts after a mind sweep has captured all ideas, one to a 3×5 card. Then I lay the cards out on the table so that I can see them all, and then start moving related cards toward one another.
As related ideas come together, I organize them in a column, not-overlapping. After I have arranged all related cards into columns, and separated the not-related cards. I can look at the cards and “see” the structure of what I need to do.
If I am writing a complex document,
I will see the document organization, and I can proceed to writing an outline. But usually, I’m in a hurry and I just write the document. Once it is off via email, I throw the cards into recycling.
If I am organizing a project,
I can distill next actions for the project and who to delegate what actions to. This goes into OneNote and then the cards into recycling.
Rough Organizing: How does it save time?
I find that rough organizing makes writing happen faster. Instead of free writing, then editing, the refactoring the writing. I can see the big elements that need to be covered, organize them in a sensible sequence, and then proceed to writing.
Time is saved because:
Ideas jump from 3×5 cards into a computer, in a much more organized fashion than using other writing tools (mind maps, outlines, detailed note cards, Scrivener, etc.).
Rewriting is dramatically cut down. The 3×5 card/ideas … are the floors, walls, and ceilings of my writing. It has always been hard for me to go from a writing project idea, to an outline. But with a mind sweep of 3×5 card ideas, to framing in an argument, is … easy. Perhaps I am just writing an outline, by writing the individual ideas without organization, and then organizing them after they are all out. Whatever … works.
It is much easier to make writing flow, when one arranges the stepping stones thoughts travel across. And my personal writing nemesis, the creative “leap” (leaving readers behind), has all but vanished since I’ve employed rough organizing.
I save time because I write modularly. I’ll make a first pass at a document. Get the ideas framed in, use the document. Then, I find later I’m building out the document and repurposing it for other tasks. Getting feedback from colleagues, to put up drywall, paint, and sometimes, even decorate rooms.
I save time because I no longer experience writer’s block.
who runs a small, extremely high-touch graphics business: PixelLight.com. By extremely high-touch I mean: gigapixel pictures with digital scan backs, heavily customized web sites, and seemingly impossible pictures without parallax (i.e., the entire width of the picture is taken at a perfect 90 degree angle to the subject) and …
New Addition:
The picture at the top of this post is an un-retouched image taken of objects spinning. It was taken with a BetterLight.com digital scan back in a standard 4×5 industrial bellows camera, Mark gave a tutorial at BetterLight where he showed step by step how the picture was taken. Click here for the magic pixie dust demo via an .mov file that shows the process.
Mark and I have been implementing Getting Things Done together for several years. Mark uses a customer requirements planning program, Asana.com, to organize, share, and track his work. Mark and I just spent two hours looking over his implementation of Asana, and reflecting on how GTD lives in very complicated, very powerful systems like Asana.
Lessons Learned
Using Skype to share screens is easy!
1. Get your Skype session going.
2. Click on the plus thought bubble at the bottom of the screen 3. Click share screen in the pop up: 4. Continue your conversation while sharing your screen!
Complexity of the tool, Asana, Omni-Focus, whatever, expands like a gas to fill your energy and memory, leading to feelings of being overwhelmed. And,
… complexity crowds GTD logic out of your mind.
When GTD gets crowded out by a tool, we naturally stop managing self-expectations. You are now standing at the top of the GTD off-ramp.
Get to know the system, really try to make it work. But, relax. Rome was not built in day.
When you get frustrated, talk to your GTD buddy. Getting started with GTD is much easier when you have a buddy. Mark VanderSys is my GTD buddy.
What your GTD buddy will tell you:
Slow down. Rome was not built in a day.
Go back to basics. Now that you know a bit about Asana (or OmniFocus, or whatever) it is time to re-read the first three chapters of Getting Things Done. As you go through the chapters s-l-o-w-l-y, write ideas on 3×5 cards, page by page through chapters 1 through 3.
Focus on how the program allows each of GTD’s tools to be implemented. Make notes of next actions for doing GTD more fully.
Organizing Work with Hierarchy … and in an Intertwingled World
Organizing tools allow different kinds of organization. In particular, different kinds of project-next action relationships.
Paper
… with a next action focus, manila folders, creates an implicit one-to-many work hierarchy. One project, one manila folder, and inside many next actions. All the next actions relate only to the project indicated by the folder’s name.
Outline tools
… like OmniFocus (built around OmniOutliner), Evernote, and OneNote use an implicit one-to-many work hierarchy. That is, you start with a project, and then create N next actions to complete the project. But advanced tools like OmniFocus go a bit further. Next actions can relate not only to projects in a hierarchical way. Next actions can also relate to contexts. So the simple one-to-many hierarchy of project and actions, begins to fray. GTDers are coached to think of projects and contexts as a kind of matrix organization structure, and then next actions live at the intersection of project and context.
CRM (Customer Requirements Management)
… systems like ASANA however, are not limited to one-to-many work hierarchy. Yes, you can create a project and then a task underneath the project. But in addition, Asana tasks can be related explicitly to multiple projects.
This is a many-to-many link which CRM systems have evolved so that a next action can be tracked in relation to many projects. With many-to-many relationships, CRM allow GTDers to use “more colors of the rainbow” by tracking multiple projects that a next action relates to, but CRM systems shatter top-down one-to-many work hierarchy that a GTD person is used to seeing, and substitute an extra step of running queries, to see the full status of a next action against its projects. Very disorienting … at first.
Ugh, I’m feeling scared. Overwhelmed, dizzy. What can I do if I need to use a CRM system to implement GTD in my intertwingled life?
Go back up to what your GTD buddy told you above:
Just be aware of what the electronic system can do. And use GTD within that electronic system, as fully as you can. Don’t force yourself to use too much complexity.
Wait. Over time, as you keep your eye on GTD inside the system, you’ll have ideas. For example, you might have the idea in Asana, of doing a query that shows you the next actions in the system, that will move the most projects forward. Might be useful to try!
Experiment. Let these ideas come, and then experiment with them.
Thanks Mark VanderSys for a fun afternoon of GTD buddy check in!
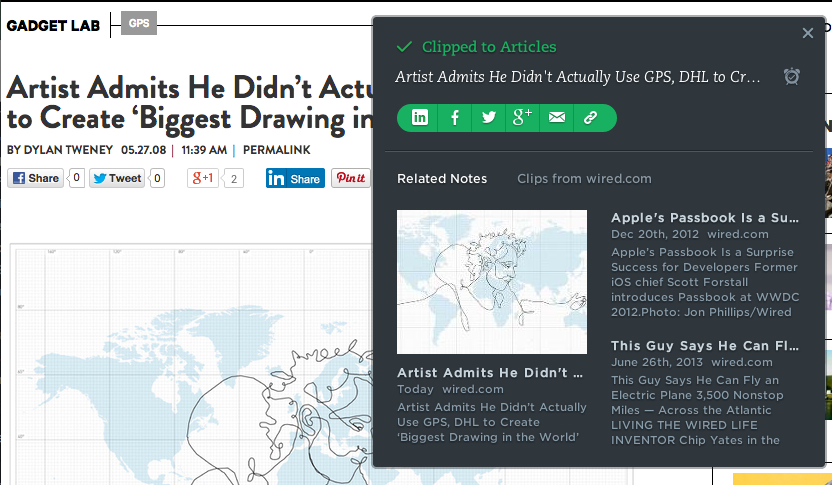
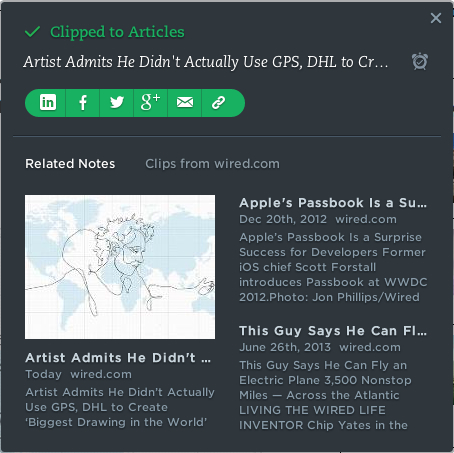
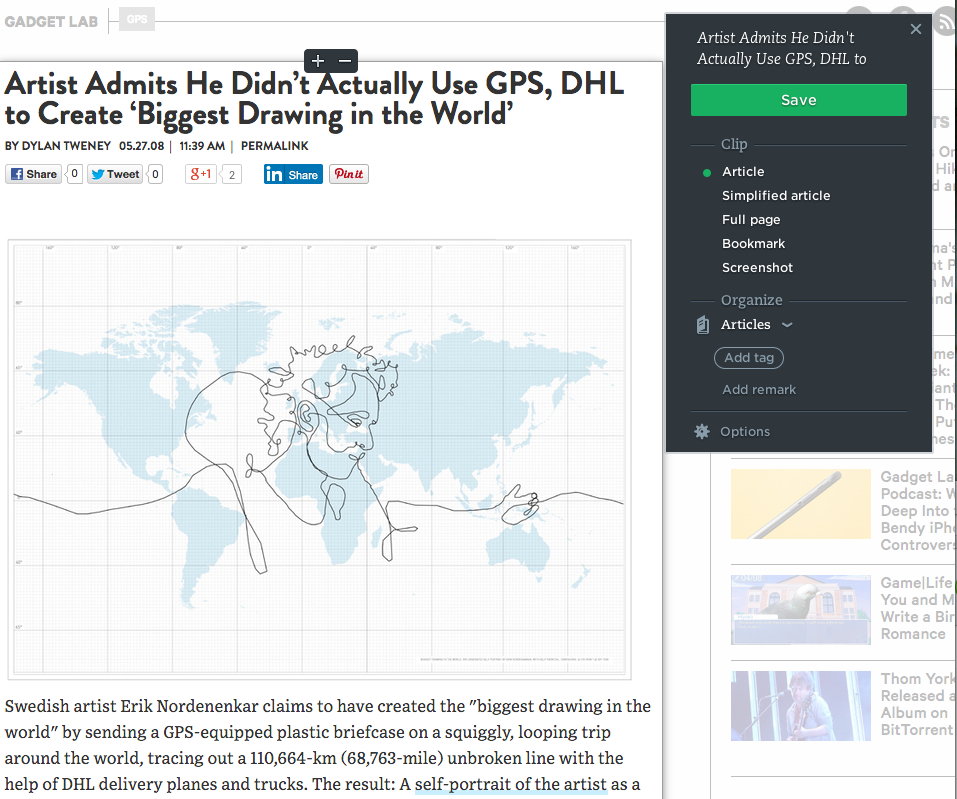
In the past week I’ve noticed problems with Evernote capturing from Web Clipper and Clearly. For example, go to this WIRED article on an artist who did a self portrait with GPS equipment and DHL taking the equipment around the world.
When I opened the article in Chrome for Mac, Evernote Web Clipper, and clicked Save:
Evernote said that it saved the clip:
But … the clip did not appear in Evernote on my Mac after I synchronized.
WARNING!!!
GTD Evernote users, *might* want to check that web clippings are actually being captured. Just to be sure.
Fast Ways To Double-Check-Web Clipper:
When Web Clipper displays the confirmation that your note has been captured: Click on the title of the article to open the note in Evernote, to make sure the note is there.
Or, instead of using Web Clipper, capture the note with Clearly. I’ve had no trouble with Clearly capturing notes this week.
Open Evernote on your computer, click the Sync icon And then click on the “All Notes” (or “Clear” icon if you have run a search) and then scroll to the top of your notes to make sure the note Clearly or Web Clipper says it captured, is there.
This might be a problem of capture (from Web Clipper or Clearly) or it might be a problem of synchronizing. I’m using Evernote Mac 5.6.0 which I think is a beta release.
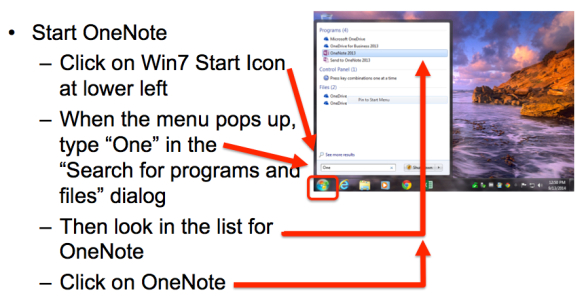
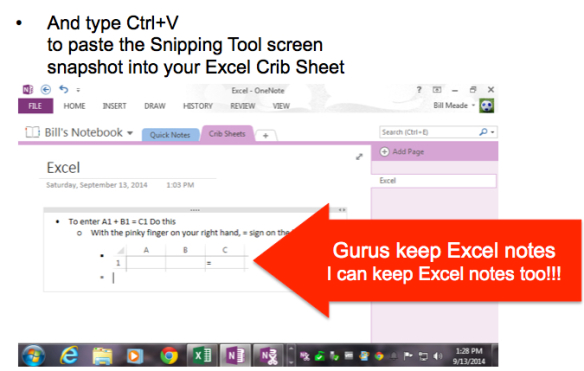
I’m teaching a remedial Excel class this week, and so I’ve developed a tutorial to get people going using OneNote to capture crib sheets in Excel. I store my GTD crib sheets in Evernote (Example, Click here to subscribe). But OneNote is a great program too and if you have Microsoft’s Office, you have OneNote for free.
If you have a Mac Office, you probably don’t have OneNote but you can get OneNote for free.
If you have an older version of Office for windows you can get OneNote for free here.
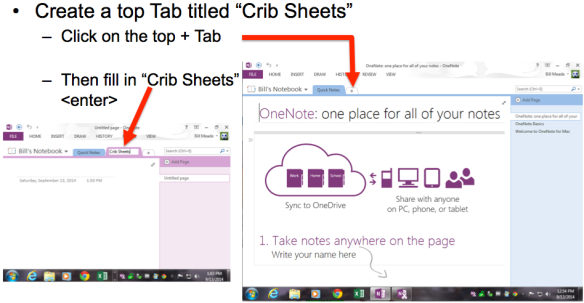
To create your OneNote Excel crib sheet do this:
When OneNote opens, then create a top Tab titled “Crib Sheets:
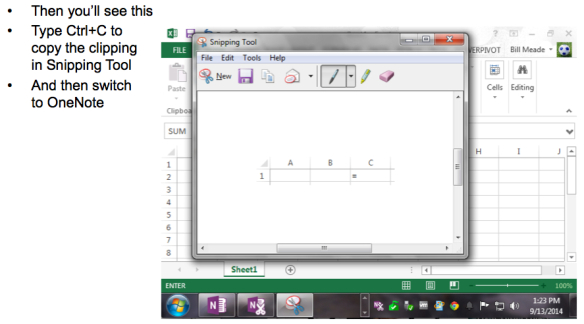
Then add an Excel page:
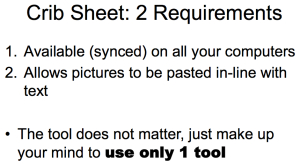
Then copy the first entry from the image at the top of this blog post.
To enter A1 + B1 = C1 do this
With the pinky finger on your right hand, push the =
sign on the keyboard
Now, start Excel so we can get some practice using our Excel crib sheet!
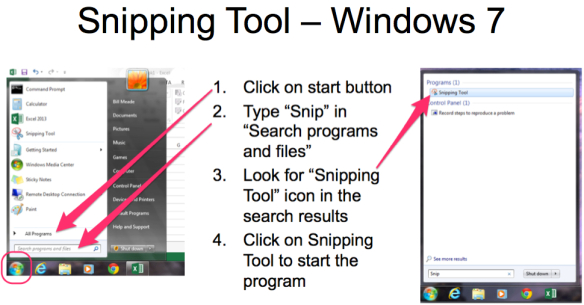
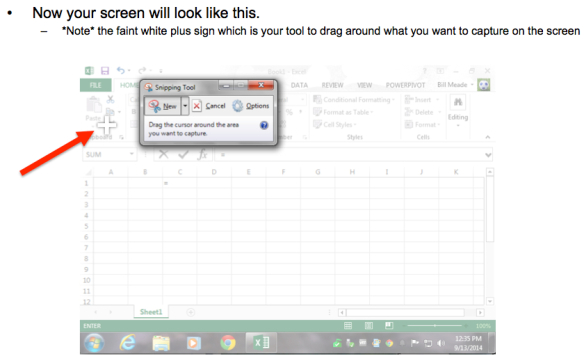
Next question: How do I snip from Excel?
You have created an Excel crib sheet, and made your first entry!!!
OK, it is possible that I’ve raved about Evernote. Perhaps you installed Evernote and paid for an account based on my recommendation or a step-by-step. But, then … you never reached critical mass with Evernote. And your Evernote account has gone dormant. And, you’ve fallen off the GTD wagon. If so …
This post is for you.
The stumbling block with Evernote is that it comes in two pieces: (1) A database piece that takes care of reference filing, and (2) a web-browser-plug-in that takes care of sweeping all worthwhile internet content into your reference files.
Most people install the database and are so tired after getting their minds around yet-another-software-install, that they don’t go “ALL THE WAY” to having the on-ramp, the web-browser piece, installed. The on-ramp never gets installed, so the database never builds.
If this is you, follow these steps to rejuvenate your Evernote (reference filing) experience.
Click “Download for Chrome” or if you are using Safari, you can not install Evernote Clearly. You have to use some other browser. For instance Chrome or Firefox.
Or if you are using FireFox you can click “Download for Firefox” like this:
Or, if you are using Internet Explorer for Windows, you are in the same boat as Safari users. Sorry. You have to use Chrome, Opera, or Firefox.
Whether you use Chrome or Firefox on Mac or PC, your mission, should you choose to accept it, is to install Evernote Clearly into your browser.
Click the download link and take the defaults to the questions that pop up, and then you should see a Luxo Lamp icon in your Mac or PC browser. Look for something like this:
Now, you have Clearly downloaded and installed. Let’s go to the world’s ugliest web page: PCMag.com. When you arrive the page will look something like this:
Source: www.pcmag.com = Clutterville in the Firefox web browser
Now, either wait, click the the escape key, or click the circled X in the “Signup now….” pop up box. to bring the web page to the foreground of your browser. Now you’ll see this:
Source: www.pcmag.com in Firefox
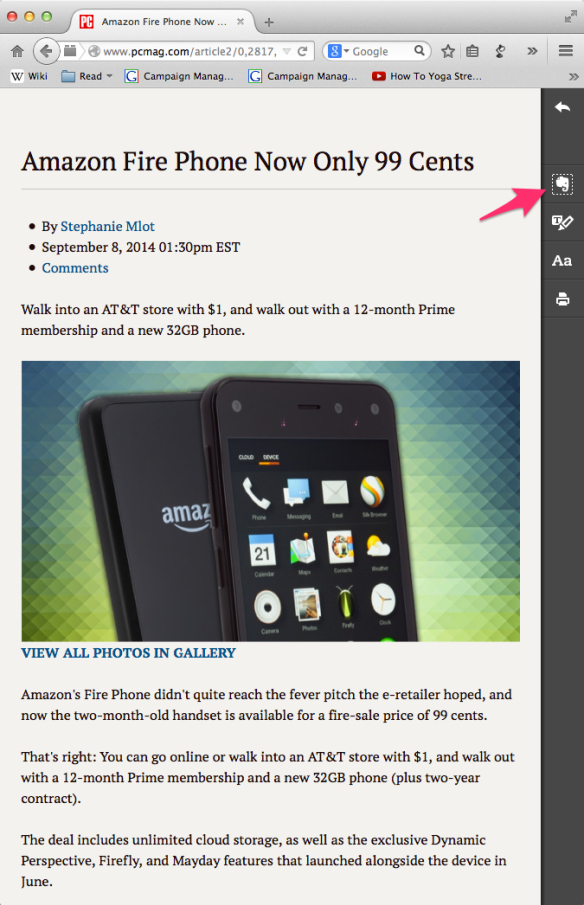
Next, find an article like “AMAZON FIRE PHONE NOW ONLY 99 CENTS” and click on it. If you need help finding the article, follow the red arrow here:
Source: www.pcmag.com in Firefox
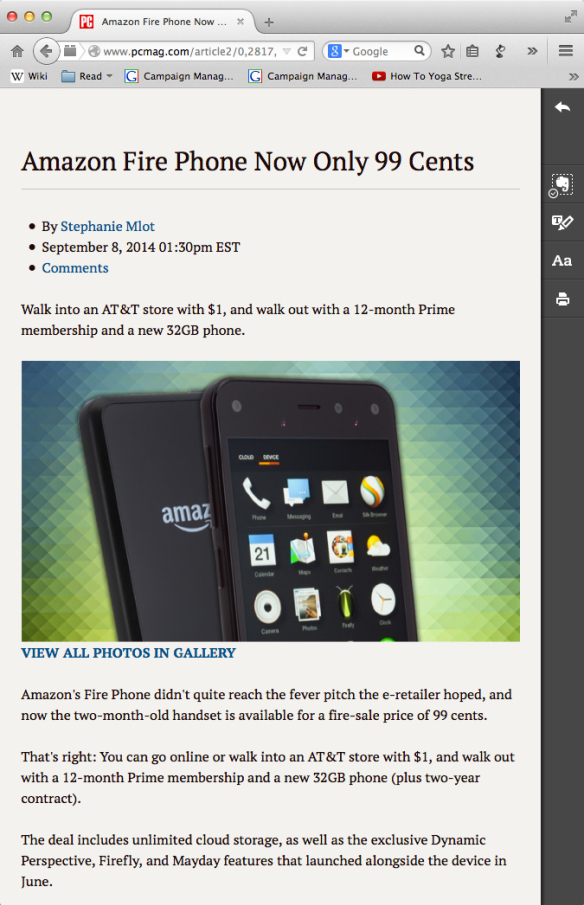
When the article comes up with all its fireworks of flash (thank you IBM!), it will look like this:
Source: www.pcmag.com in Firefox
Now, click on the Luxo Lamp icon in your browser. and you will see this:
Source: www.pcmag.com in Firefox, via Evernote Clearly
No flash advertisements. No advertisements of any kind. Just the pictures from the core of the article, and the text. Next, click the Elephant icon. This will save the article into your Evernote database. Don’t worry, you can delete it easily, once you see it in Evernote.
Anyway, when you click on the Elephant icon you will be asked for your Evernote username and password. So get those out if you don’t have them handy, and then fill in the dialog box. The dialog looks like this:
And you just need to fill in the numbers and click “Continue” and then your screen will look like this:
Where now we can have some fun. Click on the highlighter icon underneath the elephant icon at top right. Then, select the title of the article. Your page will look like this:
And if you open Evernote, and then synchronize it with your cloud database, the note will look like this:
And, the note will be editable!
You can use clearly to read notes, highlight them, and after you add new highlights, Evernote Clearly will re-synchronize the new highlights into the note in your Evernote database. Cool!
But … it gets better!
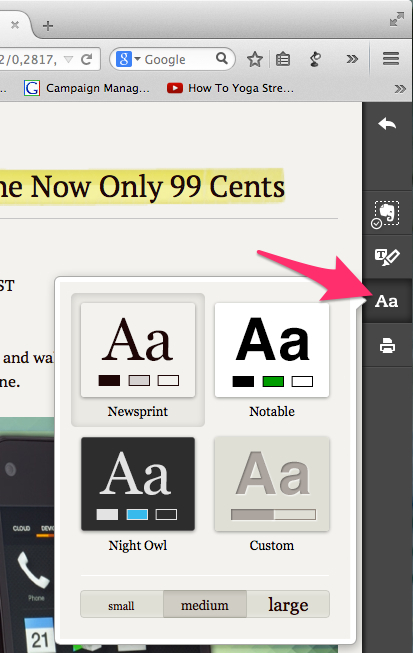
Not only can you strip annoyances from the web page, you can also set the default font size, and page style of the pages you read. To do this, click once on the “Aa” icon at middle right of the Clearly-processed web page:
You can pick the page style from “Newsprint” or “Notable” or “Night Owl” or “Custom” and the fonts as “Small” or “Medium” or “Large” and …
if you mistakenly highlight a passage (Sign of Genius!) you can mouse over the passage and a small circled x will appear that you can click to delete the highlighting. Here is large font size, newsprint, with the circled x appearing on “fire-sale price of 99 cents.”
To highlight notes already in Evernote, select the text and if you are on a mac, type Ctrl + Command + H. If you are on a PC type Ctrl + Shift + H.
Evernote.com is constantly working on the highlighting to make it smarter. I’m hoping before long we will be able to highlight in multiple colors. And, that we will be able to insert sticky notes on top of the web pages we capture.
RestartGTD
Take the trouble to get Evernote Clearly working, and you will go a long way to restarting your Evernote GTD use. It is SO EASY to capture web pages in Evernote. Then, when you need to send a friend a link, you open Evernote on your computer, type in the two words that will search out the web page you are looking for, and then click the saved link on the page. The saved link is available in the note when you are not editing the note.
Click on the note at left, then click on the link that pops up over the top of the note. This will open the original web page, so you can see the link is still working. Then copy the link, and paste it into an email to your friend. Or tweet. Or Facebook post.
Once you have the most vital source of information (the web) functioning as an on-ramp for your Evernote database, I defy you to not use Evernote. And once you are using Evernote, your reference filing will get better. Better to the point where you are doing GTD reference filing.
Because reference filing is a capstone GTD skill. Evernote will pull you back into GTD and hold you there. Hold you because it is easier to do reference filing in Evernote, than to live in a blizzard of paper, browser book marks, and desk clutter.
Getting started with GTD is much easier if you have a buddy. Preferably, two buddies, and experienced GTDer buddy, and someone who is at the same experience level as you in implementing GTD. See GTD buddy system for more details.
How To:
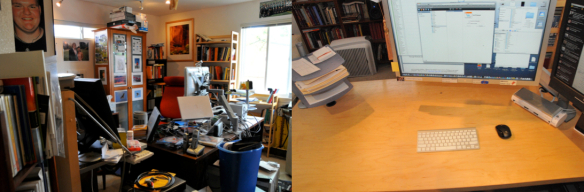
If you asked me how to get started with GTD today (see What is GTD before embarking on this journey), this is the advice I would give. Step zero, take a picture of your desk. If you follow this guide, and get GTD to stick, starting point chaos, will be a valuable data point to refer back to. Here’s my initial desk before embarking on GTD
Go to CostCo and get 4 large (free) boxes in which to triage documents
Subscribe to Evernote
a. Go to Evernote.com and click on “Sign Up”
b. Get you your credit card and pay the $45 a year
c. Get your email confirmation that you account is set up. Write down your username and password for evernote on a 3×5 card.
Download Evernote and install the client on the computer you use most
a. Download Evernote
b. Install Evernote
c. Connect the installed software on your computer, to your evernote account (use the username and password you wrote down in Step 4 c.
Install Evernote Clearly into the web browser you use most
a. Clearly is a browser add-in, separate from the software you installed above. Evernote = database. Browser add-in = on-ramp to database.
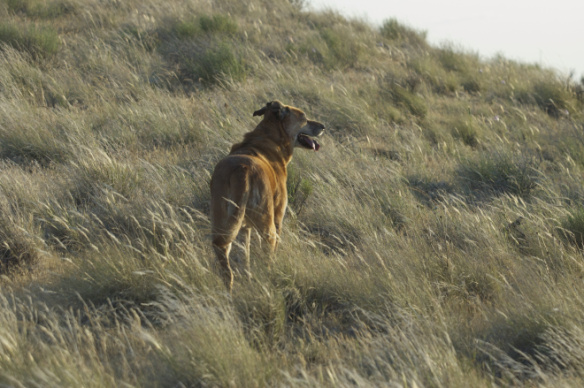
b. Go to a favorite web page of yours, then click Clearly (a Luxo Lamp Icon) and watch as Clearly removes the clutter from the web page, allows you to highlight text. And most importantly, allows you to save the page to Evernote when you highlight or click sae. You are done for day 1. Time to walk your dog. Your dog will feel stress lifting off you as Millie demonstrates in the picture at the top of this post.
Practice with Evernote (open it up, see the pages you have captured, add manual notes, create notebooks, etc.) each day as you wait for GETTING THINGS DONE and your ScanSnap to arrive.
Practice with Clearly every day as you wait for GTD and your scanner. You might want to read the RestartGTD post where the capstone line is: “Clearly all by itself makes Evernote worth it!” towards the bottom. Then go back and play with Clearly and Evernote.
When the ScanSnap arrives, unbox it immediately, and install it on your computer with the included DVD. This will take you about 20 minutes. Do not read GETTING THINGS DONE until instructed to do so in Step 12. If you procrastinate on installing the ScanSnap to save 20 minutes now, it will take you 20 months or never, to get the ScanSnap installed. Do it. Do it now! (31 seconds in)
After the ScanSnap is installed, get it working so you can Scan-To-Evernote with one click.
a. Start the installed ScanSnap software by clicking on its icon at the bottom of your screen
b. Left-click once on the ScanSnap software icon after it is running
c. Look for “Evernote” in the pop-up list, and left-click once on it
d. Put a page in the ScanSnap, push the blue button, and watch as the page appears in Evernote. Cool!
Once you have steps 1 through 10 accomplished, then …
Read the first three chapters of GTD.
Read only the first three chapters of GTD. Don’t give in to temporary energy and enthusiasm, and read the entire book. Just chapters 1-3.
Energized by your first wave of hope after reading …
Mark the 4 boxes you brought home from CostCo as
“Recycle” “To Scan” “IN” and “Precious”
Next put all your papers into the “IN” box. Don’t worry about making a mess. Just put each document in as a document. You will process and re-organize these documents later.
After “IN” is full, then stop. Take the rest of the day off. I know you are eager to sprint to GTD nirvana. But, you need to pace expectations. Expecting to do a single good block of work at a time to implement GTD is a maximum. If you try to do more than a single block of work, you set yourself up for failure, self recrimination, and external ridicule. 83% of people who attempt to implement GTD fail. And they fail because they try to do too many things, too quickly, while tired. You did not make your organization a mess in a day. And you can’t transform it to a masterpiece in a day. One good thing a day is enough. If you want to see an organizational mess, check out the RestartGTD post on GTD Time Lapse at the top for before pictures.
Next day, approach the “IN” CostCo box, and pull the first document from “IN” box, hold it up. Look at it, suppress any feelings about it, and ask yourself:”Will this ever have a next action?”
a. If the answer is “Yes” put the document into “To Scan” and then go back to “IN” and repeat this step.
b. If the answer is “Maybe” then put the document into “To Scan” and then go back to “IN” and repeat this step.
c. If the answer is “No” then put the document in “Recycle” and then go back to “IN” and repeat this step.
Once your “IN” box is empty, or your “To Scan” box is full (whichever comes first) then take another rest. At least 90 minutes to let your brain reset.
When you come back, move the “To Scan” box next to your ScanSnap. Take each document out one at a time. Put the document into the ScanSnap, push the blue button. When the document is finished scanning, either put it in the box labeled “Recycle” or the box labeled “Precious” if the document needs to be saved.
Once your “To Scan” box is empty, take the rest of the day off. Manage your expectations. One block of GTD work. One day. P-a-c-e yourself.
Go back to Step 15 if you have more papers to process. And repeat Steps 15-20 until all the paper in your life has been recycled or captured in the box marked “Precious”
Take the rest of the day off. Manage your expectations. One block of GTD work. One day.
Once you have all the paper in your life captured in Evernote, the next step is to get your desk clear. Everything off. No pictures. No teddy bears. No momentos. Nothing on your desk in your field of view as you work. In particular, no pictures of faces in front of you where you work. Your brain will work processing faces without ever shutting off. One student has commented to me that this HUGELY reduced her fatigue.
a. If you don’t have a real desk. Get a real desk. No substitutions, kitchen tables do not count. Floors do not count. You need a big space where you feel pleasure when you work. Go to IKEA’s “As Is” department and buy returned legs, tabletops, panels, conference tables. And modify to taste.
b. Go to Amazon and get a monitor arm, wireless keyboard, and wireless trackpad or wireless mouse, to transform your desk back from being a giant monitor stand cluttered with paper, into being a brain’s desk that facilitates work. This is the most disregarded step in my instructions. But, it REALLY HELPS. So give yourself a leg up and try investing in your desk.
Once you have a clear desk, and all your paper captured in Evernote, it is time to take your first “After GTD” desk picture. Put the “Before GTD” desk picture into Powerpoint on the left. And the “After GTD” desk picture on the right. Then save the PowerPoint slide where you won’t lose it. Here is my before/after PowerPoint slide:Before/after pictures are important. Before/after pictures are hope. Elephant food if you are a Heath & Heath SWITCH: How to change when change is hard fan.
Next step is time to clear your mind. Most people have 300+ projects in their minds when they start GTD. Sitting down to scrape these out of your head and on to paper, is terrifying. But once you start, you won’t believe how it lightens your mind, and how the time flies.
a. Sit down and write down every open loop you can think of on 3×5 cards. Go for 100 at your first sitting.
b. Once you get to 100, take the rest of the day off. Manage your expectations. One block of GTD work. One day.
Repeat step 23 until you don’t have anything else on your mind.
Once your mind is clear, then lay the cards out on your desk. The bigger the desk, the easier this is. Then
a. group the cards together in clumps of similar stuff.
b. These clumps are your projects.
c. Organize each project’s clump into a neat stack on your desk. Once you have all the cards into their natural clumps d. put rubber bands around each stack of cards/clump.
e. Take the rest of the day off. One block of GTD work. One day.
At this point, your mind is clear. You have all your ideas where your brain knows they won’t be lost. Now you have to decide how you want to move forward with GTD.
a. Whether you will go all analog, using manila folders - one for each project - with 3×5 cards in them, and keeping a master project list by hand.
Or …
b. Go digital OneNote to organize your projects. Creating project lists with [[projectname]] and then transcribing your 3×5 card notes for each project, into next actions. *Note* your 3×5 cards are likely not Next Actions in the David Allen sense. The step of taking a thought on your mind that you are feeling guilty about, and then compiling it into next actions as you transcribe the card into OneNote is not wasted effort.
c. Using Evernote to manage your projects as well as your reference files. Create a “Projects” folder in Evernote. Then, create a sub folder for each project. And then either transcribe your 3×5 card into next actions as in b. above with OneNote. Or, by scanning your 3×5 cards into Evernote.
d. Using OmniFocus (if you are a Mac person). OmniFocus is powerful … and dangerous. OmniFocus is probably the highest fidelity GTD software system. But you may experience over-organization from OmniFocus with the consequence your brain refuses to use the system … as I did. However, if you are a sales person, think hard (try) OmniFocus because David Allen has refined the GTD system to work for sales people. Nobody works harder than sales people, you will need all the system you can get to do your job well.
e. Some kind of hybrid system. My GTD trusted system is broken up across paper and electronic tools. This is less simple to explain. But, my brain will use it. I tried OmniFocus in a monolithic trusted system (27 d.), but I hated sitting down to my desk. So I had to retreat to paper.
The Goal
The above 28 steps are the process that I’ve seen work the best for the about 200 people I’ve helped boot-up GTD. Personally, I’ve stayed on the GTD wagon because I have a ScanSnap and Evernote. These tools make it easier to capture information correctly, than to live in a mass of disorganized papers. My love of 3×5 cards and manila folders gradually gives way to electronic project organizing as a project lifts off. The cards and folders are early stage capture tools for my projects.
Your mileage will vary. My tools will not be perfect for you. I’ve changed my tools so many times (except Evernote and the ScanSnap) that I’m proof that one size does not fit all. Single design does not even fit one person all the time. But the point is to build your system gradually, experimenting, testing, reflecting on how it *feels* to your brain. Does it allow you to swing, to stop constantly worrying you’ll forget something? Does it *feel* fun to work with? Does your system cut your procrastination and guilt? Are you trying to do too much, too fast?
Incompleteness
This process will not get you 100% to the way David Allen’s system. But, it will get you to the nearest local maxima of GTD productivity and GTD swing. Once you go paperless you will discover what a drag paper is. Your Evernote reference filing system will allow you to find everything … in 15 seconds. Evernote *secret* = Evernote does text recognition on all your documents. All you have to do is think of two words that would only be on the document you need, type them into Evernote and *zap* the document is at your finger tips.
Once you have all your projects in some kind of place (manila folder, OneNote folder, Evernote folder) you will feel release of stress. An emergency department doctor who I dragged kicking and screaming to Evernote and a clear desk said to me “I can’t believe how much less stress I’m feeling now.” After my first week of GTD my wife said “Why are you so happy?”
Notes
When doing a mind sweep, I do not follow David Allen’s two-minute rule. This is the only time in my GTD life, that I don’t DO anything that can be done in 2 minutes, and instead, just write down the 2 minute tasks. After my mind is empty, it is easy to take the 2 minute pile, and burn through it. And, it gives you quick wins to keep expectations at bay.
I’ve found that three steps in the above process are sticking points:
a. Getting the scanner out of the box and functioning. I’ve had to drive to people’s desks and make the scanner go for them because of this “out of box” sticking point. See RestartGTD post abomination of deskolation for case study.
b. Getting the desk clear. Again, I’ve found it easier to drive to desks and show people what their desk looks like REALLY EMPTY. If you contact me ([email protected]) for advice. The first thing I will say is “Tell me about your desk?” and what you need to say back is “I got EVERYTHING off it.”
c. P-a-c-i-n-g yourself. Manage your own expectations. Do not change everything in your organizing, all at once. Know that change will take t-i-m-e. Match building your GTD system, to when you have blocks of fresh energy. Energy is temporary. Read that sentence again!
This step-by-step puts getting your computer infrastructure working as a pre-cursor to reading GTD. If you don’t put infrastructure first, you will try to get Evernote and your ScanSnap working while you are tired. Not a good strategy.
When starting out, keep two separate kinds of files: (a) Project Files, and (b) Reference Files. Consciously separating the two kinds of files can prevents confusion. *Aside* I suspect that I *resist* using Evernote for project files because my brain likes having physically separate project and reference files.
Reference filing is a capstone skill of getting into and staying with GTD.
Having a real desk is a capstone skill of getting into and staying with GTD. Clutter is the enemy, and there is more clutter on desks than everywhere else in your life. Win the battle against clutter, GTD will work.
Managing expectations is a capstone skill of GTD. One block of GTD work. One day. Is the rule.
Experimenting with new tools, selectively, is a capstone skill of staying with GTD.
Bill’s *Trick* for using OneNote Like Evernote to GTD
In my previous review of OneNote I mentioned that Evernote’s canvas was superior to OneNote because I could just insert objects (pictures mostly) and the canvas would make space for the object. I discovered last week, that OneNote does the same thing … as long as you do not get carried away. This post is a four step tutorial on how to make a OneNote page, behave.
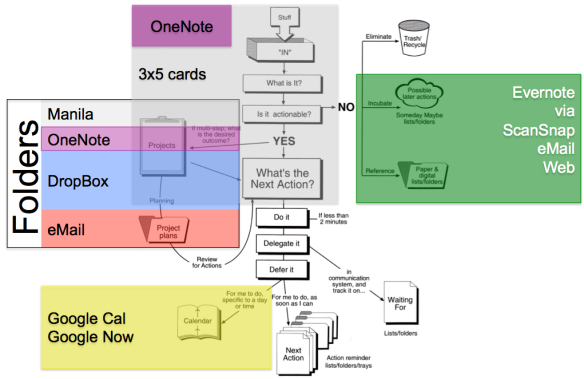
Step 1: Create the page
From a GTD perspective, it is SO EASY to create a OneNote “Project” page, and start new projects from there, I’ve become pretty GTD-addicted to creating pages from m project list. Start with a blank project list like this:
Then type in the project name beginning with [[ and ending with ]]:
When you enter the 2nd ] your linked project page will be created and will look like this:
Step 2: Go to the project page
Go to the project page and click at the end of the project name so your cursor thinks you are going to modify the end of the project name:
The trick is to hit *enter* at this point. Cursor will jump down below the title of the project, and will wait for you to type something. Should look like this:
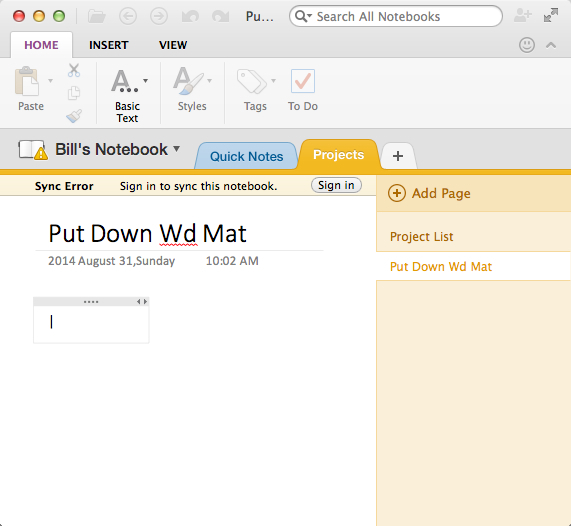
Step 3: Type Something
Type something like a Next Action (or my Next Action post), the text box will resize automatically. Or, you can drag the text box to be as wide as you want. Will look something like this:
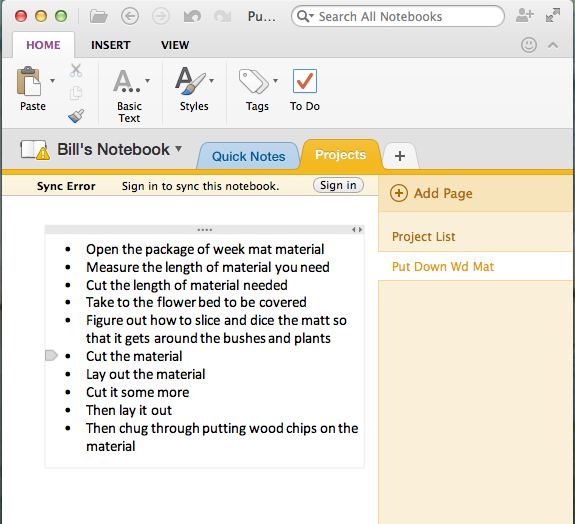
Step 4: Stay inside the text box
Now all you have to do to have an Evernote-like OneNote, is to NEVER ENTER ANY DATA OUTSIDE THE TEXT BOX. For example, maybe you want to put a picture of the weed mat after one of the next actions. Just create a new line in the list, and then drag the picture to the new line.
Summary:
If you use a text box inside OneNote notes, you can make the OneNote canvas behave just like Evernote’s canvas. New insertions add their own new rows, and you don’t have to use one note’s “add space” tool.


