The first post on this blog, 2011/12/31 GTD Desk 2.0, had as its centerfold, a 2008 24″ iMac on a monitor arm with a hideous array of accessories mounted out of sight. Flashback:
2008 24" iMac on VESA adapter (anyone want the VESA adapter?)
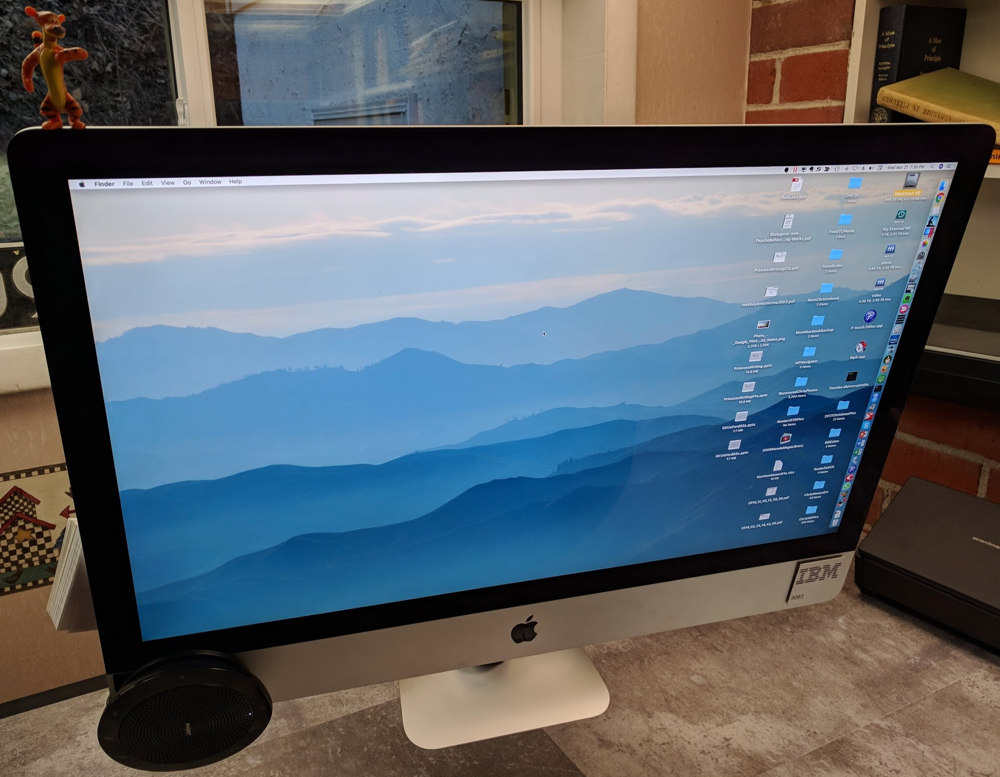
The purpose of this post is to update post 001 (today’s post is 185) over seven years, and two iMac generations.The previous two posts on GTD Desk 5.0 covered desk resurfacing, and a sit/stand upgrade.
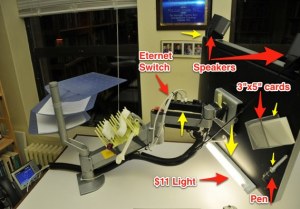
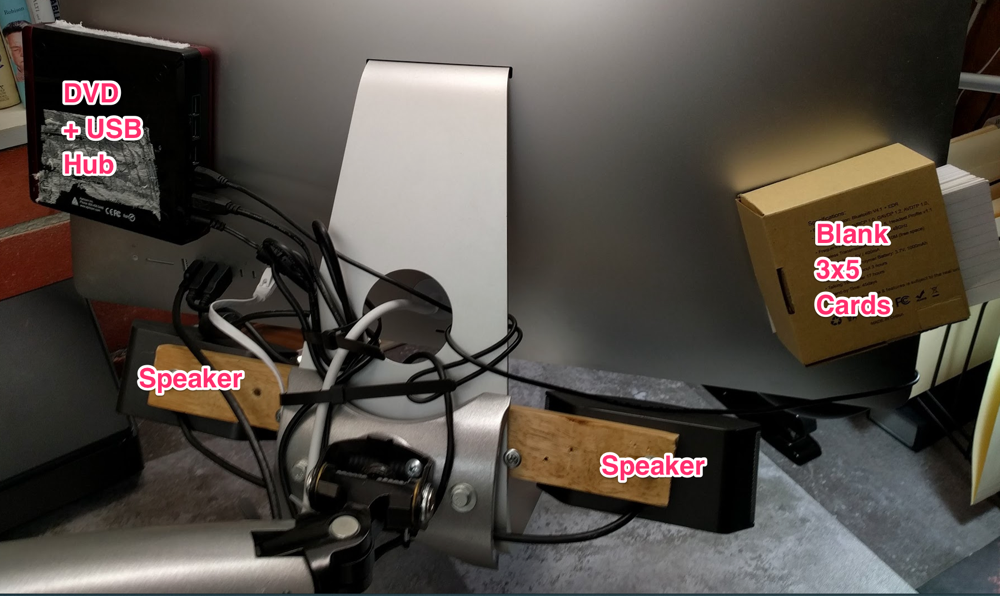
However, in addition to these upgrades, I have also graciously accepted Apple’s offer to take my money for a new iMac (first full iMac refresh in 6 years!) when I bought a 2017 iMac. The 5.0 update adds an external DVD drive on the left, with a 4 port USB hub, a board which allows speakers to be mounted to the iMac stand, and kept for the most part, out of sight.
Finally, on the right is a cardboard box that holds blank 3×5 cards to keep one piece of paper, available to capture ideas. The entire iMac back, remains a hideous melange of cables, cables, cables. But, I don’t care, I don’t have to look at them. Out of sight, out of mind … like water. :-) The best innovation of GTD Desk 5.0 is mounting of speakers up behind the iMac screen, angled down, to bounce sound off the desk almost invisibly. Step 1 bolt the speakers to board, step 2, tack the board to the iMac stand with two wide headed screws. Step 3 mount audio control on the base of the iMac, to make practical use of the impregnable iMac stand. Alas. But, mount a sound control on the base, and you can at least get SOME use out of it. Why not use the stand integrated into iMacs? Simple, because I need a desk, not a giant monitor stand. If you don’t have your monitors floating free, you don’t have a desk that can do rough organizing.
The final upgrade to GTD Desk 5.0 is the addition of the Jabra 510 speakerphone to the lower left hand corner of the iMac. With Google Voice and the Jabra, I have at long last recycled my office phone. More clear desk space!
After starting a new job in January 2017, I discovered the awesomeness of sit/stand desks. And since I was moving, and had the Perfect GTD Desk V4 in pieces, I decided to replace the fixed height legs with a sit/stand mechanism.
Most important = lift capacity of the mechanism, second most important = cost. Searching the internet while the moving van was crossing the country, I found StandDesk which has a 350 pound lifting capacity, and cost $429 delivered. I ordered my StandDesk from Amazon.com but alas, Amazon no longer sells StandDesk mechanisms.
Fear not, StandDesk sells the bases now for $399 without top. The telescoping mechanism is different, but no worries, the lift capacity increased from 350 to 400 pounds.
Why does lift capacity matter? Because I hang a 27″ 2017 iMac from an arm, iMacs weigh one pound per diagonal inch of screen size, so the iMac with USB hub, Bose speakers mounted hidden, along with the floor tile re-covering of the desk, Scanner on the desk, and heavy computer building projects, make me want max lift capacity.
After After:
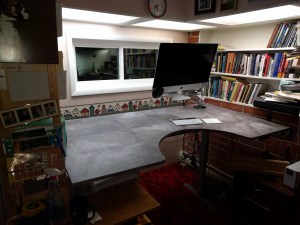
The work surface has a minimum height of 24.5″ and a maximum height of 50″ which is way more flexibility than my at-work sit/stand desk.
Next post will be “Perfect GTD Desk V5.0 Upgrade! - Part 3 Back of the iMac” where I reveal how I finally moved my speakers out of sight, without impairing sound. Two bolts, four screws, one piece of wood, and ZAP, sight-lines clear.
This post will step-by-step Macintosh users through getting our most excellent ScanSnap iX500 scanners, to scan directly to our smart phones.
This journey began 2 posts ago with the discovery that when you set up ScanToPhone the first thing Fujitsu’s programmers want you to do is to update the firmware on your scanner. Then, 1 post ago I explored why anyone would want to scan directly to phone. Mostly, I just decided to close my eyes and try setting this up.
OK, this tutorial will assume that you have gone through how to update your firmware step by step and you now have your iX500 scanner all cutting edge and ready to go.
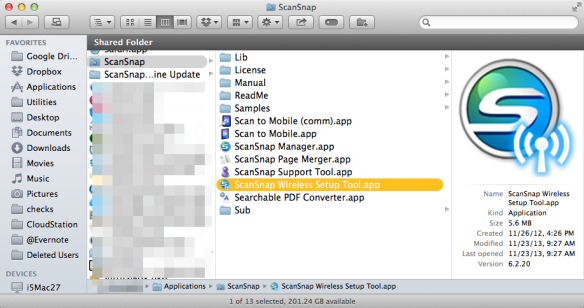
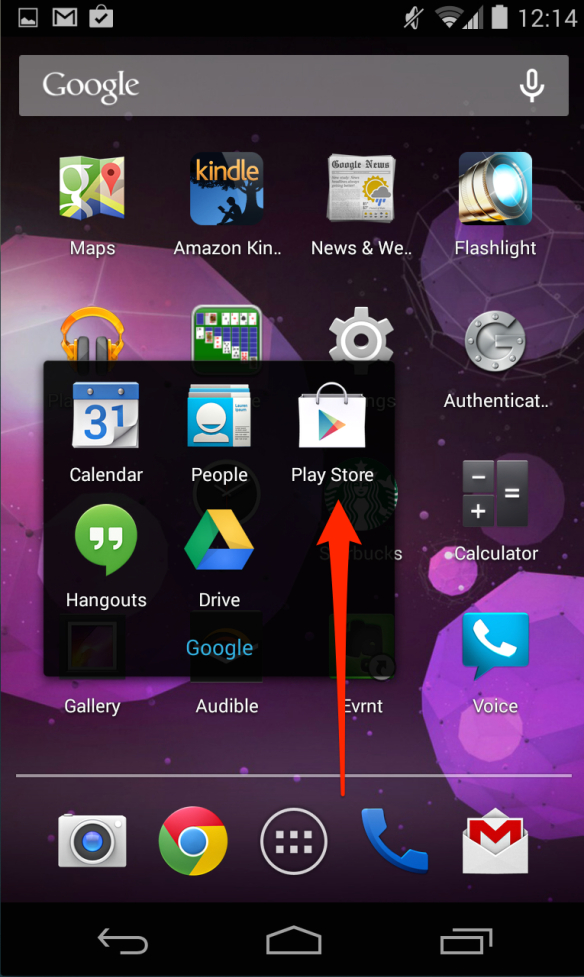
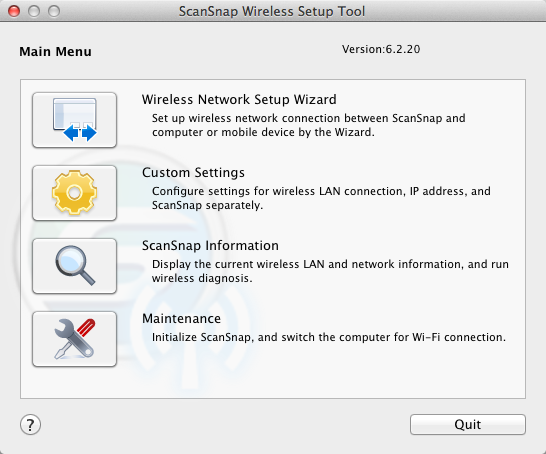
Step 1: Run “ScanSnap Wireless Setup Tool.app”
Go to /Applications/ScanSnap/ScanSnap Wireless Setup Tool.app and double click. Your should see this in your /Applications/ScanSnap folder:
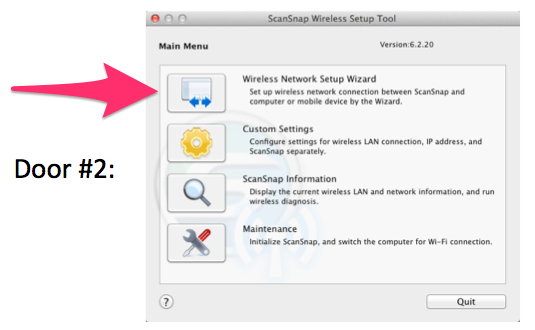
Step 2: See which door opens up. Door #1, Door #2, or Door #3
If you see Door #1 this is good! You either have a Ph.D. (license to be absent-minded), you have not turned on your ScanSnap iX500, or both. Next action? Open the ScanSnap iX500 so that it turns on.
Fantastic, you are ready to implement your X clicks and to begin scanning from ScanSnap to phone. **Note** If you saw Door #1 and then opened your ScanSnap, you will see Door #2 in about 2 seconds.
Step 3: Click “Wireless Network Setup Wizard” in Door #2
… and then follow the dialogs along …
… and find your network and click on it, then follow the dialog …
… then enter your security key and follow the dialog …
… then you will be informed that your ScanSnap is successfully connected, click on OK to continue …
… you will be shown a dialog like this to indicate you have successfully connected your ScanSnap wirelessly …
… next you will be asked if you want to scan to your mobile device (phone), click “OK” …
… after you click “Yes” on the previous dialog you will see a new dialog that will send us from configuring the iX500, to installing Fujitsu’s phone app …
… so go to the iOS or Android store and download the free ScanSnap program to your phone …
… once you have ScanSnap Connect Application installed on your phone you can click “Yes” on your Mac, (for having installed the app) and then click Continue …
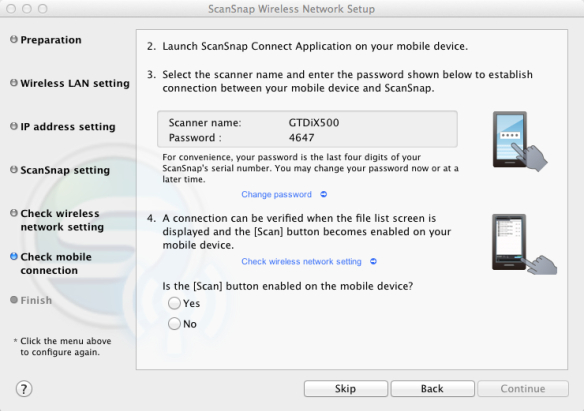
… the next dialog you see shows you two critical facts:
(1) Scanner Network Name and = GTDiX500 for my scanner (2) Scanner Network Password = 4674 for my password <- write this down
Now you are ready to open the ScanSnap app on your phone (see Appendix A for step by step instructions for installation on an Android phone) …
… and then click “Yes” and “Continue” in the dialog …
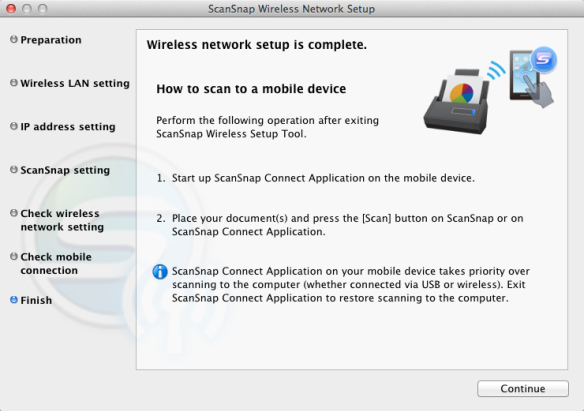
… and the Macintosh part of setup is almost done! …
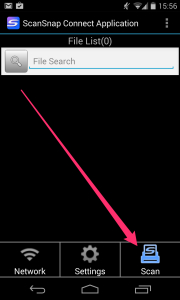
… Click finish and then the Macintosh side of ScanToPhone setup is complete. Now pick your phone up and open the ScanSnap Connect App, then your phone will find your ScanSnap and ask you for your four digit password … it should look like this …
Whoa, where was that password set? <<Panic>> Four digits? But, … I’ve got all my fingers … I’m confused!
Fear not! Setups involving two devices, are the worst. So take a chill pill and scroll up three dialog boxes. My password is 4647, your password will be different, but will be in that same dialog. Now wait, you wrote your password down right? :-)
… enter your password phone your app screen will look like this …
… **note** the blue scanner icon in the lower right-hand corner. This is the indicator that your scanner is read to scan to your phone. Put your business card into your iX500 and then touch the blue icon on your phone …
… like magic, your phone will have a PDF scan of your business card. Mine looked like this …
… if all went well, you should be done and the happy owner of a ScanToPhone new core competence. For maximum payoff, use this capability to “Wow” your peers and make them say “Whoa, I’ve never seen anything like it!”
Or, if this did not work for you, contact me, or at least vote on why it did not work below:
Enjoy!
Support RestartGTD by buying at Amazon with this link!
bill meade Data researcher seeking team see http://goo.gl/JkkEI8
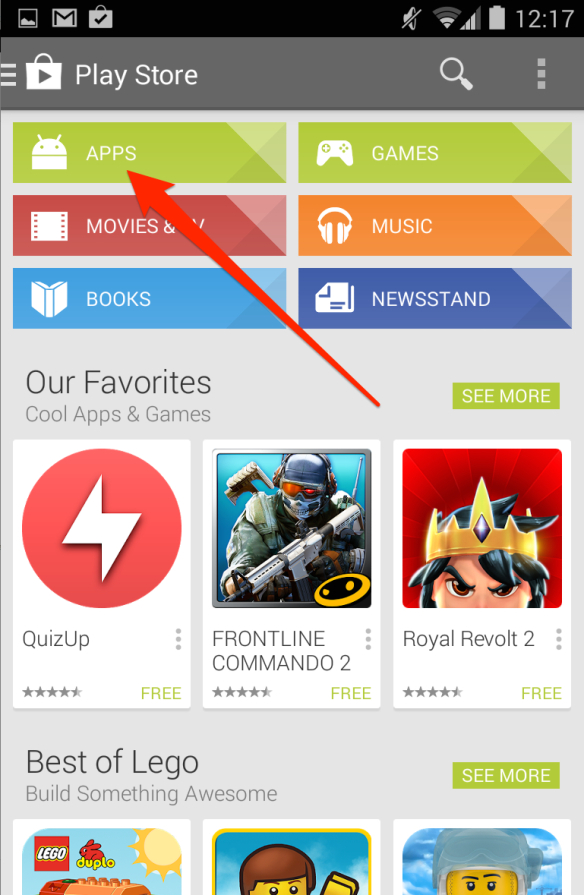
Appendix A: Installing Scansnap Connect Application on an Android phone
Go to Google Play Store:
… then click on “Apps” …
… then search for “ScanSnap Connect Application” and choose “INSTALL” …
… the app will then install …
… and once installed will give you the option to open or uninstall …
This article will show Macintosh users how to set up their ScanSnap iX500s to scan directly to their cell phones.
I know, I know, you are thinking “Why would I want to do that?” I’ll tell you: “I don’t know.” But, just because you do not want to scan to your phone, does not mean that you do not need to scan to your phone.
I’ve learned the differences between wants and needs many times with computer technology:
Before I used email a colleague said “I’ll show you how to use email!” to which I replied “Why would I want that?”
Once I was using email, AOL instant messenger happened, which made me say “Email already does that! Why would I use AOL messenger?”
When spreadsheets game out, I said “Why would I want a spreadsheet when I can program in BASIC?”
You get the idea. About the time Lotus 123 Version 2.0 came out with regression analysis built in, I began to get with the program and look at new features as discovery opportunities rather than as opportunities to demonstrate my instinct to fixate on the fossilized residue of what I already know. I still relapse frequently, only adding a facebook account in order to access the facebook accounts of my children. But in the main, I “get” that change is the dance in the dealing with computers.
Use Cases:
What are the use cases for putting information on your phone? Does anyone DO THAT?
:-)
Rule of three: There must be at least three compelling reasons for using ScanToPhone, for Fujitsu to create the capability. I don’t count “Because it is cool!” which no doubt was used on the ScanSnap product manager by the firmware programmers.
Showing off. Like the remote open and close doors on a mini van, there is “demo value” in new features like ScanToPhone. Getting your peers to watch you demonstrate new information technology, and then hear them say “I’ve never seen anything like it!” Is dollars in the pocket, and not just for Apple. Nice idea Fujitsu!
As if! It is possible in the not distant future, that people will carry all their stored information (health records, Evernote accounts, photo libraries, etc.) on their phones. As storage technology approaches atomic resolution limits, the amount of “stuff” we organize, carry, access, and forward, on our phones may become very large. Again, Fujitsu is there ahead of the rush.
Thumb in the dike. One can argue that 90% of the documents that we access are created or are locally available on computer (or LAN). ScanToPhone then can be rationalized as being a way to get the remaining 10% of our information (since we are on the internet, pictures of cats for example) on our phones where the pictures can be accessed while we are in “meat-space” with other humans. So, ScanToPhone is arguably the thumb in the 10% leak in the dike of 100% of digital information available everywhere at all times.
Next post, Use your ScanSnap iX500 to scan to phone: Part 2 How?
Support RestartGTD by buying at Amazon with this link!
bill meade Data researcher seeking team see http://goo.gl/JkkEI8
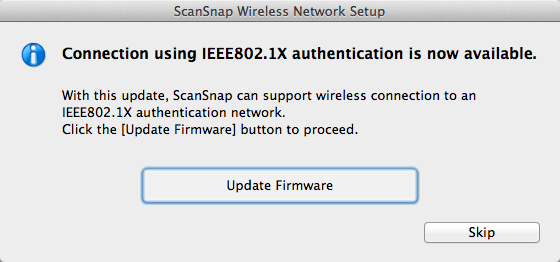
Just a quick post to end the week. I’ve been working on a post showing step by step how to enable the ScanToPhone capability of the ScanSnap iX500 scanner. In the process of setting up ScanToPhone. The *first* thing that happens when you start enabling the ScanToPhone feature is that your ScanSnap’s firmware gets updated.
Now, having worked at HP in LaserJet-land, I’m always for firmware upgrades because they are the king. Upgrade firmware, you can do more, do faster, do with less heat, do without hassle, etc. New Firmware = Goodness.
In fact, I have checked for firmware upgrades for my iX500 at Fujitsu, multiple times, but have not seen them. Once I began setting up ScanToPhone *bam* first thing is a firmware update. Here is how (on the Mac):
Step 1: go to your /Applications/ScanSnap/ folder and click on “ScanSnap Wireless Setup Tool.app”
The first thing you will see after you open this program is:
As I said, I’m a sucker for updating firmware. Whenever I see a dialog button saying this, I click it. When you click “Update Firmware” you will then see a thermometer dialog that looks like this:
And when you look at your iX500 you will see that the panel light is indeed orange as indicated in the dialog. The dialog will progress for about 3 minutes, and then the panel light will turn blue and you’ll see a dialog like this:
And then you will see the gateway dialog to the ScanToPhone setup process that looks like this:
And you are done. Your firmware has been updated in your ScanSnap iX500!
Enjoy!
Support RestartGTD by buying at Amazon with this link!
Kevin Smith has a nice list of 14 tricks to get more out of Evernote over at Business Insider. I love web sites like this where someone carefully takes one simple feature or problem that real users experience, and then explains/solves. Another web site like Business Insider only for Mac users, is Paul Horowitz’s http://osxdaily.com/.
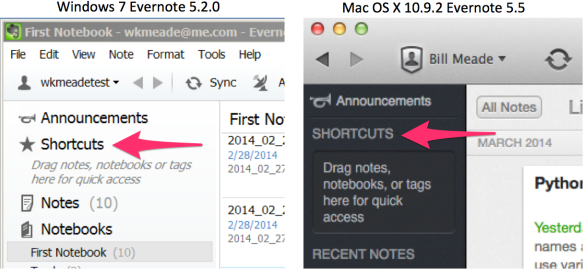
I recently discovered the simple pleasure of a trick in Evernote: Shortcuts. Shortcuts are the first menu item below “Announcements” at top left in the evernote client. Here is a view of both Windows and Mac Evernote clients showing their “Shortcut” areas:
To use shortcuts in Evernote, all you have to do is drag the note or folder that you want to quickly access, on the word SHORTCUTS. For example, I’ve been having a lot of fun with Python and the statistics program R of late, and have developed cheat sheets of all the names, functions, methods, etc. In this screen snap you can see that I dragged my cheat sheets for R and Python and dropped them on SHORTCUTS.
Once you have a document in your SHORTCUTS you can open it in a separate window with a double click, or make it viewable within Evernote with a single click.
Notebooks work the same way, drag the notebook and drop it on SHORTCUTS and it will handy. Notebooks open the notes in a notebook inside Evernote, no matter whether you single or double click.
Enjoy!
Support RestartGTD by buying at Amazon with this link!
bill meade Data researcher seeking team see http://goo.gl/JkkEI8
Mike Koehler “called me” on assuming that Mac programming teams are smaller than Windows programming teams at Evernote in Think Like An Evernote Programmer yesterday. And while he may be right (see my comment on Mike’s comment) I’ve come to realize that another part of being a computer user from “the old days” of microcomputers is that as a Mac user, I carry around a market-share-based inferiority complex to Bill Gates. :-)
As Morpheus would say, my “residual self image” as a Mac user is as a second class citizen to Windows. So, when I noticed that Windows Evernote has “Import Folder …” function, and Mac Evernote does not, I began to feel a little bit “Second Class Citizen.” Thankfully, I’m NOT bitter about it!
We Can Fix That!
So, today’s post is about providing Mac Evernote with an equivalent to the Windows “Import Folders …” function.
The *trick* is to use an Automator script. I found the script I’m using at Veritrope.com. Here is how it works:
Go to http://veritrope.com/tech/evernote-desktop-folder/
Download the script by clicking
Unzip the script which will create a folder with 2 files in it.
Evernote Folder Action.scpt
EvernoteDrop.png
Copy “Evernote Folder Action.scpt” to /Library/Scripts/Folder Action Scripts folder.
*Note* to find this folder you need to
Go to your desktop by clicking on it
Hold down the Option Key, then click on “Go” command at the top of the screen. Here is the menu you will see while you hold down the Option key: If you let go of the Option key, the “Library” menu item will disappear. Don’t worry, just hold down the Option key and “Library” will re-appear.
Click on Library and then click on /LIbrary in the 2nd column, then /Scripts, then /Folder Action Scripts
Next, create a folder on your desktop (I used @Evernote as the folder name as recommended by Justin the script’s author).
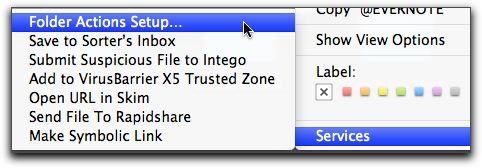
Next control-click (or right mouse button click if you have right clicking enabled) your @Evernote folder and select /Services/Folder Actions Setup …
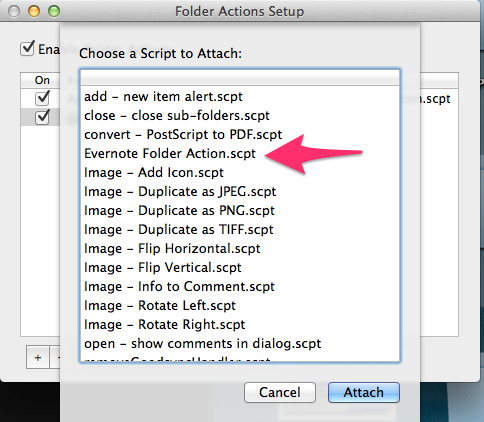
You will then see a list of folder action scripts. Click on “Evernote Folder Action.scpt” and click “Attach”
Next you will see two columns, on the left a column with the folder you created on your desktop to receive files bound for Evernote. And on the right, the script attached to this column to import and then erase files.
You can now close the Folder Actions Setup dialog and test whether the script is working.
Put a file in the @Evernote folder, and see if Evernote gobbles it up!
Enjoy!
Support RestartGTD by buying at Amazon with this link!
bill meade Data Scientist seeks Data see http://goo.gl/JkkEI8

 2008 24" iMac on VESA adapter (anyone want the VESA adapter?)
 Finally, on the right is a cardboard box that holds blank 3×5 cards to keep one piece of paper, available to capture ideas. The entire iMac back, remains a hideous melange of cables, cables, cables. But, I don’t care, I don’t have to look at them. Out of sight, out of mind … like water. :-)
 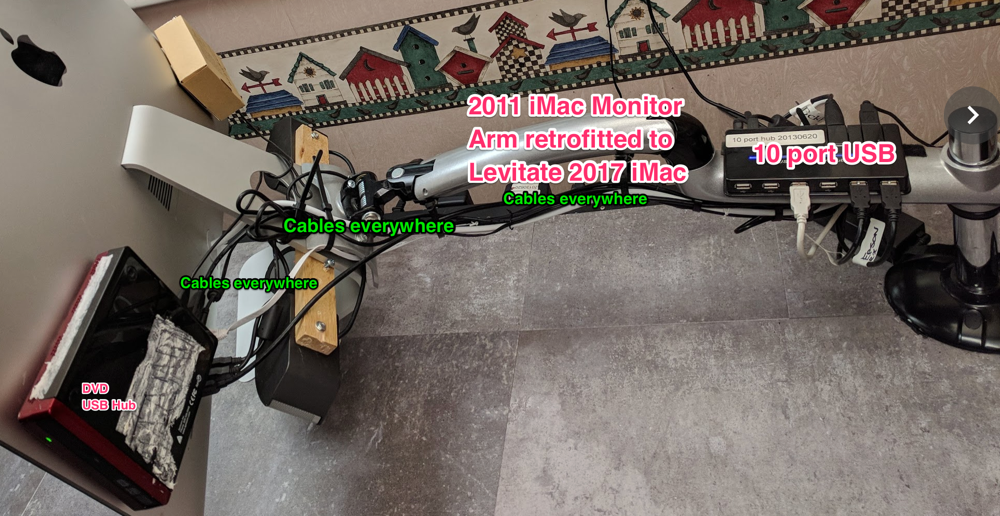 The best innovation of GTD Desk 5.0 is mounting of speakers up behind the iMac screen, angled down, to bounce sound off the desk almost invisibly. Step 1 bolt the speakers to board, step 2, tack the board to the iMac stand with two wide headed screws.
 Why not use the stand integrated into iMacs? Simple, because I need a desk, not a giant monitor stand. If you don’t have your monitors floating free, you don’t have a desk that can do rough organizing.


