This is the 2nd post in a 2-part series on Evernote 2 factor authentication. The first post (here) explains what 2 factor authentication is and why it is good. And then this post points you to a Rick Broida eight step set-up procedure for Evernote’s 2 factor authentication at PC World, and then … adds a few instructions where I *suspect* people might experience confusion.
Step 1:
Hardest part of any step by step is the first step. Rick’s first step is to sign into your Evernote account. If you do not yet have an Evernote account, you will need to go to Evernote and sign up, before you can turn on 2 factor authentication. Click here to do so.
Also, you will need some way to read a QR code on your phone. So if you have an Android phone go here and pick a free QR Code reader and install it on your phone. If you have an iPhone click here.
Step 6:
Rick’s step-by-step flows smoothly until he gets to step 6 where account verification rear’s its head.
Account verification is simply using the 2nd factor in 2 factor authentication. Evernote has set up two ways to verify your identity when you open Evernote in a fresh computing environment (new computer, new phone, web-surfing-in-from internet cafe, etc.). Either authentication method you choose, you will begin the authentication process by opening Evernote and seeing this:
Way1: text messaging.
If you choose text messaging to obtain your 2nd factor, when you attempt to log into Evernote, you’ll see the above screen, and then wait with your phone in hand, to receive the 6 digit code.
Way2: using Google’s app for authentication (for Android, iOS, and Blackberry).
If you choose to obtain your 2nd factor via a Google app (which I showed in the previous post) you will need to pick up your phone, start the Authenticator App, and then copy the 6 digit number for Evernote from the phone into the dialog box on the screen above. Here is what I see (because I use 2 factor authentication on Gmail as well as on Evernote):
Both ways produce the same 6 digit code, no big deal. Only difference is how you receive the code.
Discussion:
Day to day, using Google authenticator on your phone is the best way to go because:
Google’s app is *instant* while text messages takes extra time
Text messages have a likelihood of disappearing in direct proportion to the urgency with which you need to access your information.
So, the more urgent it is for you to get into Evernote, the more likely your text authentication code will be lost.
Authenticator apps are clean, you open them and look at your code. Text apps are spaghetti monsters.
BUT…
Evernote has positioned text messaging as a premium service. Wait, what? Perhaps texting is the premium service because if you use text messages you will not have to install Google Authenticator on your phone? I don’t know. My advice is to set up Google Authenticator on your phone. How?
Setting Up Google Authenticator for Evernote:
Step 1: ON YOUR COMPUTER Go to Google’s Authenticator install page and read the step-by-step for installing Google Authenticator on your phone (Android, iOS, Blackberry).
Step 2: ON YOUR COMPUTER Log into Evernote via web browser, go to account settings, security summary …
Step 3: Click on Google Authenticator and you will see this dialog box:
then click on the appropriate operating system for your phone. Here is what I see when I click on Android:
Now, take a picture of the QR code (*Note* This QR Code will not work for you, each QR code is specific to one Evernote account). And your Evernote 2nd factor authentication key will be added to your Google Authenticator account.
THERE!…
OK, I *think* I’ve got all the confusions to setting up 2 factor authentication in Evernote, covered. If not, email me ([email protected]) and let me know what I missed!
The efficiency/security tradeoff has changed! Well for me at least. Until now I’ve deliberately risked using Evernote as my reference filing system, knowing that if someone guessed my password I would be hosed. The “Evernote deal” seemed to be capturing the value of increased efficiency now, at the price of possibly getting hacked later.
This “Everyone has been hacked. Now what?” attitude is calculated. Our IT infrastructure is what it is. I may be hacked and not know it. As long as I can use Evernote to keep track of my stuff, do I really care? If I start obsessing about my net-connected infrastructure too much, the profit of using computers will quickly become a loss. I mean it is pretty clear why all my computers have been so slow all these years: the NSA! Hacking! Botnetting!
Locks were invented to keep honest people honest. Determined criminals find ways in.
So I’m excited to start trying out Evernote’s two-factor authentication: A padlock for Evernote.
What is it?
Two factor authentication is one step up in security, from using username+password protection. In two factor authentication your password is used same as normal (the username+password is factor 1 of 2) and then a second special password is used in addition (the special password is factor 2 of 2).
The idea is that while a criminal can easily guess your username from defaults (Unix “admin” or Windows “Administrator” or your email address), and then either steal or “break” your password. A criminal will need to go to a whole new level of effort in order to get your phone. What makes stealing the phone essential is that the special password changes every few seconds on the phone. But I am digressing into the next question about 2 factor authentication: How does it work?
How does it work?
The special password generated on your smart phone is dynamic. It changes every 60 seconds. To find your dynamic password, you use the Google Authenticator app on a smart phone. Here is what Google authenticator looks like on my smart phone:
So when you need to authenticate into Evernote, you start Google Authenticator, and then you see your password of the current moment. Here is what I see on my Google Authenticator:
The red arrows point to countdown timers showing you how much longer the 6 digit passwords will work to authenticate you into Evernote/Google.
So, because the passwords are constantly changing, a casual criminal will have to obtain your phone, and then break into it (you do have your cell phone password protected don’t you :-) to log into your account.
QUESTION: Do I have to authenticate every time that I start Evernote on my computer?
ANSWER: No
We now come to the how does it work … hands and knees perspective. In a wonderful BYTE magazine article in 1989 Peter C. Olsen articulated a theory of how to hire programmers: send them to Africa and tell them to hunt elephants, and then watch the algorithm they use.
*Note* that assembly language programmers execute the basic algorithm … on their hands and knees. So in the rest of this article I’m going to emulate an assembly language programmer in trying to go slow, be very careful, to take each step one at a time.
What were we taking about? Oh yes, authentication. You will have to authenticate to Evernote when:
Case 1: Logging into Evernote from the web. Here is the log-in screen you’ll see using evernote web: Note that you can check the box and not have to re-authenticate for a month on the computers you use to access Evernote web. But, if you log into Evernote from friends computers, you will have to have your phone available from now on.
Case 2: Setting up Evernote on a computer for the first time (duh). Here is what the dialogs look like on a Mac:First, the normal dialog asking for factor 1 (Username+Password) Next, a pop up dialog asking for the factor 2 (from Google Authenticator on my phone): Note that the new dialog asking for the number gives you a hit with a phone icon with Google Authenticator’s thumbnail graphic. You type your 6 digit number in here and then you enter Evernote as usual.
Case 3: After you log out of your Evernote account on your computer. *Note* I had never logged out of my Evernote account before playing with Evernote two factor authentication. So this will likely be no big deal. After enabling two-factor authentication I tried to trick Evernote into annoying me by asking for authentication. I quit Evernote, restarted, re-booted, etc. and Evernote did not ask me to authenticate. *Note* two factor authentication is smart but not paranoid.
Case 4: After you log out of Evernote on your spouse’s computer. *Note* anything that can go wrong will. If you turn on two factor authentication and share your evernote account with someone, you will have to authenticate for them on their computer, or they will be locked out of Evernote at the most inconvenient time. Plan on it.
This is all the cases I can see where Evernote users will have to authenticate. Note, if I have missed a case, email [email protected] and let me know, I’ll add your case to this list.
What is the strategy?
2013 was the year of security on the internet. We are all red queens now, our security skills and infrastructure are going to have to run, in order to keep us in a place where computers remain profitable to use. The strategy of introducing two factor authentication is a step in the direction towards keeping computing profitable for its users.
Will computing ever be secure? Probably not. There are too many evil geniuses. In a way the deal of using computers will always be a bet on the value of using technology today, against the eventuality of being hacked. Should this deter us from using two factor authentication? No. We are stupid not to use very slick, very simple tools that at the least, will shift bad hackers to softer targets.
What are the objections?
Objection: “I will have to authenticate every time I use Evernote!”
The reality is no. You will have to authenticate to Evernote every time you change the computing environment where you are using Evernote.
When you get a new computer.
When you log in to Evernote from a coffee shop or a friend’s computer.
Or when you give another person access to your Evernote data store.
Or when it has been 30 days since you last authenticated via the web.
*Note* I personally think that Evernote’s marketing communications on this two factor authentication objection, are confusing. If I were Evernote I would have said:
“Evernote’s 2 factor authentication works just like Google’s 2 factor authentication.”
The average user will authenticate about once a month during the first year they use 2 factor authentication.
Signalling that people can re-use what they learned getting Google authentication working, and that we are all marching into a common, reasonable, computer security future.
Objection: “Evernote two factor authentication is too hard for a normal person to set up!”
Probably false. Two factor authentication is a new use model for end users to learn. But, it is not if we end users will need to learn to set up two factor authentication. It is a when.
My next blog post will be a step-by-step on setting up Evernote two factor authentication on Macintoshes with Android phones (A totally recessive combination I admit!). Take a peek at that next week and see what you think. I’m a marketer, I set up 2 factor authentication. As any enginerd will tell you “If a marketeer can set it up, any user can!”
Objection: Anyone who steals my phone will have access to my Evernote account.
True … if you do not have your phone password set. :-) But, this is true even without two-factor authentication today! If your phone is wide open, and you have logged into evernote before you lose the phone, whoever has your phone has access to everything in Evernote.
Personally, I find Evernote on my Android to be about .6 of the way to a 1.0 that is compelling to use. My short term security plan with Evernote is to take Evernote off my phone.
Then, if someone steals my phone, they will have access to my special password (authentication factor 2), but will still have to guess/break my Username+Password. My theory is that when I notice my phone is gone (God’s way of telling you to get a new Android phone! :-) I’ll log into Evernote on my computer, change the password, and then log into my remote wipe on Android and zap the phone. Safe! Or at least, safe enough.
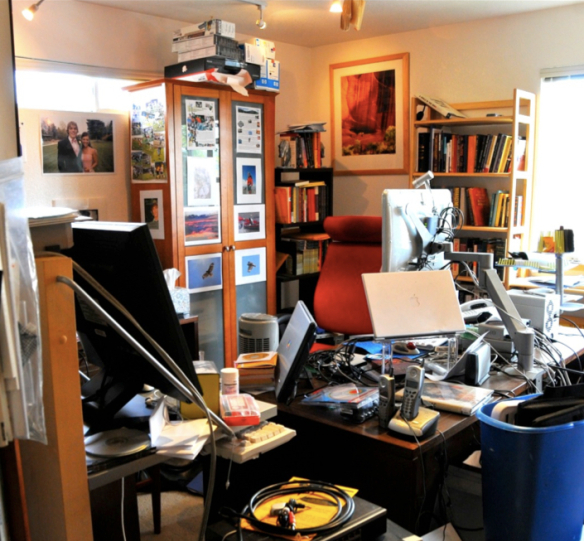
Perfect GTD desk +1 has been refactored once again. The above action shot displays several changes:
The monitor arm has switched ends of the desk
The cable access door in the Ikea Galant Conference Table has been filled in with wood
Gave up on mounting the Fujitsu ScanSnap on the monitor arm. It was cool to look at, but even cool stuff is clutter when you are trying to get work done. So I resurrected a shipping box and mounted both the ScanSnap and the Brother label printer on the box. So far so good, the box has not interacted with the chair legs.
Screwed the chair mat to the floor in the correct location with 4 2″ drywall screws. *Bam* no more wandering chair mat!!!
A 15.5″ semi-circle has been cut out of the center front of the conference table.
To create a 15.5″ radius, the conference table was slid forward until the back edge of the desk was flush with the Galant support frame.
I also slid the conference table surface to the right until the left edge of the work surface became flush with the left side of the Galant support frame. Here’s an action shot of the top left corner of the desk:
Power adapter moved from underneath the work surface to Galant table legs. With diagonally crossing cable ties it was simple to mount the power adapter and then slide it around to readjust it.
A cordless remote control light switch was added (mid right hand of the back of the iMac) controlling the keyboard light, the floor lamp over the desk, and the floor lamp in the corner of the office.
The “un-drawer” was shifted left and canted at a diagonal angle from lower left hand corner of the desk, to upper right hand corner. This removes the un-drawer from constant collisions with knees.
The purpose of the undrawer is to hold all the items that need to be at hand, but that clutter up the desk surface. I have stapler, tape dispenser, utility knife, a 10 port USB hub, flash light, and my Plantronic USB headset (wireless headsets suck!).
Action shots:
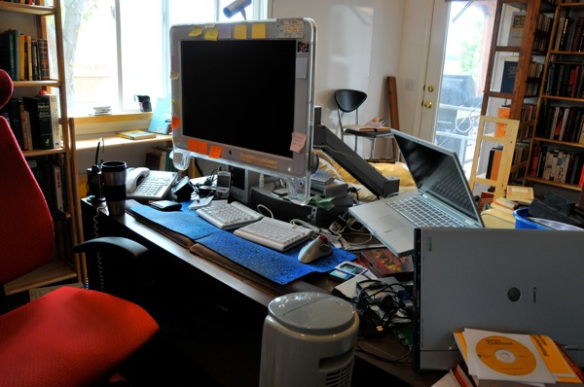
USB and power were added to the right hand end of the desk (form the semi-circle side of the desk). While I wanted usb and power plugs available, I need them to be out of sight, and they can’t be mounted under the surface without cables working their way out with gravity. So I turned both poet and USB adapters 90 degrees and mounted them with cable ties and cable tie anchors.
Action shot:
Results:
When I sit at my desk now, I’m in the semi-circle and can rest both elbows on the work surface at all times. I can also reach a much larger proportion of the work surface. I especially noticed the altered surface to volume ratio of the desk when I wiped it down with Windex to shoot the pictures in this blog post. Standing in the semi-circle it is easy to wipe down the entire surface of the table.
When people try the desk out, the first word that comes out of their mouths is “Game changer!” and then “I’m going to do this to my desk!”
The monitor arm now swings the iMac completely out of the way of the desk. Action shot:
And when sitting at the desk, it looks like this:
How To Section:
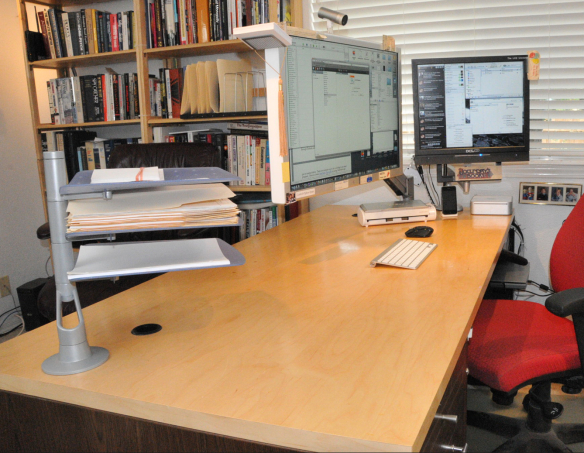
I started with this configuration:
This worked OK, except that it began to bug me that the cable access door in the work surface did not do anything. If a feature is not doing work then it is clutter by definition. So I stripped the monitor arm off the desk, removed the power outlet and the IKEA cable management baskets, and then the un-drawer which you can just see peeking out under the work surface by the red mouse.
Then I detached the work surface, and laid under the desk sliding the surface to different places and then seeing how it *felt* from beneath and above the desk. I had the idea to slide the desk forward and to the right to maximize the work surface overhang.
Next I started drawing curves on the surface of the desk. Because it is a whiteboard, I was able to draw, look, erase, redraw, and play with the shape in my mind. I like the idea of reshaping the desk with bulbous organic curves at the corners like this:
But, I was too chicken to cut very much out of the desk. Because desks are experience goods, you can’t think your way to what you will love. You have to generate and test. So I decided to start simply with a semi-circle cut out. Starting out the project looked like this (mr. batik supervising):
I decided to cut the cable access door plug from the semi circle and marked it with whiteboard marker. Then I drew a 15.5″ radius semi-circle from the measured center of the front edge of the work surface. Then cutting began with a jig saw and after the semicircle was cut out, I hustled the iMac back on to the left side of the desk this time. I don’t know why I tried the left side of the desk. Just happened that way. At this point the project looked like this
Once I re-mounted the iMac on the monitor arm, I was delighted to see that shifting the work surface forward created an opening between the desk and the wall, that allows the iMac to swing behind the far edge of the work surface. This leaves the work surface completely clear for jotting down ideas, spreading out 3×5 cards, etc. I like the additional openness of this configuration over where I started from. Gratifying to contemplate.
At this point I cut a grommet hole out of the semi circle and then used steel straps to mount the cable access door plug and grommet hole plug from the under side of the desk. Action shot (sorry it is blurry):
Then I filled in all the gaps around the plugs with white plastic wood which I was very delighted to discover at HomeDepot.com. Much sanding and re-filling and re-sanding ensued. And once I got the work surface to be “not terrible” I moved on to finishing the edge the jig saw cut.
I was surprised at how easily iron-on melamine edging went on. Get a clothes iron, cut the length of edging you need, then slowly iron the melamine edge on to the work surface. Took about 30 minutes from start to cleaned up. And I’m very delighted with how the edging is staying attached.
Partial component list for desk:
Galant conference table from Ikea $299 new, much less when available in the AS-IS department
Evernote is document storage and synchronization infrastructure. Pay $50 a year for a premium account, then install Evernote’s client software on as many Macs or PCs as you want, and all the documents in Evernote will be synchronized across all your computers without you having to take any actions. Evernote could be described as a means of providing “working backup” where your Evernote store is used on each of your computers, so you are testing your backups whenever you switch machines.
Key features of Evernote in decreasing priority value are:
Full text search. Pictures, Word files, plain PDF files, and even some hand-written scans, are processed once a day so that the documents become full text searchable. Once you start using full text search, you tend to do much less organizing of documents into notebooks, because documents become so easy to find via keyword search and tagging.
Friction-free capture of (advertising-free) web pages. <== Turns Evernote into short term memory for me.
Keyword searching.
Tagging.
Friction-free synchronization.
Cross computer availability of all mission-critical documents.
Remote access to documents. Evernote has a cloud component, so you can be at an internet cafe, decide you want to print a document, and then log in to your Evernote account, download the file and print it.
Some people have their entire GTD system in Evernote. Not me. When I first started doing GTD I put my entire life into OmniFocus, and my brain hated the one-electronic-system-to-rule-them-all solution. I could not sit down at my desk and use OmniFocus after I had entered every open loop. Welcome to my first “off the GTD wagon” experience. Since then, I’ve been iteratively refining my GTD trusted system, keeping it as simple as possible, but no simpler.
I use Evernote purely for reference filing (purple region 3 in the following figure). Evernote has several nagging weaknesses: (1) it does not search within all file types, (2) It does not have a simple highlighting function. Lack of a highlighting function causes me to read documents in PDF form, highlighting them in PDF, and then emailing them to Evernote, and using Evernote just to recall documents and original source web pages.
Fujitsu ScanSnap S1500
I can’t say enough about this little machine. It enabled paperless reference filing, via Evernote. It folds up into a very small package. It scans fast enough that a 150 pages scan, in under five minutes. I strongly encourage you to at least go to Amazon and look.
Here is my sales pitch on selling you on buying a scanner:
In under a week, you can be paperless via Evernote and the ScanSnap S1500. I started with 94,000 pages in December 2010 and in 4 days, I had recycled the entire 94,000 pages.
Once you are paperless in Evernote, you will discover that you can “find” documents you never would have bothered to look for, while the document was in paper. I’ve found old newspaper articles that were handed out to me as a student, and then forwarded them to my students.
When was the last time you could find any document that you knew you had? You can be there again with Evernote and a ScanSnap.
There are four tricks to guaranteed scanner success:
First, go through all your papers and sort them into boxes labeled “Recycle” and “Scan.” When in doubt, put the paper into your “Scan” box. Once you pre-sort, you will know which scanner to buy.
Second, buy the right scanner for the amount of paper you need to scan. If you have less than 500 pages you can buy the slightly cheaper ScanSnap S1300. I did this at first when implementing Evernote. I found that the S1300 with its 12 page paper bin, and slow speed, was just too clunky to get it done with my piles of paper. If you have 400 pages to scan and a doubt about buying a slower unit, or, if you have 501 pages to scan, then you are crazy not to buy the ScanSnap iX500.
Third, as soon as the scanner arrives, take it out of the box and put it on your desk.
Fourth, once the scanner is on your desk, call your friend “Bill” the gadget guy and tell him what is on your desk.
Remember “Meade’s Law” which is “Buy the best, only cry once.”
I was lucky and a friend offered to buy my ScanSnap S1300, I warned him that he’d be happier with the iX500 but he insisted. By the way, “Thank you Steve!”
For most people with a bureaucratic residue of disorganization, the Fujitsu iX500 is going to be the happiest, highest-utility long run solution.
If you’ve read this far, ask yourself, “How long have I been thinking that a scanner ‘might be useful’? If you have been thinking about this for longer than a month, the time is now to GET YOURS. You won’t regret it.
What happens next?
One you have a reference filing system, you have an anchor set solidly into improved organization. Whenever your fall off the wagon with GTD, no matter what, your reference filing system will be in ever increasing order. Evernote and the ScanSnap make it easier to be organized, than to be disorganized. Once you have an anchor in improving your organization, you have a home base to work out from as you refactor your life to incorporate more effectiveness and more efficiency.
If anyone has had great experiences with other scanners, please post what scanner you have (make and model), how long you’ve used it, what the one best thing about it is, in the comments to this post?
Ladies and gentlemen, 28 years in the making, RestartGTD brings you THE ABOMINATION OF DESKOLATION!
Figure 1: The Abomination of Deskolation!
Figure 2: The Accompanying Office
Now the after pictures:
Figure 3: The wait, … what?
Figure 4: Wow, just wow!
Figure 5: How It was accomplished
The Story:
This is John Niebergall’s desk. John is an engineering teacher at Sherwood High School in South Portland. As I’ve gotten to know John (i.e., seen his desk and had him over to my office to see my desk), I encouraged him to read GETTING THINGS DONE. Over the holidays John listened to GTD three or four times via Audible, and then wanted help translating the ideas in GTD to his work processes. I believe the specific words were “I’m a visual learner, I don’t do well reading books. I need to see it.”
John is the target blog reader that I started RestartGTD to serve. I’ve traveled to John’s office, carrying my Fujitsu ScanSnap S1500M (I use portable Macs), had John take down one of the three ring binders against the back wall of his office, and we scanned it into PDF. Done! Four minutes, and now the paper and the binder both can go in the recycle bin. It was hard to let that first binder go. But the liberation grows on you rapidly. It gets easier the more space you free up in your office.
Seeing scanning is believing. John ordered his own Fujitsu ScanSnap S1500 (PC) and I made another trip down to his office to take the scanner out of the box. Maybe I should do a poll of how many GTDers have purchased scanners and never taken them out of the box? You know who you are! De-boxing is the key next action in getting a scanner up and contributing to your mind-like-water.
In addition to the visible things on and around John’s desk, I believe there is a second USB hub that is hidden inside the typing elevator drawer space. And also, that there is a power adapter in that space to feed the label printer and scanner.
Reflections on Abomination’s Redemption:
Note in Figure 1, that John had a trackball on his desk when he started GTD. This desk makeover has shifted him to a small travel mouse. There are wireless trackballs from Logitech and Kensington, but they cost $30 more than the Logitech M305.
John chose to keep his legacy desk with leg stalls. That is this style of desk is like a horse stall, only for your legs. I prefer sliding side to side so that I can start parallel projects on different parts of my desk during the day as interruptions happen. My advice to John was to cut the surface off this desk and then mount it on IKEA legs. Ikea’s desks have inexpensive cable management options, and they are simple to work with.
The glass on the desk feels disruptive to me. Glass is cold when you put your hands and forearms on it. I think I’d prefer to remove the glass, and then I’d probably resurface this desk with white-board-contact-paper. White lightens the room (always welcome in Portland where we get 5.5 inches of rain per month), and gives you a place to jot notes with white board pens, so you can save paper.
John is a public school teacher who has been in Sherwood High School for 28 years. And he is digging his way out via GTD. Teachers, you CAN DO THIS! If I can shift to GTD, anyone can. The key is to start. Don’t start big or small. Don’t give yourself the chance to over think this. Just start. John got the scanner, Evernote, and then beautifully reconfigured his desk (putting the scanner on the old typewriter elevator is genius!:-) to support his workflow.
Thank you John for sharing your before after. Anyone else interested in sharing? Before/afters are fantastic motivators. Email me if you have pics you are willing to share.
GETTING THINGS DONE (hereafter GTD) has had a big impact on me. As witness, this post shows as much of the before/after GTD as I can articulate, it will evolve as I refine the post into enough detail to please visual learners (you know who you are John Nieberall!).
Question 1: What is GTD?
To my mind, GTD is a brain hack. GTD may look like a self help book, it may feel like a religious cult. But, GTD is an approach to organizing that helps you shop around for tools that allow productivity with a peacefulness.
GTD is important because life does not come with an owner’s manual that says “get organized in a sustainable high performance way.” So people go through school, work, phd programs (I did all three) and never spend a day getting organized beyond coping with the next deadline.
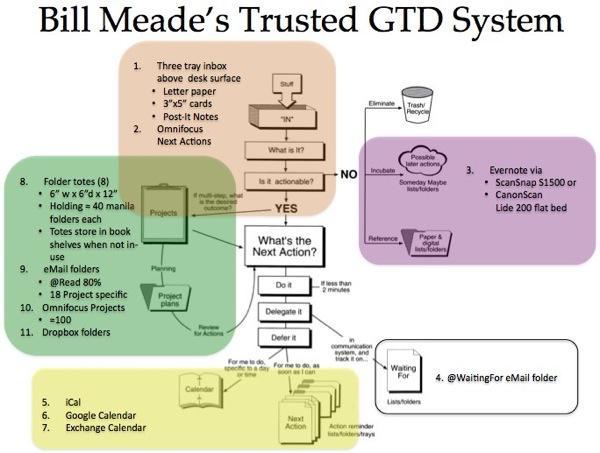
Here is the GTD architecture diagram taken from the PDF accompanying the Audible version of GTD:
Question 2: What did your life/office look like before GTD (circa 2009)?
In the garage, I also had a 5 drawer horizontal filing cabinet with 94,000 pages of journal articles, research data, and miscellaneous documents that were too good to throw out but not good enough to use. Here is the filing cabinet in the garage next to the Y2K water barrel.
Question 3: What does your life/desk look like after GTD?
Note that this desk is: (1) large 6′ x 35″, (2) clutter free from the surface up 6″, (3) canted (the front edge is 1″ closer to the floor than the back edge. I will write more posts on desks and their requirements as taking back my desk was a key stepping stone for implementing GTD.
<<Aside>> the most up to date “after” desk picture is available in the Dungeon Desk post.
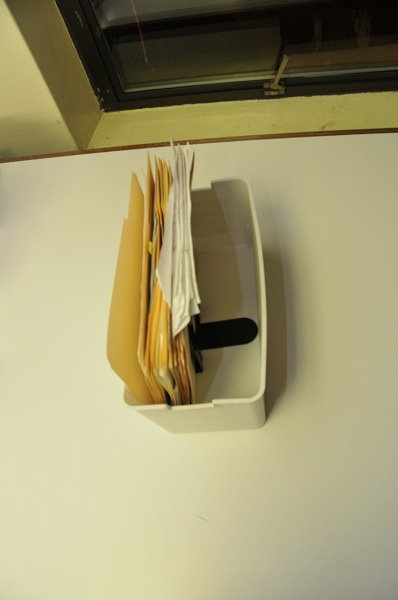
Next comes my physical filing system (Target totes) with 5″ book ends in the tote if there are not enough manilla folders to completely fill the tote:
But, over the years, I’m using fewer and fewer of these totes, and shifting the vast majority of my projects into electronic formats. The reason for this is Evernote. Go buy Evernote. Do it. Do it now!
Nothing has helped me to stay on the GTD wagon more than Evernote. Makes it easier to file documents correctly, than to deal with the clutter, loss, and despair of messy papers.
So while before GTD had the 5 drawer horizontal file cabinet, after GTD I have a modified GTD system:
To get from paper to Evernote I raked through the 94,000 pages of paper in the file cabinet, and ask myself for each document “Will there ever be a next action for this document?” 80% of the documents were instant “No!” and they went straight into recycling. The 20% that were yes or maybe, were 17,500 pages which I scanned in a week on my Fujitsu ScanSnap.
Here is my annual capture of reference file information. The median monthly count of documents captured for the first three years of my using Evernote, is 65. For the most recent 3 years, the median is 164 documents per month.
Many of the documents I capture in evernote are web pages, the Evernote Webclipper and Evernote Clearly browser add ins have become indispensable for me. I’ve capture 3,336 documents via Web Clipper (to see how many you’ve captured type source:web.clip* in Evernote’s search box). The total for Clearly is 1,441 documents captured (source:clearly*). I use Web Clipper whenever I need to assign the notebook the document needs to be placed in.
Here is my cumulative Evernote document count over the 57 months I’ve been doing GTD. The jumps happen as I have scanned and recycled, as I Evernote has lifted limits on file sizes, as I’ve moved, and often, when I start a new job. I have 48 gigabytes of information in Evernote as of 2014/10/01. But I’ve paid just $45 a year, which has felt like rounding error. Nothing.
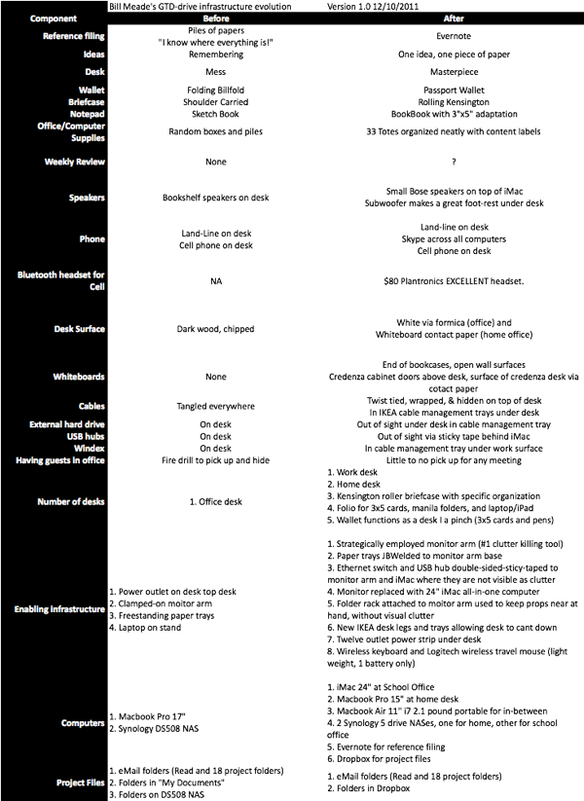
My final offering to the visual learner on Before/After GTD is a worksheet that covers more pieces of my system (GTDInfrastructureEvolution01b.xlsx):
Here is a summary view of how I am doing GTD after 3 years:
See also 5 years of subsequent GTD system evolution in GTD Time Lapse.


