What is “clear working space” on a desk? Involuntary Clutter Makeover for RandsInRepose.com

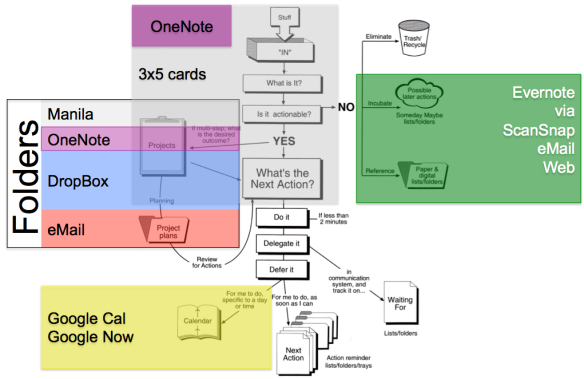
Source: RandsInRepose.com’s CAVE ESSENTIALS

Introduction:

I’m still reflecting on RandsInRepose.com’s CAVE ESSENTIALS post. And while I think Rands has the perfect idea about the job of a desk:

“A desk’s job is to build productivity, and for me, it achieves this by first providing an immense amount of clear working space.”

I don’t think Rand’s desk meets his criteria. Why? Because:

  1. Rand’s desk is neither clear
    nor
  2. Immense

Wut?

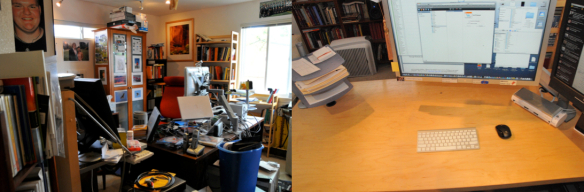
Here is a close-up of Rand’s desk:

The elements of a desk being “not clear”

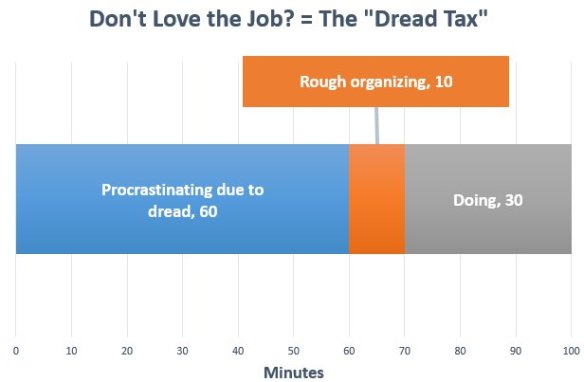
Clutter is the STRATEGIC enemy desk productivity.  It is impossible to remove all clutter, but the more you remove, the less brain energy wasted. For example, I think facial pictures are “the queen mother” of all clutter. Why? Because our brains are hardwired to recognize faces. Whenever a face is in front of your eyes, part of your brain is concentrating on an infinite decode loop (“Who is it? Who is it? …).

One of my MBA students heard me say facial pictures are the queen mother of clutter, and moved her daughter’s picture from next to her monitor, to out of her peripheral vision to the left. The pic is still there, she can look at the pic whenever she wants, but she is not burning energy decoding the picture when she’s trying to work. The result:

“I can’t believe how much less tired I feel at my desk.”

  1. Monitors are not on arms that would:
    1. Lift monitors clear of the work surface to allow the work surface to be used … for work!
    2. Allowing monitors to be effectively removed from the desk when one is not being used
    3. or both are not being used
    4. Allowing use of the desk space now taken up by the base of the monitor stands. Rands barely has space to lay down 3 3″x5″ cards, let alone to try to arrange cards to hot-boot a project.
      1. As my go-to hot-boot project methodology is Rough Organizing with 3×5 cards, this is a major defect in my eyes. *Note* Rands probably does not organize with 3×5 cards like I do. To each brain, it’s own organization scheme.
    5. Allow monitors to be precisely aligned/arranged
    6. Prevent the instinctive piling up of clutter on monitor bases
  2. Visible clutter on the desk
    1. What is visible clutter?
      1. Anything not being used to work, that is within the eyesight envelope of the person working.
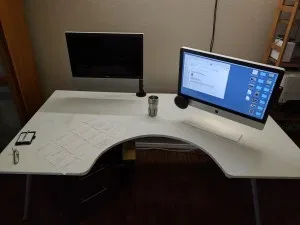
      2. Take the above picture, and make the 0 degree line perpendicular to the center of each monitor, and then you can construct the full “clutter envelope” of a desk.
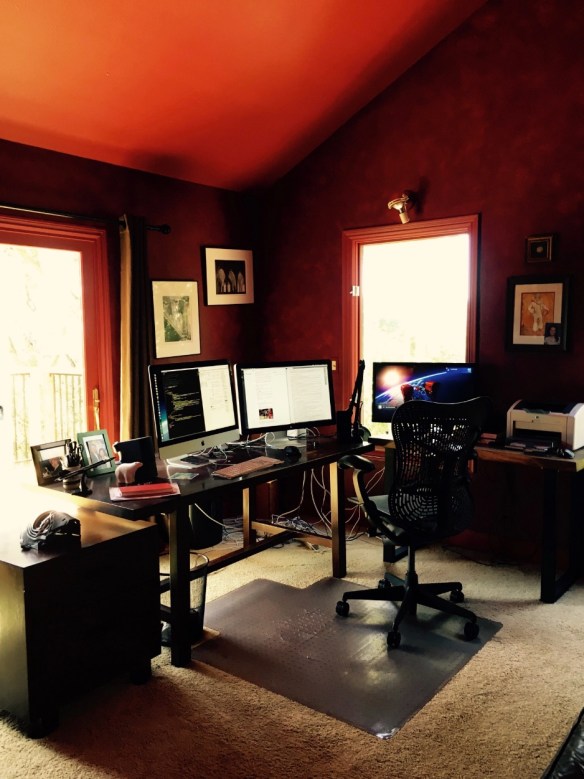
      3. I recently had a work desk that had 180 degrees of isolation when I was sitting. Action shot:
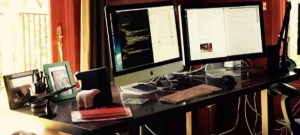
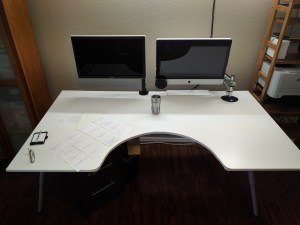
      4. Here is the close up of the work surface
      5. Sitting at this desk, the walls of the alcove were just long enough to shield my peripheral vision from any motion. And having all motion and clutter removed from peripheral vision is FANTASTIC!!!
  3. Wires, wires, everywhere.
    1. Can’t tell if Rand’s mouse is wired, but the keyboard looks wired.
    2. I switched to Apple’s Magic Keyboard 2 and Magic Trackpad 2 this summer and both are “Meh” not great, but they are … wireless and minimally increase clutter.
    3. *Note* that I have a Jabra 410 talking hockey puck speaker phone which is wired, mounted on the lower left hand corner of my iMac.
      1. I just recently discovered Velcro with “Rogue Adhesive” which allowed me to get the Jabra 410 off my desk surface, and removed 1 wire’s worth of clutter.
    4. Pay me now, pay me later.
      There is no such thing as a free lunch. I have just as much wire clutter as Rands, I just insure that I can’t see the wires when I’m working. Here is the back of my iMac:

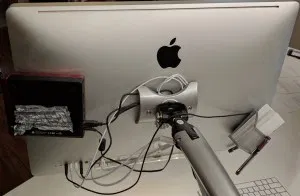
      1. From left to right I also have a USB hub/DVD ROM driver,
      2. an extra Apple cable to charge my (Meh) Apple Keyboard and Mouse. Tucked in at top center under the Apple.
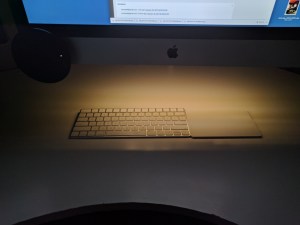
      3. And a 3×5 card/pen reservoir
      4. And last but not least, I have a low intensity under-counter LED light attached to the bottom of my imac so I can work in the dark on my (meh) keyboard and still see the letters.
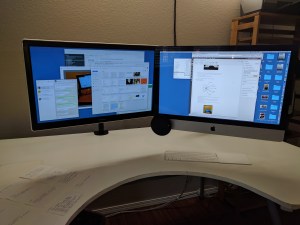
      5. 1.E.i. above show the clutter seen when working

The elements of a desk not being immense

Rands’ desk looks like it is 2.5’x5′ which in inches is 30″x60″ which is not bad by today’s standards. But … the I would change about Rands’ desk is to make it deeper. Like a foot deeper. My IKEA conference table desk is 43″ deep, and 73″ long.  Rands likes having his couch super deep, he needs to do the same thing with his desk.

Surface to Arm Ratio

After using my IKEA conference table work surface for a year, I felt like I was not able to use enough of the desk surface, so in true barbarian style, I slid the work surface far forward on the support frame. This made the front overhang off the support by 15.5″ and allowed me to cut a 15″ diameter hemisphere out of the desk front.

I can now roll my chair all the way into the hemisphere and reach both the far left (with my left hand) and far (with my right hand) right corners of the desk. So the surface to arm ratio for me on this desk = 1.

Makeover Suggestions for Rands’ Desk

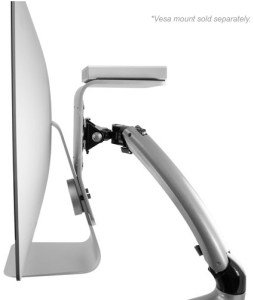
  1. Two VESA monitor arms + iMac VESA adapter
    1. If your two display devices are vesa, two $30 single monitor arms are the way to go. I’ve tried the dual monitor arms and they don’t allow enough freedom to arrange the monitors.
    2. If you like Rands, have a recent vintage iMac without VESA support, then you’ll need the $100 MacSales.com VESA adapter. 
  2. Larger desk surface
    1. Deeper by at least 12″ is a must
    2. Wider would be nice too
    3. I would look for a larger desk surface at IKEA’s clearance area. There are lacquer panels in blood red that might do nicely while costing next to nothing.
    4. Try mounting the new surface over the top of the existing surface. Height change will not be too great. Chair goes up and life goes on.
    5. Rands probably does not need as much desk space as I do because it looks like 300 3×5 cards are not a big part of his thinking life.
    6. So Rands won’t need the 15″ hemisphere cut out either.
  3. Clutter (pictures, polar bear, etc.) moves left until it is out of peripheral vision while looking straight at the left-hand monitor.
    1. There seems to be a credenza at left, I would move that 3′ into the room perpendicular to the front of the desk (to get stuff out of peripheral vision), and put the clutter on the credenza.
      1. Idea = Minimal change and clutter eliminated.
      2. As David Allen says, you want “just enough” organization.
  4. Wireless keyboard/mouse/trackpad
    1. I switched to a track pad because I move my right wrist less on a track pad, and less movement has led to zero wrist pain.
  5. Twist ties or cable ties to hide all the wires from view while working at the 2 monitors.
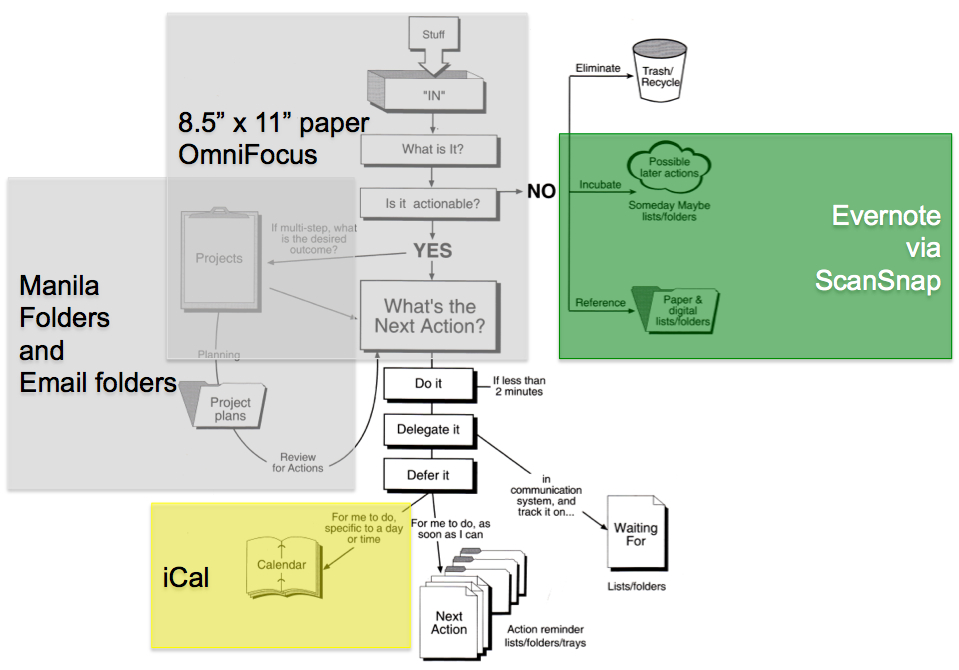
  6. ScanSnap iX500 next to the printer at right.
    1. Scansnap is the digital on-ramp to
    2. Evernote to go paperless
    3. Printer is the digital off-ramp

Paperless Resolutions

Bits Are Better Than Atoms:

Just noticed a Fujitsu ScanSnap on Amazon (not sold by Amazon so Caveat Emptor) for $350 which is just about $100 less than normal price for an iX500. Arrival is already after Christmas, but for those of you taking off for India (not naming names Shobhit!) for a month, might be worth considering.

And, from Amazon, there is an Evernote edition of the Fujitsu ScanSnap for:

  • Brand new for $406 which is still less than the iX500 has been costing. As of post time, this should arrive before Christmas.
  • Six open box iX500s for $356 which might be a deal for a small business!!! All 6 come with free 2-day shipping.

I heartily recommend the iX500 as can be seen by clicking here to read RestartGTD’s 40+ article ScanSnap library.

For those of you on the cusp of buying Evernote due to the 70+ RestartGTD article library, please consider clicking here to support RestartGTD (at not additional cost) as you sign up.

Best Regards for happy holidays and greener pastures for us all in 2017!!!

bill meade

Easy GTD

cropped-restartgtd011.jpg

Introduction: 

I’ve discovered something. A way to make Getting Things Done (GTD) easy to do. Three words:

Love.

Your.

Job.

This Post’s Story:

When I finished graduate school in 1992 I read Waldrop’s COMPLEXITY. The book is about the development of chaos theory from lunatic fringe, to the Santa Fe Institute. The book is not available on Kindle, so I can’t cite the passage exactly, but there is a description of John Holland that goes something like ‘Holland is a nice guy, helping a lot of people, doing work he loves, and having a genuinely good time.’

When I read that I was … jealous. And ever since, I’ve wanted to be John Holland.

Along the way, I’ve come across books that have helped me become more like John Holland:

1. The Artist’s Way (TAW) by Julia Cameron

Mary Meade, my artist sister bought me TAW. Julia Cameron is the world’s greatest ninja in getting “stuck” creative people, unstuck. Her formula is “Write three pages every day. Does not matter what. Just write three pages every day.” Kind of like “one idea, one 3×5 card” in GTD. This unsticks writers, sculptors, painters, …

In TAW I learned:

  • About “crazy makers” who prey upon creative minds, giving them busy work and drama. Don’t have an agenda, crazy makers will give you an agenda.
  • That jealousy is a signal. It tells you what you want to be doing.
  • That getting ideas out, is critical. If you don’t get ideas out of your head, you can’t move the ideas forward.

2. Getting Things Done

Ian Watson basically got on my chest and said “I’m not getting off until you promise me you will read GTD.” I’ve tried to document on this blog, the result. If you haven’t seen the progress, start with the before/after post.

From GTD I learned:

  • Organizing is possible, and then fun. Until GTD, my wife said “I have to have a door I can close on Bill’s office.” Since GTD, the opposite is the case.
  • Organization is about figuring out how your brain works, and then structuring your work naturally. Example: I had a book that I knew I needed to write “stuck” in my head. For seven years I would sit down, try to “dump” the book, and fail. After 1.5 years of GTD, my work environment and mind became organized and synchronized to the point, where I sat down and was able to dump the book, in outline format (a first for me), into a computer.
  • When you organize, God comes along beside you and encourages. S/he has you on earth for specific reasons. Organizing is how we can figure out the reaons.

3. & 4. The House That Cleans Itself (THTCI) and 2,000 to 10,000 (2Kto10K)

  • THTCI taught me about the concept of “stations.”Stations are how you organize to eliminate localized clutter. The formula is to let clutter build up in your life, then take pictures of localized clutter storms.

    Then, figure out the clutter storm’s function. Once you “get” that you are manufacturing clutter when you are doing a specific function (ex., creating draft after draft of writing, dealing with multiple projects simultaneously, missing appointments (temporal clutter), or forgetting tasks) you can organize your environment, trusted system, calendar, etc. to focus on the function at a station optimized to slam dunk the function.

    In a way, GTD as a book, is a pre-fabricated system of stations (next actions, one idea one 3×5 card, project list, 2 minute rule, predigesting tasks by context, etc., etc., etc.). Stations are how I evolve GTD.

  • 2Kto10K taught me about matching enthusiasm to work.Rachel Aaron, a novelist and the author of2Kto10K kept a log of how much she wrote each writing session. She then figured out that she wrote faster and better when she:- Knew what she was going to write before sitting down to write (this is what I’m doing when I take 3×5 cards of ideas, rearrange them before doing)
    - Had long blocks of time (1 hour = 500 words/hr, 5 hours = 1,500 words/hr)
    - Was “was in a place other than home” while writing.
    and most importantly
    - Was enthusiastic about what she was writing.

    Being behind in Rachel’s words was “the perfect storm of all my insecurities” … (feel *familiar*)????? But her ninja-nerd writing log helped here avoid perfect storms, by structuring her work naturally. What I got from Rachel, and what provoked this blog post is …

    The importance of enthusiasm. The word roots of “enthusiasm” are en which means “in” and “theos” which means God. Enthusiasm is “the God within.” Work you loves has the God in you coming along side.

So what?

I’m in a job right now, that makes applying GTD easy. This blog post is my attempt to be a Rachel-Aaron-like nerd, to figure out … Why?

For me, it is about dread. Here is what my task completion time looked like while I work in jobs that were, well, … OK.

Screenshot_022115_121906_PM

Dreading a task is 50% mentality, and 50% environment. When I’ve worked in jobs that I don’t love, the phone rings, there is a knock at the door, there is a meeting that pops up. And for me, very often, a crazy maker boss that drops in. So out of 100 minutes I was only getting work done during 40 minutes.

When in a job that I love, I preemptively manage the environment part of dread procrastination. I turn off the phone, close email, log out of Lync, so I can focus. And, the 1/2 of dread procrastination (just about what the task takes to complete), that is mental … evaporates.

When I love my job, I look forward to rough organizing, and then slam dunking the next action. When you love your job, you avoid the dread tax and get more done. You begin to be more like John Holland:

  • Help more people.
  • Genuinely enjoy the work.
  • Be nice.
  • Do your job effortlessly.
  • Build momentum.

I worked 75 hours this week. Trip to Mexico, lots of driving around and meeting people. Sharing the gospel of simple models applied to the obvious data, to solve obvious problems. On the flight home I realized “I feel like John Holland in Waldrop’s book!”

A first for me.

Implications:

  1. If you find GTD “too hard” to do. You might need a different job.
  2. If you need a different job, you probably know it.
  3. If you know you need a different job, if you are like me, you have not:
    1. created a “find a job of destiny” project, then
    2. rough organized the job of destiny project, or
    3. started executing the job of destiny project.
  4. If you don’t execute on finding that job of destiny, you won’t find your job of destiny.
  5. It is easy to shift blame to GTD for being too hard, when the root cause lies elsewhere.
  6. Looking back on jobs that I did not love, GTD was depressing. Keeping track of all the stuff that isn’t fun, is depressing. Unloved jobs truly are “same shit, different day.”
  7. If dread is part and parcel with doing GTD for you, see implication 1 above.

Bill Meade

Getting Started with GETTING THINGS DONE - 2014 - in 28 steps

DSC_9660

Amendment:

Getting started with GTD is much easier if you have a buddy. Preferably, two buddies, and experienced GTDer buddy, and someone who is at the same experience level as you in implementing GTD. See GTD buddy system for more details.

How To:

If you asked me how to get started with GTD today (see What is GTD before embarking on this journey), this is the advice I would give. Step zero, take a picture of your desk. If you follow this guide, and get GTD to stick, starting point chaos, will be a valuable data point to refer back to. Here’s my initial desk before embarking on GTD

  1. Order GETTING THINGS DONE and 1,000 3×5 cards
    a. Buy the unabridged audible version of GTD and listen to it while you are driving.
    b. And, buy a Kindle or paper version so you can highlight passages, when you circle back to re-read GTD.
  2. Order a Fujitsu ScanSnap iX500
  3. Go to CostCo and get 4 large (free) boxes in which to triage documents
  4. Subscribe to Evernote
    a. Go to Evernote.com and click on “Sign Up”
    b. Get you your credit card and pay the $45 a year
    c. Get your email confirmation that you account is set up. Write down your username and password for evernote on a 3×5 card.
  5. Download Evernote and install the client on the computer you use most
    a. Download Evernote
    b. Install Evernote
    c. Connect the installed software on your computer, to your evernote account (use the username and password you wrote down in Step 4 c.
  6. Install Evernote Clearly into the web browser you use most
    a. Clearly is a browser add-in, separate from the software you installed above. Evernote = database. Browser add-in = on-ramp to database.
    b. Go to a favorite web page of yours, then click Clearly (a Luxo Lamp Icon) and watch as Clearly removes the clutter from the web page, allows you to highlight text. And most importantly, allows you to save the page to Evernote when you highlight or click sae. You are done for day 1. Time to walk your dog. Your dog will feel stress lifting off you as Millie demonstrates in the picture at the top of this post.
  7. Practice with Evernote (open it up, see the pages you have captured, add manual notes, create notebooks, etc.) each day as you wait for GETTING THINGS DONE and your ScanSnap to arrive.
  8. Practice with Clearly every day as you wait for GTD and your scanner. You might want to read the RestartGTD post where the capstone line is: “Clearly all by itself makes Evernote worth it!” towards the bottom. Then go back and play with Clearly and Evernote.
  9. When the ScanSnap arrives, unbox it immediately, and install it on your computer with the included DVD. This will take you about 20 minutes. Do not read GETTING THINGS DONE until instructed to do so in Step 12. If you procrastinate on installing the ScanSnap to save 20 minutes now, it will take you 20 months or never, to get the ScanSnap installed. Do it. Do it now! (31 seconds in)
  10. After the ScanSnap is installed, get it working so you can Scan-To-Evernote with one click.
    a. Start the installed ScanSnap software by clicking on its icon at the bottom of your screen
    b. Left-click once on the ScanSnap software icon after it is running
    c. Look for “Evernote” in the pop-up list, and left-click once on it
    d. Put a page in the ScanSnap, push the blue button, and watch as the page appears in Evernote. Cool!
  11. Once you have steps 1 through 10 accomplished, then …
  12. Read the first three chapters of GTD.
  13. Read only the first three chapters of GTD. Don’t give in to temporary energy and enthusiasm, and read the entire book. Just chapters 1-3.
  14. Energized by your first wave of hope after reading …
    Mark the 4 boxes you brought home from CostCo as
    “Recycle”
    “To Scan”
    “IN” and
    “Precious”
  15. Next put all your papers into the “IN” box. Don’t worry about making a mess. Just put each document in as a document. You will process and re-organize these documents later.
  16. After “IN” is full, then stop. Take the rest of the day off. I know you are eager to sprint to GTD nirvana. But, you need to pace expectations. Expecting to do a single good block of work at a time to implement GTD is a maximum. If you try to do more than a single block of work, you set yourself up for failure, self recrimination, and external ridicule. 83% of people who attempt to implement GTD fail. And they fail because they try to do too many things, too quickly, while tired. You did not make your organization a mess in a day. And you can’t transform it to a masterpiece in a day. One good thing a day is enough. If you want to see an organizational mess, check out the RestartGTD post on GTD Time Lapse at the top for before pictures.
  17. Next day, approach the “IN” CostCo box, and pull the first document from “IN” box, hold it up. Look at it, suppress any feelings about it, and ask yourself:”Will this ever have a next action?”
    a. If the answer is “Yes” put the document into “To Scan” and then go back to “IN” and repeat this step.
    b. If the answer is “Maybe” then put the document into “To Scan” and then go back to “IN” and repeat this step.
    c. If the answer is “No” then put the document in “Recycle” and then go back to “IN” and repeat this step.
  18. Once your “IN” box is empty, or your “To Scan” box is full (whichever comes first) then take another rest. At least 90 minutes to let your brain reset.
  19. When you come back, move the “To Scan” box next to your ScanSnap. Take each document out one at a time. Put the document into the ScanSnap, push the blue button. When the document is finished scanning, either put it in the box labeled “Recycle” or the box labeled “Precious” if the document needs to be saved.
    1. Once your “To Scan” box is empty, take the rest of the day off. Manage your expectations. One block of GTD work. One day. P-a-c-e yourself.
  20. Go back to Step 15 if you have more papers to process. And repeat Steps 15-20 until all the paper in your life has been recycled or captured in the box marked “Precious”
  21. Take the rest of the day off. Manage your expectations. One block of GTD work. One day.
  22. Once you have all the paper in your life captured in Evernote, the next step is to get your desk clear. Everything off. No pictures. No teddy bears. No momentos. Nothing on your desk in your field of view as you work. In particular, no pictures of faces in front of you where you work. Your brain will work processing faces without ever shutting off. One student has commented to me that this HUGELY reduced her fatigue.
    a. If you don’t have a real desk. Get a real desk. No substitutions, kitchen tables do not count. Floors do not count. You need a big space where you feel pleasure when you work. Go to IKEA’s “As Is” department and buy returned legs, tabletops, panels, conference tables. And modify to taste.
    b. Go to Amazon and get a monitor arm, wireless keyboard, and wireless trackpad or wireless mouse, to transform your desk back from being a giant monitor stand cluttered with paper, into being a brain’s desk that facilitates work. This is the most disregarded step in my instructions. But, it REALLY HELPS. So give yourself a leg up and try investing in your desk.
  23. Once you have a clear desk, and all your paper captured in Evernote, it is time to take your first “After GTD” desk picture. Put the “Before GTD” desk picture into Powerpoint on the left. And the “After GTD” desk picture on the right. Then save the PowerPoint slide where you won’t lose it. Here is my before/after PowerPoint slide:BeforeAfterDesk_pptxBefore/after pictures are important. Before/after pictures are hope. Elephant food if you are a Heath & Heath SWITCH: How to change when change is hard fan.
  24. Next step is time to clear your mind. Most people have 300+ projects in their minds when they start GTD. Sitting down to scrape these out of your head and on to paper, is terrifying. But once you start, you won’t believe how it lightens your mind, and how the time flies.
    a. Sit down and write down every open loop you can think of on 3×5 cards. Go for 100 at your first sitting.
    b. Once you get to 100, take the rest of the day off. Manage your expectations. One block of GTD work. One day.
  25. Repeat step 23 until you don’t have anything else on your mind.
  26. Once your mind is clear, then lay the cards out on your desk. The bigger the desk, the easier this is. Then
    a. group the cards together in clumps of similar stuff.
    b. These clumps are your projects.
    c. Organize each project’s clump into a neat stack on your desk. Once you have all the cards into their natural clumps
    d. put rubber bands around each stack of cards/clump.
    e. Take the rest of the day off. One block of GTD work. One day.
  27. At this point, your mind is clear. You have all your ideas where your brain knows they won’t be lost. Now you have to decide how you want to move forward with GTD.
    a. Whether you will go all analog, using manila folders - one for each project - with 3×5 cards in them, and keeping a master project list by hand.
    TrustedSystemgenerations01_pptx 2
    Or …
    b. Go digital OneNote to organize your projects. Creating project lists with [[projectname]] and then transcribing your 3×5 card notes for each project, into next actions. *Note* your 3×5 cards are likely not Next Actions in the David Allen sense. The step of taking a thought on your mind that you are feeling guilty about, and then compiling it into next actions as you transcribe the card into OneNote is not wasted effort.
    c. Using Evernote to manage your projects as well as your reference files. Create a “Projects” folder in Evernote. Then, create a sub folder for each project. And then either transcribe your 3×5 card into next actions as in b. above with OneNote. Or, by scanning your 3×5 cards into Evernote.
    d. Using OmniFocus (if you are a Mac person). OmniFocus is powerful … and dangerous. OmniFocus is probably the highest fidelity GTD software system. But you may experience over-organization from OmniFocus with the consequence your brain refuses to use the system … as I did. However, if you are a sales person, think hard (try) OmniFocus because David Allen has refined the GTD system to work for sales people. Nobody works harder than sales people, you will need all the system you can get to do your job well.

    e. Some kind of hybrid system. My GTD trusted system is broken up across paper and electronic tools. This is less simple to explain. But, my brain will use it. I tried OmniFocus in a monolithic trusted system (27 d.), but I hated sitting down to my desk. So I had to retreat to paper.
    TrustedSystemgenerations01_pptx

The Goal

The above 28 steps are the process that I’ve seen work the best for the about 200 people I’ve helped boot-up GTD. Personally, I’ve stayed on the GTD wagon because I have a ScanSnap and Evernote. These tools make it easier to capture information correctly, than to live in a mass of disorganized papers. My love of 3×5 cards and manila folders gradually gives way to electronic project organizing as a project lifts off. The cards and folders are early stage capture tools for my projects.

Your mileage will vary. My tools will not be perfect for you. I’ve changed my tools so many times (except Evernote and the ScanSnap) that I’m proof that one size does not fit all.  Single design does not even fit one person all the time. But the point is to build your system gradually, experimenting, testing, reflecting on how it *feels* to your brain. Does it allow you to swing, to stop constantly worrying you’ll forget something? Does it *feel* fun to work with? Does your system cut your procrastination and guilt? Are you trying to do too much, too fast?

Incompleteness

This process will not get you 100% to the way David Allen’s system. But, it will get you to the nearest local maxima of GTD productivity and GTD swing. Once you go paperless you will discover what a drag paper is. Your Evernote reference filing system will allow you to find everything … in 15 seconds. Evernote *secret* = Evernote does text recognition on all your documents. All you have to do is think of two words that would only be on the document you need, type them into Evernote and *zap* the document is at your finger tips.

Once you have all your projects in some kind of place (manila folder, OneNote folder, Evernote folder) you will feel release of stress. An emergency department doctor who I dragged kicking and screaming to Evernote and a clear desk said to me “I can’t believe how much less stress I’m feeling now.” After my first week of GTD my wife said “Why are you so happy?”

Notes

  • When doing a mind sweep, I do not follow David Allen’s two-minute rule. This is the only time in my GTD life, that I don’t DO anything that can be done in 2 minutes, and instead, just write down the 2 minute tasks. After my mind is empty, it is easy to take the 2 minute pile, and burn through it. And, it gives you quick wins to keep expectations at bay.
  • I’ve found that three steps in the above process are sticking points:
    a. Getting the scanner out of the box and functioning. I’ve had to drive to people’s desks and make the scanner go for them because of this “out of box” sticking point. See RestartGTD post abomination of deskolation for case study.
    b. Getting the desk clear. Again, I’ve found it easier to drive to desks and show people what their desk looks like REALLY EMPTY. If you contact me ([email protected]) for advice. The first thing I will say is “Tell me about your desk?” and what you need to say back is “I got EVERYTHING off it.”
    c. P-a-c-i-n-g yourself. Manage your own expectations. Do not change everything in your organizing, all at once. Know that change will take t-i-m-e. Match building your GTD system, to when you have blocks of fresh energy. Energy is temporary. Read that sentence again!
  • This step-by-step puts getting your computer infrastructure working as a pre-cursor to reading GTD. If you don’t put infrastructure first, you will try to get Evernote and your ScanSnap working while you are tired. Not a good strategy.  
  • When starting out, keep two separate kinds of files: (a) Project Files, and (b) Reference Files. Consciously separating the two kinds of files can prevents confusion. *Aside* I suspect that I *resist* using Evernote for project files because my brain likes having physically separate project and reference files.
  • Reference filing is a capstone skill of getting into and staying with GTD.
  • Having a real desk is a capstone skill of getting into and staying with GTD. Clutter is the enemy, and there is more clutter on desks than everywhere else in your life. Win the battle against clutter, GTD will work.
  • Managing expectations is a capstone skill of GTD. One block of GTD work. One day. Is the rule.
  • Experimenting with new tools, selectively, is a capstone skill of staying with GTD.

Evernote Clearly vs. Evernote Web Clipper … a quick comparison

Explanation:

Above is a side by side comparison of Evernote Clearly with Evernote Web Clipper. 11 features are compared: Web Clipper-only features (6 rows) at the top, Features both products have (2 rows) in the middle, and Clearly-only features (3 rows) at the bottom.

  • Article vs. Simplified Article

When you tell Clearly to remove clutter, it goes for broke and attempts to rip out everything it identifies as clutter. This will either work, or … not. Today, the biggest problem with Clearly is that when you invoke it, images that you wish to have included in your note, are ripped out. But, there are pages that Clearly can not decode.

Web Clipper has two degrees of clutter removal, the “go for broke” mode which Web Clipper calls “Simplified Article” and a lesser degree of removal called “Article” which removes top, left, and bottom clutter, but leaves some clutter on the right of the web page in your note.

  • Set Document Notebook and Document Tagging

These two capabilities are a big deal for me. More and more I’m using notebooks and tags. If I capture a web page with Clearly, I have to remember to go back to that page, and set it’s notebook and add tags. If I use Web Clipper, I can do both tasks with the page in front of me and not have extra todo steps.

  • Skitch Annotations

I should write a post about Evernote Skitch! Skitch is a screen capture and annotation tool that Evernote bought about two years ago. I’m a Skitch fan boy, and had a paid subscription to Skitch before Evernote bought the program. The long and short of Skitch annotations is that Clearly does not, and Web Clipper does, provide them.

  • Share Note While Capturing

I do not use this today. But, … I’m getting closer and closer to incorporating note sharing while I’m capturing. Why? Because there are images that I capture for other people. For example, I’m a Boxer dog fan boy. Knowing other boxer fans, I’m likely to capture funny boxer pictures and immediately send them. So, I get this, and am glad to have it, so I can incorporate it into my workflow.

  • Automatic Notebook Assignment

I LOVE LOVE LOVE automatic notebook assignment in Evernote. But … it does not always work. And, the logic of automatic assignment is different for Clearly and Web Clipper. I could once again lapse into my “I got your back” dueling software team monologue, but I won’t. I just wish that Clearly and Web Clipper used the same logic. And maybe, that I could control the logic (for example “bookporn clips always go into graphics notebook”).

  • Highlighting

Both programs do a great job of highlighting text in captured web pages. I just wish I could highlight in multiple colors like on Kindle for iPad. And, I wish that I had a “write notes in the margins” of pages without having the pages turn into jpg files.

  • Text to Speech, Print, and Set Document Theme

All three of these are capabilities I don’t use. Nice to have, but I wish I could trade them in for some other features. :-)


Get “IT” Off Your Desk!!!


Source: Ebay

Introduction:

I’m always on the lookout for paper trays that get paper off my desk, so the entire surface is free to organize 3×5 cards on.  Ken in a comment pointed to a very interesting family of off-the-desk products.  Purpose of this post is to show the product family off and point out the relative cost-effectiveness of these desk accessories compared to say … Steelcase desk accessories.  

The accessories:

In addition to the three tray unit for $40 above, there is a two tray unit for $30 … 

And a two tray + phone organizer for $40 … 

NewImage

A formidable six tray unit for $40 (the unit that Ken alerted me to) … 

Screenshot 6 26 13 9 20 AM

Note that the paper trays are rotated 90 degrees from their orientation in the three tray organizer, so it looks like the trays can be mounted to the tower, from either side, or the tray’s back.  

A rotary catalog + paper tray organizer for $40 … 

Screenshot 6 26 13 9 22 AM

And to mix it up a little, a catalog + phone organizer for $80 …  

For comparison, here is a Steelcase task light for … $340!   

Screenshot 6 26 13 9 29 AM

So what? 

These desk accessories are significant because, like monitor arms, they allow you to clear the surface of your desk.   Here is my desk before monitor arm: 

D3M 3218

Here is my desk after monitor arm:  

D3M 5534

Having the monitor off the desk surface allows a dramatic increase of usable desk space.  Having a monitor arm allowed me to write on my desk or sort 3×5 cards (my atomic unit of thinking) without restraint.  

My desk surface is an IKEA conference table, so it provides a lot of space.  I used this table for a year and then on impulse leaned over the desk and stretched my arms to see how much of the surface area I could reach: roughly 40%.  I composted this for a few months and then with the help of my cats … 

I cut out a plug for the mandatory hole in IKEA conference tables, and then diagrammed a semi-circle of 15″ at the middle of the desk:  

and then cut it out:

D3M 5580

Then bought white edging material at Home Depot that I ironed on to the raw edge of the cut. 

 With the cut-out I can now reach 80% or so of the remaining desk.  Of course I have lost some usable desk space from the cut out, but I have gained much more use of the remaining desk space.  For example, without the cutout, I needed to push my keyboard 14″ or so from the edge of the desk in order to get my forearms on the table (my perfect ergonomic position for typing).  As I type this my keyboard is about 5″ from the top of the cut out, and my forearms are just wresting over the edge of the cutout.  Comfy! 

So what? 

The signal in the noise of this post is that if you work at it, you can get your desk clear, you can improve the usability of your desk, you can be more organized and more comfortable at the same time.  The more of your desk you can use, the more focused your work can be.  

bill meade