
See also: The Perfect GTD Desk +1
See also The Abomination of Deskolation Redeemed
See also: The Perfect GTD Desk
Introduction:
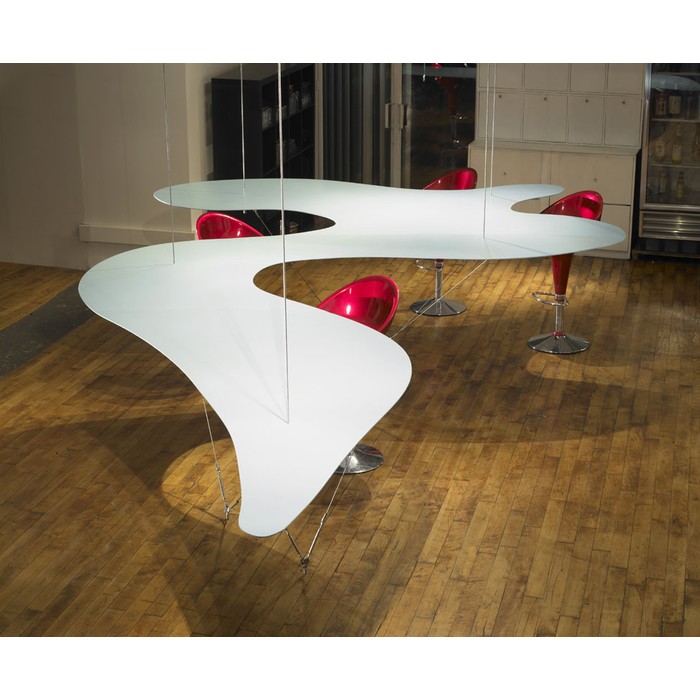
Perfect GTD desk +1 has been refactored once again. The above action shot displays several changes:
- The monitor arm has switched ends of the desk
- The cable access door in the Ikea Galant Conference Table has been filled in with wood
- Gave up on mounting the Fujitsu ScanSnap on the monitor arm. It was cool to look at, but even cool stuff is clutter when you are trying to get work done. So I resurrected a shipping box and mounted both the ScanSnap and the Brother label printer on the box. So far so good, the box has not interacted with the chair legs.
- Screwed the chair mat to the floor in the correct location with 4 2″ drywall screws. *Bam* no more wandering chair mat!!!
- A 15.5″ semi-circle has been cut out of the center front of the conference table.
- To create a 15.5″ radius, the conference table was slid forward until the back edge of the desk was flush with the Galant support frame.
- I also slid the conference table surface to the right until the left edge of the work surface became flush with the left side of the Galant support frame. Here’s an action shot of the top left corner of the desk:

- Power adapter moved from underneath the work surface to Galant table legs. With diagonally crossing cable ties it was simple to mount the power adapter and then slide it around to readjust it.
- A cordless remote control light switch was added (mid right hand of the back of the iMac) controlling the keyboard light, the floor lamp over the desk, and the floor lamp in the corner of the office.
- The “un-drawer” was shifted left and canted at a diagonal angle from lower left hand corner of the desk, to upper right hand corner. This removes the un-drawer from constant collisions with knees.
- The purpose of the undrawer is to hold all the items that need to be at hand, but that clutter up the desk surface. I have stapler, tape dispenser, utility knife, a 10 port USB hub, flash light, and my Plantronic USB headset (wireless headsets suck!).
- Action shots:
- USB and power were added to the right hand end of the desk (form the semi-circle side of the desk). While I wanted usb and power plugs available, I need them to be out of sight, and they can’t be mounted under the surface without cables working their way out with gravity. So I turned both poet and USB adapters 90 degrees and mounted them with cable ties and cable tie anchors.
- Action shot:
Results:
When I sit at my desk now, I’m in the semi-circle and can rest both elbows on the work surface at all times. I can also reach a much larger proportion of the work surface. I especially noticed the altered surface to volume ratio of the desk when I wiped it down with Windex to shoot the pictures in this blog post. Standing in the semi-circle it is easy to wipe down the entire surface of the table.
When people try the desk out, the first word that comes out of their mouths is “Game changer!” and then “I’m going to do this to my desk!”
The monitor arm now swings the iMac completely out of the way of the desk. Action shot:
And when sitting at the desk, it looks like this:

How To Section:
I started with this configuration:

This worked OK, except that it began to bug me that the cable access door in the work surface did not do anything. If a feature is not doing work then it is clutter by definition. So I stripped the monitor arm off the desk, removed the power outlet and the IKEA cable management baskets, and then the un-drawer which you can just see peeking out under the work surface by the red mouse.
Then I detached the work surface, and laid under the desk sliding the surface to different places and then seeing how it *felt* from beneath and above the desk. I had the idea to slide the desk forward and to the right to maximize the work surface overhang.
Next I started drawing curves on the surface of the desk. Because it is a whiteboard, I was able to draw, look, erase, redraw, and play with the shape in my mind. I like the idea of reshaping the desk with bulbous organic curves at the corners like this:
 Source: Modenus.com
But, I was too chicken to cut very much out of the desk. Because desks are experience goods, you can’t think your way to what you will love. You have to generate and test. So I decided to start simply with a semi-circle cut out. Starting out the project looked like this (mr. batik supervising):
I decided to cut the cable access door plug from the semi circle and marked it with whiteboard marker. Then I drew a 15.5″ radius semi-circle from the measured center of the front edge of the work surface. Then cutting began with a jig saw and after the semicircle was cut out, I hustled the iMac back on to the left side of the desk this time. I don’t know why I tried the left side of the desk. Just happened that way. At this point the project looked like this
Once I re-mounted the iMac on the monitor arm, I was delighted to see that shifting the work surface forward created an opening between the desk and the wall, that allows the iMac to swing behind the far edge of the work surface. This leaves the work surface completely clear for jotting down ideas, spreading out 3×5 cards, etc. I like the additional openness of this configuration over where I started from. Gratifying to contemplate.
At this point I cut a grommet hole out of the semi circle and then used steel straps to mount the cable access door plug and grommet hole plug from the under side of the desk. Action shot (sorry it is blurry):
Then I filled in all the gaps around the plugs with white plastic wood which I was very delighted to discover at HomeDepot.com. Much sanding and re-filling and re-sanding ensued. And once I got the work surface to be “not terrible” I moved on to finishing the edge the jig saw cut.
I was surprised at how easily iron-on melamine edging went on. Get a clothes iron, cut the length of edging you need, then slowly iron the melamine edge on to the work surface. Took about 30 minutes from start to cleaned up. And I’m very delighted with how the edging is staying attached.
Partial component list for desk:
- Galant conference table from Ikea $299 new, much less when available in the AS-IS department
- Galant cable manager $5 = the un-drawer
- Innovative 7500-hd-1500 heavy duty monitor arm (for 27″ iMac as iMacs weigh 1 pound per inch of diagonal screen) $263
- Cordless remote light switch control $20
Support RestartGTD by buying at Amazon.com with this link!