Introduction
The Fujitsu Scansnap S1500 (PC) and S1500M (Mac) are F-A-N-T-A-S-T-I-C GTD infrastructure! The decision to buy one of these is not hard to make. The problem instead is the “limited-cognitive-innovation-budget” each of us has.
The Limited-Cognitive-Innovation-Budget
The best thing about GTD is the lightness of thought while we are in flow. But getting your GTD infrastructure to the point that it supports a homeostasis of thinking, is often rough going. For example, …
Have you ever bought two productivity gadgets at the same time? What happens to me when I do this, is that one gadget or both ends up not getting employed. My brain hates it when its own learning is the bottleneck. Very frustrating and a flow-choke.
It is like my brain likes the Steven Covey idea of P/PC balance. I *think* this was Productivity/Productive Capacity balance. And this balance is another name for limited-cognitive-innovation-budget. Meade’s laws of limited cognitive innovation:
- Never attempt to innovate on GTD infrastructure with more than one component change. One thing is “a lot” to change at once. Change two things and I’m lost in the weeds.
- Cap the number of infrastructure changes attempted in a year to 4 or 5. This is because infrastructure components are experience goods, and you need time to be able to gather information on how each change is working with your brain.
- Start a someday maybe GTD infrastructure list. As you think about changes that you might make, put them on this list and then when you are around other GTD people, you can prime yourself and ask them what they are doing for the components you are thinking of changing.
- Prune ruthlessly. I am an inveterate over-thinker. If there is a way to ruin a good innovation by trying to make it the best innovation, I will find it. Don’t let the best be the enemy of the good. When in doubt, go back and re-read GTD chapters 1 through 3. Would your trusted system REALLY cave in if you got rid of X? Where X is internet at home, or Outlook, or administrative assistant, or 2nd inbox.
- If you think about buying a piece of infrastructure and feel an inner quiet riot, or even an inner dis-quiet. Wait. Reflect. Wait for your limited cognitive innovation to rejuvenate before committing.
- When in doubt, work with your current infrastructure’s bullion cube components, to dissolve the cubes and make bullion for your GTD trusted system.
GTD Infrastructure Bullion Cubes
Infrastructure bullion cubes can be software (Evernote, Omni-Focus, Outlook), hardware (Desks), or software and hardware (Fujitsu ScanSnap 1500). The characteristics of an infrastructure bullion cubes that make them worth exploring are: depth, indulgence, completeness, and elegance (DICE).
For example, the ScanSnap S1500 has dozens of switches, dial, controls, and secret trap doors that allow you to pre-set the scanner for specific kinds of scan jobs. The ScanSnap is a bullion cube of capabilities, the problem is, taking the bullion cube and extracting the very slick, very simple steps that will boil ScanSnap’s raw capabilities down into useful business process supports.
The purpose of this blog post is to dissolve the ScanSnap bullion cube and show how to create and manage ScanSnap setups for different scanning tasks..
Scanning Tasks??
Scanning seems simple from the outside, but when you get the scanner and then try to start using it throughout your business day, you’ll find that on the inside, scanning can be pretty complicated. For example, you may want to:
- Scan a signed document to email
- Scan a document to Evernote
- Scan a document to your printer to make a quick photo copy of the document
- Scan to Google Docs
- Scan checks to electronically deposit at your bank
- Or, as in the last howto, scan business cards to PDF


When you click on the selector arrows for profile, you will see something like this:
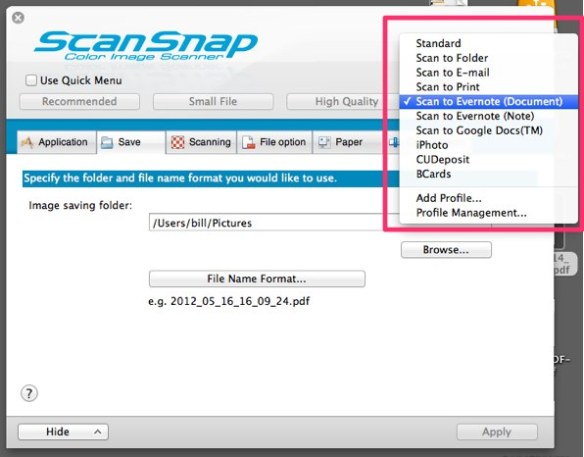
Don’t worry if you don’t see all these profiles, you’ll easily be able to set up a new profile and save it. After looking through this tutorial.
In the business card scanning howto, I gave all the settings I use for scanning business cards. These were:
- Application Tab
Key setting here is to make sure that the Application is explicitly set to “None (Scan to File)”
- Save Tab
Probably best to click on save and then create a new folder for your bcard project. I created a folder named “Bcards”
- Scanning Tab
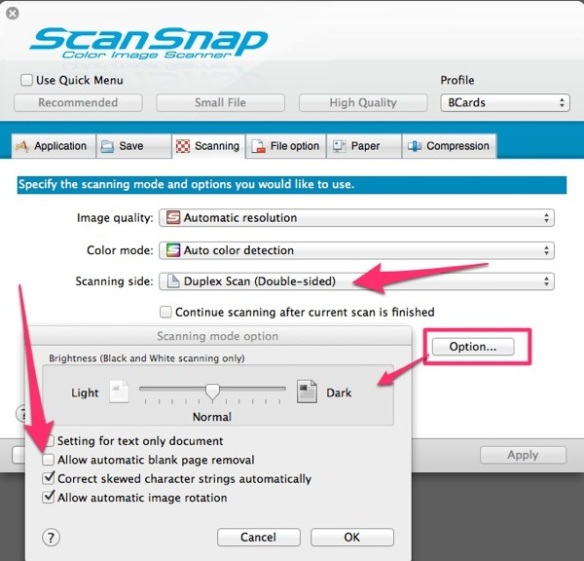
This is where you need to slow down and be very detailed. The two critical settings are highlighted with red arrows in the next figure. Duplex scanning and uncheck “Allow automatic blank page removal.” Unchecking blank page removal took 20 minutes to figure out. You are welcome!! :-)
- File Option Tab
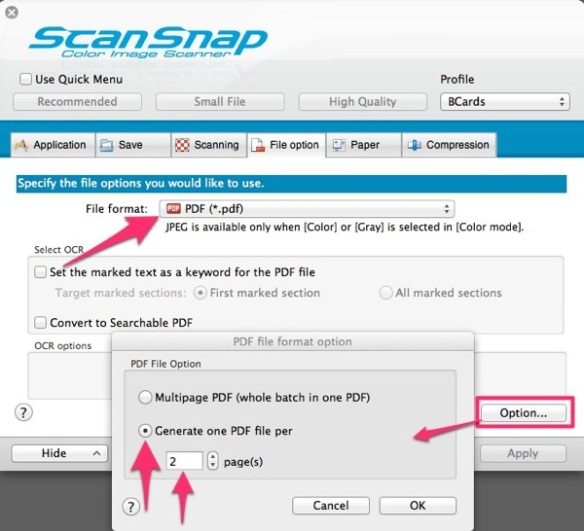
This is the second tab with a *tricky* setting. You need to click the option button to bring up the “PDF file format option” dialog. What this dialog does is to give you control over document boundaries.
The default option for PDF file format is “Multipage PDF.” If you scan all the business cards in your tote with this option, you will have one file with all the cards in it, that will have twice the page count as the number of cards you have (front = 1 page, back = 1 page).
Probably not what you want if you are thinking of pushing all these cards into Evernote so that they become full text searchable. So, if you want each card in a separate PDF file that has both front and back of the card, choose the second option “Generate one PDF file per” and then “2” pages.
This will allow you to stack the business cards up in the ScanSnap’s 50 page hopper, and let the machine devour them automatically. This approach allowed me to scan my boss’s 640 business cards in 40 minutes flat (with experimentation time).
(Note, my boss’s underestimation coefficient for card count was 2.56 which is actually not too bad. When I was at HP running invention workshops, the average boss underestimated the number of invention disclosures her/his employees would produce, by over a factor of 5!).
- Paper Size Tab
I left it on default “Auto detect”
- Compression
Also left it on the default.
The only thing I left out of that tutorial is how to save the preset once you have all the settings right. That step requires that at the very beginning of setting up scanning for a specific task that you select “Add Profile” by clicking on the profile selector and then clicking on “Add Profile …” like this:
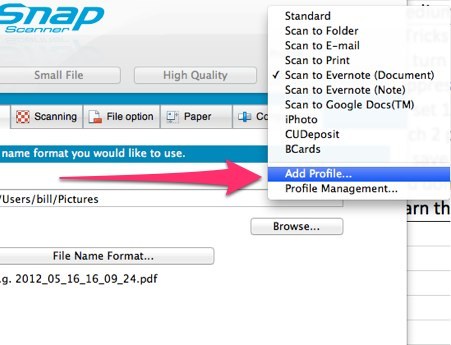
Then step through each of the menus in the ScanSnap software and put the settings in for that tab. The settings that I use are in the table above in this post. For each scanning task, you create a preset. Then, when you need to switch tasks quickly, you can just click on the ScanSnap icon in the Dock (Mac) or on the Task Bar (Windows) and the list of presets will pop up like this:
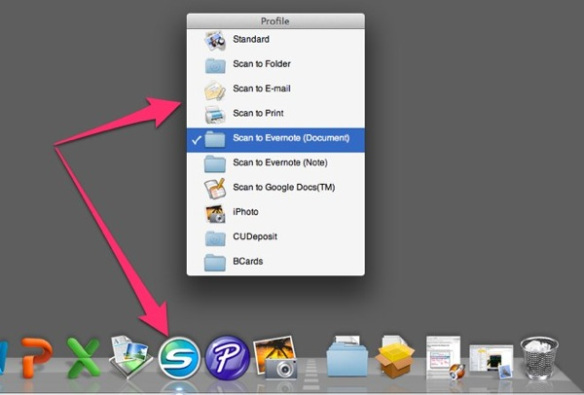
Then, you pick the task you want, put the paper in the scanner, then push the blue button.
Conclusion
Over time with your ScanSnap bullion cube scanner, you will find that you slowly grow your presets. Fujitsu adds presets with software updates (At least that is where I *ass*u*me the “Scan to Evernote Note” preset came from). And I think Google might have added the Scan to Google Docs. Either way, you will find that the gamut of scanning tasks that you can accomplish quickly and simply grows as time goes on. Your ScanSnap will get used more over time as you dissolve the bullion cube of all the capabilities and fit them one by one into your trusted system’s business processing.
Hope this helps!
bill meade


